Total amount:
plus VAT.
Quickstart Guide - phyBOARD-Mira Voice Control Kit (L-856e.A1)
Table of Contents
Introduction
This Quickstart guide describes the tools and provides the know-how to install and begin working with the vicCONTROL Industrial Voice Control System from voice INTER connect GmbH for use with Voice Recognition Adapter and the phyBOARD-Mira. This guide includes installing the appropriate tools and sources, booting the board, and starting the two demo programs (Washing Machine and Industrial Paper Cutting Machine) in order to begin working with the hardware and software.
For further information on the phyBOARD-Mira, go to https://www.phytec.de/p/som/phycore-imx-6-ul-ull/#downloads/. There you will find the following documentation:
- QS Guide: A short guide on how to set up and boot a phyCORE board along with brief information on building a BSP, the device tree, and accessing peripherals.
- Hardware Manual: A detailed description of the System on Module and accompanying carrier board.
- Yocto Guide: A comprehensive guide for the Yocto version the phyCORE uses. This guide contains an overview of Yocto; introducing, installing, and customizing the PHYTEC BSP; how to work with programs like Poky and Bitbake; and much more.
- BSP Manual: A manual specific to the BSP version of the phyCORE. Information such as how to build the BSP, booting, updating software, device tree, and accessing peripherals can be found here.
- Development Environment Guide: This guide shows how to work with the Virtual Machine (VM) Host PHYTEC has developed and prepared to run various Development Environments. There are detailed step-by-step instructions for Eclipse and Qt Creator, which are included in the VM. There are instructions for running demo projects for these programs on a phyCORE product as well. Information on how to build a Linux host PC yourself is also a part of this guide.
- Pin Muxing Table: phyCORE SOMs have an accompanying pin table (in Excel format). This table will show the complete default signal path, from the processor to the carrier board. The default device tree muxing option will also be included. This gives a developer all the information needed in one location to make muxing changes and design options when developing a specialized carrier board or adapting a PHYTEC phyCORE SOM to an application.
On top of these standard manuals and guides, PHYTEC will also provide Product Change Notifications, Application Notes, and Technical Notes. These will be done on a case-by-case basis. Most of the documentation can be found on the applicable download page of our products.
For more information or details regarding the vicCONTROL Voice Control kit, please contact the PHYTEC Sales department. Go to https://www. phytec.de/kontakt/ to find several ways to contact us.
vicCONTROL Industrial Main Features
- Local voice control for embedded platforms
- Speaker independent, no training necessary
- Natural Language Understanding (NLU)
- Semantic analysis of speech command based on machine learning
- Design your own speech applications for the embedded platform using the web tool vicSDC (included in this kit)
- Support for many languages. Examples: English (Great Britain), English (USA), French (France), Mandarin Chinese, German (Germany), and many more!
- Acoustic feedback
- Communication via the industry-standard Internet of Things (IoT) protocol - Message Queuing Telemetry Transport (MQTT)
Hardware
Kit Contents
- phyBOARD-Mira Carrier Board (PB-01501-xxx)
- Voice Recognition Adapter (PEB-AV-07)
- Evaluation Module (PEB-EVAL-01-1413-1)
- Power Module (PEB-POW-01)
- Power Adapter supplying 24 V, (60 W, 2.5 A) (SV040)
- 2 x RS-232 and CAN Adapter cable (WS228)
- vicSDC Registration Code (located on your Packing Slip DO NOT LOSE)
Components
")
phyBOARD-Mira (Top)
")
phyBOARD-Mira (Bottom)
Additional Equipment

Voice Recognition Adapter (PEB-AV-07)
Warning
The Voice Recognition Adapter (PEB-AV-07) may look different than shown!
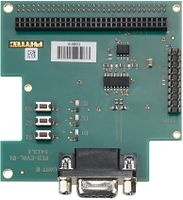
Evaluation Adapter (PEB-EVAL-01-1413-1)
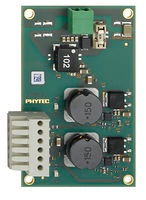
Power Module (PEB-POW-01)
")
Power Adapter 12V-24V (SV040)
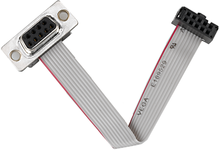
RS-232 and CAN Adapter (WS228)
Additional Equipment (Not included in Kit)
- HDMI screen (with cable) or phyBOARD Upgrade Kit 7" Capacitive Display (KPEB-AV-07-070.Ax)
- Active speaker with a 3.5mm jack
- USB Mouse
Board Connections
Module Connections
The phyBOARD-Mira comes with the following add-on adapters and cables preassembled:
- Voice Recognition Adapter (PEB-AV-07) connected via the A/V Connectors (X13 and X14) on the phyBOARD-Mira (phyBOARD-Mira with Voice Control Module)
- Evaluation Module (PEB-EVAL-01) connected via the Expansion Connector (X17) on the phyBOARD-Mira (phyBOARD-Mira with Evaluation and Power Modules)
- Power Module (PEB-POW-01) connected via the Power Connector (X2) on the phyBOARD-Mira (phyBOARD-Mira with Evaluation and Power Modules)
- RS-232 cable connected to the CAN pin header (X3). When plugged in, the red stripe on the adapter cable should be oriented toward the HDMI (X28) interface. (NOT SHOWN)
- Serial null cable (RS-232) connected to the UART3 pin header (X23). When plugged in, the red stripe on the adapter cable should be oriented toward the HDMI (X28) interface. (NOT SHOWN)

phyBOARD-Mira with Evaluation and Power Modules

phyBOARD-Mira with Voice Control Module
Warning
The Voice Recognition Adapter (PEB-AV-07) may look different than shown!
Display
Warning
A display is required for the two demo programs to work.
There are two options to connect a display to your kit.
HDMI
An HDMI display can be connected via the HDMI connector (X28) on the phyBOARD-Mira. HDMI is the default display output. This requires an HDMI display and cable.
PHYTEC Upgrade Kit 7" Capacitive Display
The PHYTEC upgrade kit, KPEB-AV-07-070.Ax for the phyBOARD-Mira, is a 7" capacitive display that can be used instead of an HDMI display. For more information, please read Connecting the Capacitive 7'' EDT Display to Voice Recognition Kit (LAN-078e_1).
Audio Input and Output
Warning
Audio is required for the demo to work. This requires an active speaker to be connected to the Voice Recognition Adapter.
The Voice Recognition Adapter has two built-in microphones. For a simple use case, only a speaker needs to be connected. Connect an active speaker to the 3.5mm TRS connector on the board.
Setting USB Input and Output
Warning
By default, the built-in microphones on the Voice Recognition Adapter are used. If you would prefer to use USB audio inputs or outputs, you will need to manually change the settings.
- Login to the phyBOARD-Mira
Stop recognition applications:
systemctl stop speech.target
Start the dialog manager:
/opt/speech/dialog_manager/vicdm_dialog_manager \
     "/home/root/.speech/workspace/dialog_manager"
The available audio devices will be listed after the line "Available audio devices:". find your audio device, e.g. USB PnP Sound Device: Audio (hw:1,0). Stop the dialog manager with Ctrl + C
Copy the config.json file to the user config folder:
cp ~/.speech/workspace/dialog_manager/config.json \
     ~/speech/config/config.json
Open this file with a text editor and set the value of the inputDevice and /or the outputDevice to the device you have selected above. When not using the built-in microphones, set the inputAmplification to 1.
Tip
The setting will use the system's default device.
- Save the file and close the editor.
Reload the speech applications:
systemctl restart speech.target
It might take a few seconds until all applications are reloaded. The application should now use the new configuration.
Tip
The log output journalctl --unit dialog-manager --all or journalctl --unit semantics --all might be useful for debugging.
The selected audio devices should support the required sampling frequencies: 16kHz for input and 22.05kHz for output. If this is not the case, one option is to use the default devices and the following configuration in ~/.asoundrc (modify the card number if it is not 1):
pcm. !default {
     type plug slave { pcm "hw:1.0" }
}
ctl. !default {
     type hw card 1
}
USB Mouse (optional)
A USB mouse can be connected to the phyBOARD-Mira. This is optional but will make using the interface and demo easier.
Warning
Either a mouse or touch screen is required to change the language of the Washing Machine demo.
Initial Boot Up
Tip
To obtain the SD card image used in this kit, please contact our support: support@phytec.de
Once the SD card has been inserted and a speaker and display attached to the board, connecting a power supply will boot up the phyBOARD-Mira. A pre-loaded demo, Washing Machine, will then begin automatically
vicCONTROL Industrial Usage
Starting the Demo Program
The Boot Sequence
Before you can start working with the demo applications, you will need to make sure the phyBOARD-Mira is set to the correct boot sequence.
Tip
The boot switch on the phyBOARD-Mira has only one label: ON. To avoid confusion when selecting the boot sequence, the side not labeled is considered to be OFF.
On the bottom of the phyBOARD-Mira is a switch controlling the boot sequence (either internal memory or SD card). The default setting (the boot switch set to OFF) begins booting from the internal memory. To change the boot sequence, power off the phyBOARD-Mira, and move the switch from OFF to ON:
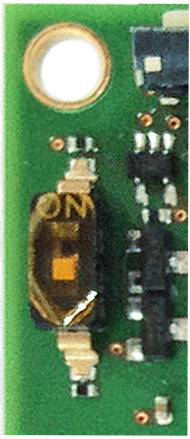
phyBOARD-Mira Boot Switch (S2)
- Booting from internal memory (boot switch set to OFF) will start the pre-loaded demo Washing Machine.
- Booting from the SD card (boot switch set to ON) will start the preloaded vicCONTROL Industrial Demo
     - Industrial Paper Cutting Machine.
then power the board back on. The system will boot using the chosen boot sequence.
Boot Switch set to OFF - Washing Machine Demo
By default, the boot switch on the phyBOARD-Mira is set to OFF and the demo "Washing Machine" will automatically start after the board has been powered on.
Warning
The "Washing Machine" application is for demonstration only. It cannot be used as a starting point for your own applications.
Tip
The German version is the default setting for the "Washing Machine" demo. You can return to the main menu with the button in the upper left corner and select another recognition language from there. This can only be done if there is a mouse or touch screen attached to the pyhBOARD-Mira.

Washing Machine Demo in different languages - left: German; right - Mandarin
Say the wake-up phrase. This will allow you to control the setting on the screen.
Tip
The wake-up phrase is different for each language but is shown on the screen. For example, in the German version, you might say:
*	Hallo Waschmaschine, Kockwäsche 90°C, 1200 Umdrehungen, extra Spülen, fertig in 5 Stunden!
*	Hallo Waschmachine, wie lange dauert das Programm noch?
Tip
You do not have to follow this format exactly when talking to the application. The system should be able to understand natural speech.
Inside the "Washing Machine" screen, you can say the wake-up phrase, for example: "Hallo Waschmachine", and then a command phrase.
After the wake-up phrase and before issuing a command, you should wait for the system to respond with a short tune and highlighting of the wake-up phrase on the screen. This is, however, optional. You can also say the wake-up and command phrases at once, without a pause in between.
In general, the system supports two tasks (or intents):
- Selection of a program or changing its parameters by voice: The system provides natural language input and will try to follow any reasonable command that you provide by voice. You can set a program or any of the parameters here or even many at once.
- Get the remaining time of the "currently running" program: Just ask how long the current program will last.
The following provides just a few short examples of sentences. Get creative! Try long or short sentences! Try synonyms for words...and have fun!!
English (Great Britain) - Washing Machine
"Hello washing machine, wash my coloured cloths at 60 degrees!" "Hello washing machine, how long does the program last?"

English (USA) - Washer
"Hey washer, wash my white clothes, hot!"
"Hey washer, how long?"

French (France) - Lave-linge
"Allô lave-linge, couleur 60 degrés Celsius!"
"Allô lave-linge, quand le programme est-il terminé?"
SSH Login
The root user can be used for SSH login. There is no password set for this account. The system uses a static IP: 192.168.3.11. If you need to change the network configuration, please refer to PHYTEC Yocto Reference Manual: How to Change the Network Configuration.
Boot Switch set to ON - Industrial Paper Cutting Machine Demo
If the boot switch on the phyBOARD-Mira is set to ON before connecting the power supply, the vicCONTROL Industrial Welcome Screen will be presented. This screen also shows the system ID:

An example of a vicCONTROL Industrial Welcome Screen showing the system ID
Tip
If a display is not available, logging in via SSH aslp prints the hardware ID as part of the welcome message.
With the given hardware ID, a license can be obtained from vicSDC (vicsdc.voiceinterconnect.de). The generated license file, named lic, should be deployed to:
/home/root/speech/config
and then speech applications need to be reloaded:
supervisorctl reload
systemctl restart vic-paper-cutting-gui
After a license is successfully deployed, the vicCONTROL Industrial - Industrial Paper Cutting Machine Demo will be shown:

Industrial Paper Cutting Machine Demo
- Similar to the Washing Machine demo, simply say the wake-up phrase followed by a command, for example:
Hey machine, turn on.
Hey machine, set the paper size to A5, 500 pieces.
Tip
Audio input and output can be tricky and has many components involved (microphone, amplifier, casing, the room's acoustic you are in, the noise inside the room, speaker distance, etc.).
- The demo is meant to be used in relatively quiet office environments.
- The speaker should be within 1 meter of the microphone and there should be no obstacles in the way.
- The system can also work with USB audio input and output devices. If you would prefer to use USB audio inputs or outputs, see Setting USB Input and Output on how to manually change the settings.
Command-Line Example App
After logging in, you can run the command line (CLI) demo with the following command:
demo_speech_cli
The application will print the recognition results for the running speech application (the Paper Cutting Machine demo by default). The user can also input the name of an audio prompt that is included in the application and the prompt will be played. The application can also serve as a sample Python implementation for communication between a user application and the rest of the recognition system. The code for the application can be found in:
/opt/speech/example/cli/speechapp_mqtt.py
Registering to vicSDC
After exploring the two demo programs, you will want to see how to create and modify your own speech application. vicSDC is a web tool where speech applications are defined and generated. These applications can be downloaded from here, ready for deployment on the phyBOARD-Mira.
Warning
The vicSDC registration code can be found on your Packing Slip. DO NOT lose, throw away, or destroy your Bill of Delivery as you will not be able to register your account!
Go to the following webpage and click Register from the main menu:
https://vicsdc.voiceinterconnect.de/
Enter a username and password, along with the Registration Code found on your Bill of Delivery to register. With this account, you are now able to create and maintain all speech applications for the vicCONTROL Industrial.
Tip
Only one user account can be created per Registration Code.
After registering, you can now log in and see the included example application or create new speech applications. Under Support, you will find a downloadable user's guide to help work through the many options you have when designing an application.
Further Documentation
For information on how to use the vicSDC web tool (under Support):
https://vicsdc.voiceinterconnect.de/
For information about voice INTER connect GmbH products and services:
https://www.voiceinterconnect.de/en/
For information about PHYTEC Messtechnik GmbH products and services:
https://www.phytec.eu/
For more detailed information and documentation on the phyBOARD-Mira:
https://www.phytec.eu/product-eu/single-board-computer/phyboard-mira/
Revision History
Date | Version # | Changes in this manual |
14.03.2019 | L-856e.A0 | Preliminary edition. |
04.06.2020 | L-856e.A1 | PDF Version
|