Gesamtbetrag:
zzgl. Mwst.
ESEC/Connagtive IoT UDM Kit Guide (L-1027e.A1)
Table of Contents
Copyrighted products are not explicitly indicated in this manual. The absence of the trademark (™ or ®) and copyright (©) symbols does not imply that a product is not protected. Additionally, registered patents and trademarks are similarly not expressly indicated in this manual.
The information in this document has been carefully checked and is considered to be entirely reliable. However, PHYTEC Messtechnik GmbH assumes no responsibility for any inaccuracies. PHYTEC Messtechnik GmbH neither gives any guarantee nor accepts any liability whatsoever for consequential damages resulting from the use of this manual or its associated product. PHYTEC Messtechnik GmbH reserves the right to alter the information contained herein without prior notification and accepts no responsibility for any damages that might result.
Additionally, PHYTEC Messtechnik GmbH offers no guarantee nor accepts any liability for damages arising from the improper usage or improper installation of the hardware or software. PHYTEC Messtechnik GmbH further reserves the right to alter the layout and/or design of the hardware without prior notification and accepts no liability for doing so.
@ Copyright 2021 PHYTEC Messtechnik GmbH, D-55129 Mainz.
Rights - including those of translation, reprint, broadcast, photomechanical or similar reproduction and storage or processing in computer systems, in whole or in part - are reserved. No reproduction may occur without the express written consent from PHYTEC Messtechnik GmbH.
| EUROPE | NORTH AMERICA | FRANCE | INDIA | CHINA |
Address: | PHYTEC Messtechnik GmbH | PHYTEC America LLC | PHYTEC France | PHYTEC Embedded Pvt. Ltd | PHYTEC Information Technology (Shenzhen) Co. Ltd. |
Ordering Information: | +49 6131 9221-32 | +1 800 278-9913 | +33 2 43 29 22 33 | +91-80-4086 7046/48 sales@phytec.in | +86-755-3395-5875 sales@phytec.cn |
Technical Support: | +49 6131 9221-31 | +1 206 780-9047 | +91-80-4086 7047 support@phytec.in | support@phytec.cn | |
Fax: | +49 6131 9221-33 | +1 206 780-9135 | +33 2 43 29 22 34 | +86-755-3395-5999 | |
Web Site: | http://phytec.in | http://www.phytec.cn |
Introduction
This Kit supports the Update & Device Management mechanism using the Connagtive IoT Device Suite. To use this mechanism an IoT platform is provided where the following tasks can be performed:
- Rolling out updates
- Monitoring the health status of a device and other system parameters
- Remote access from the IoT platform to a device
- Managing information about currently installed update bundles
- Managing logs of already installed updates
- Monitoring statistics
You can access the Connagtive IoT Device Suite and its documentation by visiting the following links:
| Platform Login | https://phytec.iot-suite.io/login |
| Platform Documentation | https://osb-connagtive.atlassian.net/wiki/spaces/AIDSD/overview |
| Connagtive Support E-mail | support@iot-suite.io |
Kit Contents
Hardware
The Update & Device Management kit contains the following hardware components:
- phyBOARD-Polis i.MX8M Mini (PB-02820-001-Z.A0)
- 24 V DC power supply (SV040)
- Ethernet cable (WK114)
- USB Type-A to Micro USB Type B cable (WK345)
- USB stick with pre-configured Ubuntu VM to build (SO-555v1)
- Quickstart Guide (L1026e.A0)
- LKI-003eu_2 GNU license information
Software Components
The image phytec-connagtive-start-image.sdcard is installed on eMMC out of the box. This image includes:
| RAUC | Update client operating on the device; installs update bundles |
| rauc-hawkbit-updater | Acts as a communication bridge between the hawkBit server hosting update bundles and RAUC |
| phytec-board-config | Tool to add a device to the Connagtive IoT Device Suite and creating new accounts |
| phytec-board-info | Outputs general information about the device |
| awsclient | Connects to the Connagtive IoT Device Suite platform and manages the device's shadow state and configuration files |
| remotemanager | Helper client to access the device remotely via SSH |
| blink-led | Small application showing the active slot of the A/B system by using different colors for the system LED |
Initial Setup
To initially use the Connagtive IoT Device Suite platform with your device, the phytec-connagtive-start-image has to be installed on the device. For this kit, this is done by PHYTEC at the factory, so no additional flashing of images has to be done.
Warning
The phytec-connagtive-start-image.sdcard image can only be flashed onto the eMMC. It will not work on an SD card!
To manually flash a device, flash an SD card with the phytec-connagtive-provisioning-image and boot this image. Be sure to select the correct boot jumper configuration to boot from the SD card. With this image flash the phytec-connagtive-start-image via SSH to the device's eMMC:
host$ dd if=phytec-connagtive-start-image-phyboard-polis-imx8mm-3.sdcard | ssh root@192.168.3.11 "dd of=/dev/mmcblk2 bs=1M"
Creating an Account and Registering the Device
If this is the first device you want to register on the Connagtive IoT Device Suite, then you first need to create an account. There are two ways to create an account and register the device: either by using a graphical user interface or by executing command-line arguments. Both methods use the phytec-board-config tool.
Note
In accordance with the GDPR ("DSGVO" in Germany), no data is sent or received to the Connagtive IoT Device Suite platform (based on Amazon Web Services) unless explicit consent is given.
Using the Graphical User Interface
To create a new account and add your device, execute the following command on your phyBOARD:
target$ phytec-board-config
This opens a graphical user interface inside your terminal.
┌────────────┤ PHYTEC - Connagtive IoT Device Configuration Tool ├─────────────┐
│                                                                              │
│                     1 New Account and Onboarding                             │
│                     2 Onboarding with existing Account                       │
│                     3 Login Settings for Console                             │
│                     4 Login Settings for SSH                                 │
│                     5 Terms and Conditions                                   │
│                     6 Help                                                   │
│                     7 About                                                  │
│                                                                              │
│                     <Select>                     <Finish>                    │
└──────────────────────────────────────────────────────────────────────────────┘
Select "New Account and Onboarding". First, you need to accept the terms and conditions before you can continue. Note, that if you decline the terms and conditions, the Connagtive IoT Device Suite cannot be used.
After accepting the terms and conditions, enter the e-mail address that you want to create the account with:
┌──────────────────────────────────────────────────────────────────────────────┐
│ Your email address for the new account:                                      │
│                                                                              │
│ ____________________________________________________________________________ │
│                                                                              │
│                     <Ok>                         <Cancel>                    │
└──────────────────────────────────────────────────────────────────────────────┘
The phytec-board-config tool will request a token from the Connagtive IoT Device Suite platform to assign your device to the new account. If the token was successfully fetched, the following screen appears:
┌──────────────────────────────────────────────────────────────────────────────┐
│ Welcome "phytec_0xdead1234beef"                                              │
│ to the Connagtive IoT Device Suite                                           │
│ The next steps are:                                                          │
│  1) Check your email account for a message                                   │
│     from welcome@esec-experts.com                                            │
│  2) Verify your email                                                        │
│  3) Login to your IoT Device Suite account                                   │
│  4) Check the state of your device in                                        │
│     your IoT Device Suite account                                            │
│                                                                              │
│                                    <Ok>                                      │
└──────────────────────────────────────────────────────────────────────────────┘
Follow the instructions on this screen to confirm and complete the registration of your device:
- Check your e-mail address for a new message from
welcome@iot-suite.io. - Verify your e-mail address with the message you just received.
- Login to your IoT Device Manager at https://phytec.iot-suite.io/login.
- Check the state of your phyBOARD in the IoT Device Suite platform.
When Onboarding with a new account the device is created automatically on the IoT Device Suite account.
Using the Command Line
It is also possible to create an account and register the device via the command line. To do this, execute the following:
target$ phytec-board-config acceptcontract --newaccount=myemail@company.com
Enter the correct e-mail address for the parameter--newaccount. When using this command, you will not get instructions on how to further proceed to complete your registration. Using the non-interactive command-line arguments is mainly meant for use in automated scripts.
Registering a Device with an Existing Account
If you already have an existing account on the Connagtive IoT Device Suite, you can register your device directly on the IoT Device Suite platform.
Onboarding Using the Graphical User Interface
To register your device, you will first need to generate a UID (Unique Device ID) and token. Execute the following command:
target$ phytec-board-config
This should open up the following user interface:
┌────────────┤ PHYTEC - Connagtive IoT Device Configuration Tool ├─────────────┐
│                                                                              │
│                     1 New Account and Onboarding                             │
│                     2 Onboarding with existing Account                       │
│                     3 Login Settings for Serial Console                      │
│                     4 Login Settings for SSH                                 │
│                     5 Terms and Conditions                                   │
│                     6 Help                                                   │
│                     7 About                                                  │
│                                                                              │
│                     <Select>                     <Finish>                    │
└──────────────────────────────────────────────────────────────────────────────┘
Select "2 Onboarding with existing Account". This will show you the Terms and Conditions if you have not already accepted them.
Select "Yes" to accept the contract. Now you should be able to see the generated UID and token. Follow the step presented on the screen to complete the onboarding of the device.
┌──────────────────────────────────────────────────────────────────────────────┐
│ Welcome to the Connagtive IoT Device Suite                                   │
│ The next steps are:                                                          │
│  1) Login to your account on the Connagtive IoT Device Suite                 │
│     https://phytec.iot-suite.io.                                             │
│     If you do not have an account, then use                                  │
│     option 1) New Account and Onboarding to register                         │
│  2) Add the device with                                                      │
│     Unique device ID (UID): "0xdead1234beef"                                 │
│     Token: "2159f3531d8d9375e92832a572b893a5"                                │
│     Valid until: "2021-05-21 08:20:02"                                       │
│     to your account                                                          │
│  3) Press 'Ok'. The awsclient will be                                        │
│     restarted three times.                                                   │
│                                                                              │
│                                    <Ok>                                      │
│                                                                              │
└──────────────────────────────────────────────────────────────────────────────┘
Onboarding Using the Command Line
Another option to generate a UID and token for the onboarding is via the command line. Execute the following command:
target$ phytec-board-config acceptcontract --onboarding
Adding a Device to Your Connagtive IoT Device Suite Account
Visit the Connagtive IoT Device Suite page and log in to your account. At the "Home" page you should see the "Add Device" button:

After you click on the "Add Device" button you will be asked to insert your generated UID and token:
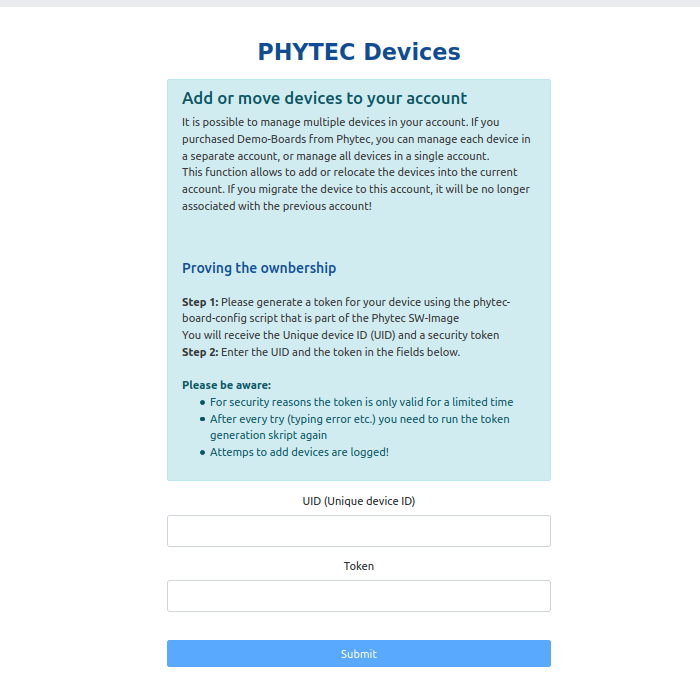
Copy and paste your generated UID and token and click on submit to add your device to your fleet. You should now see the device under the "Fleet Overview".
Uploading RAUC Bundles to the Connagtive IoT Device Suite
At this time it is not possible to upload a bundle using the Connagtive IoT Device Suite UI for demo accounts. To upload a custom bundle contact our support at support@phytec.de.
When using a productive version of the IoT Device Suite, you can directly interact with the hawkBit server and upload bundles there. Note, that this option is disabled for the demo account used with this kit.
Updating a Device from the Connagtive IoT Device Suite
To update your device, login to your Connagtive IoT Device Suite account and go to "Overview". Select the device you want to update. Click on the tab "Firmware Update".
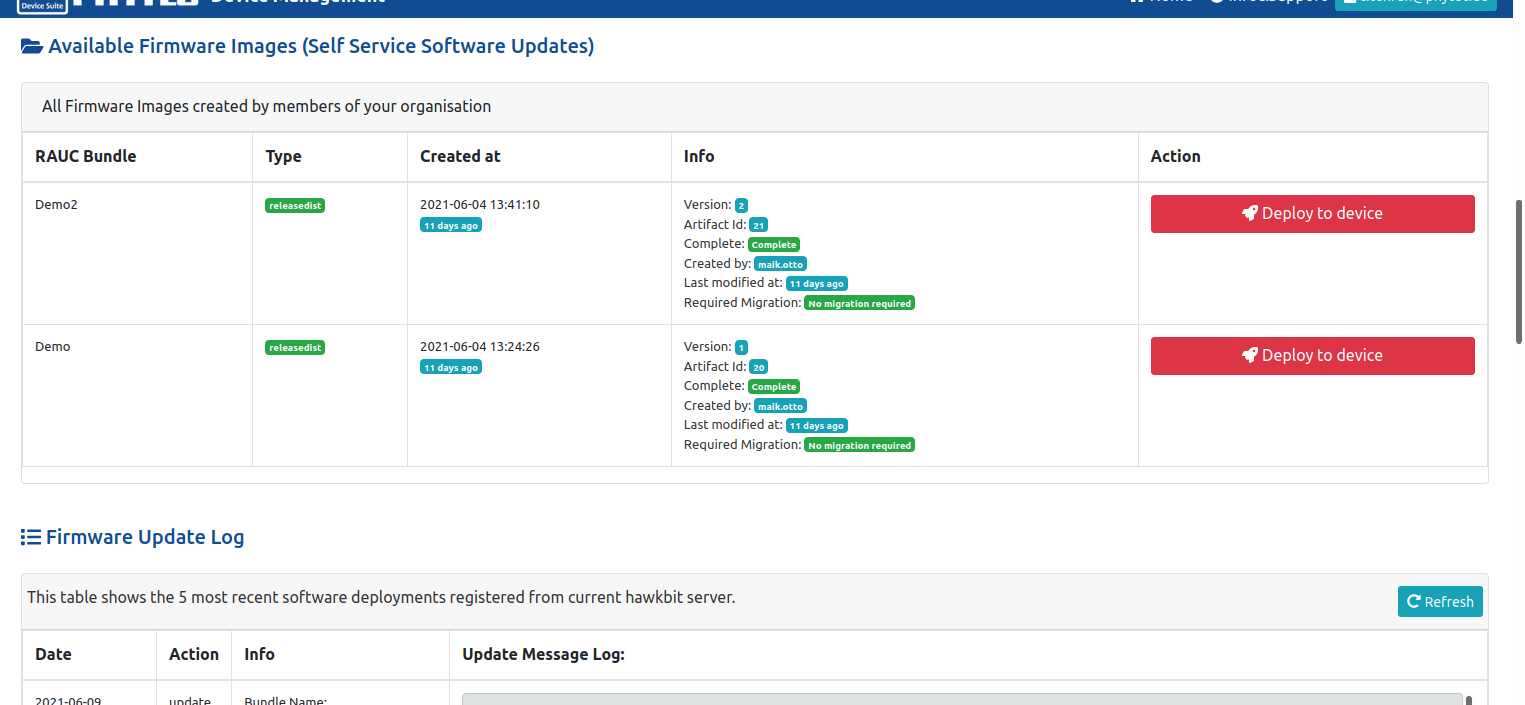
Here you should see all available software update bundles. Find the bundle you want to download and install and press the button "Deploy to device".
Under "Firmware Update Log" you can view the progress of the deployment. You may need to press the refresh button to see new logs of the current deployment.
For more information on how to perform an update using the Connagtive IoT Device Suite see the full documentation of the platform: https://doc.iot-suite.io
Login Settings
One way of improving the security of your device is to use one-time passwords, instead of static passwords which may get leaked. This makes it more difficult for possible attackers to maliciously access your device. Another advantage and possible use-case is that one-time passwords allow for giving a person one-time access to your device, e.g. when servicing it in the field. After finishing their work on the device and logging out, they cannot access the device again, as would be the case with using static passwords.
To change the login settings start the phytec-board-config tool with:
target$ phytec-board-config
Select which login settings you want to change, either "Serial Console" or "SSH".
┌────────────┤ PHYTEC - Connagtive IoT Device Configuration Tool ├─────────────┐
│                                                                              │
│                     1 New Account and Onboarding                             │
│                     2 Onboarding with existing Account                       │
│                     3 Login Settings for Serial Console                      │
│                     4 Login Settings for SSH                                 │
│                     5 Terms and Conditions                                   │
│                     6 Help                                                   │
│                     7 About                                                  │
│                                                                              │
│                     <Select>                     <Finish>                    │
└──────────────────────────────────────────────────────────────────────────────┘
Then select the method for the login method. This can be either the usual password or a one-time password generated by the IoT Device Suite.
┌──────────────────────────────────────────────────────────────────────────────┐
│ Choose the login method for Console. (Select an item with the arrow keys and │
│ spacebar)                                                                    │
│                                                                              │
│    (*) 0  Static Password                                                    │
│    ( ) 1  One-time Password (IoT Device Suite platform)                      │
│                                                                              │
│                     <Ok>                         <Cancel>                    │
└──────────────────────────────────────────────────────────────────────────────┘
The currently active method is marked with an asterisk * in the list. In this case, the static password verification method is active.
To select the Login Settings in the phytec-board-config tool use the arrow keys and space bar. After you choose your verification method press "enter" to exit.
- Password verification method:
For access to the device via serial console or SSH (whichever you choose, possibly both) you have to enter a device-specific password:- User:
root Password:
rootplus the device's MAC address in upper case letters, e.g.root502DF4010203
- User:
- Connagtive Authentication method: Using the Connagtive IoT Device Suite Platform you can generate a one-time password to gain access to the device.
If you change the login settings via the phytec-board-config tool, those changes are only valid until a new bundle or image is installed. To make those changes last you need to edit the yogurt-vendor-connagtive.conf file:
CONNAGTIVE_ROOT_AUTHENTICATION = "password"
Set this variable to either "password" for password verification or "authenticator" for the Connagtive authentication. Build the bundle/image and use it to have your preferred login setting.
Generating a One-time Password
To generate a one-time password for logging in to your device, visit the Connagtive IoT Device Suite website at https://phytec.iot-suite.io/.
Go to "Overview" and select the device you want to generate a token for. Select the tab "Remote access" and the following page should be shown:
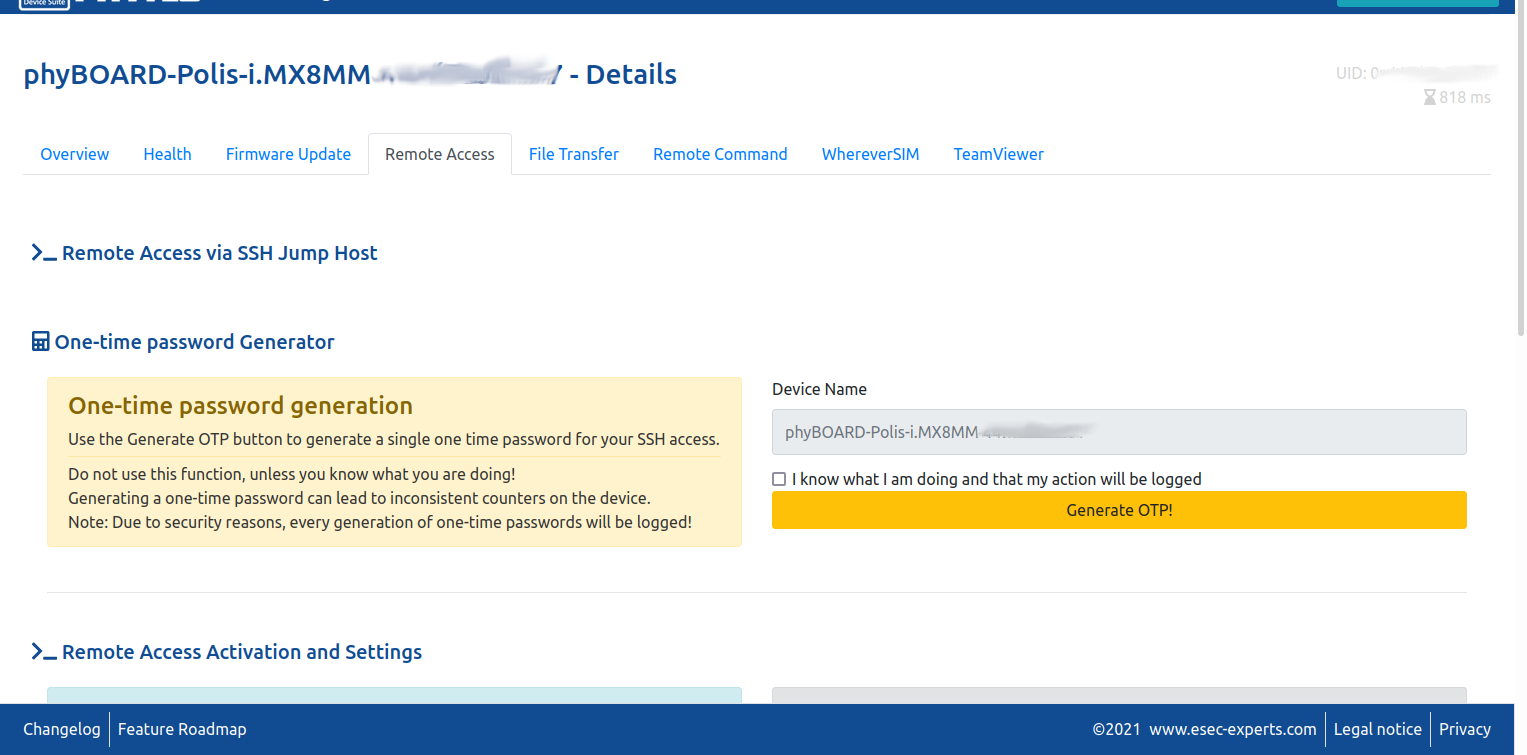
Check the box "I know what I am doing and that my action will be logged" (if you truly do) and click on "Generate OTP!". This will generate a one-time password you can use to log in on your device if the login settings are set accordingly.
Using the Remote Manager and Logging in via SSH
You can access your devices from everywhere via "Remote Manager" as long as you have access to the "Connagtive IoT Device Suite" platform. To use the "Remote Manager" you will need to set up a "Tunnel" from the platform to the device. Login to your "Connagtive IoT Device Suite" account and select the device you want to connect to. Select the index tab "Remote Access" and scroll down to "Remote Access Activation and Settings"
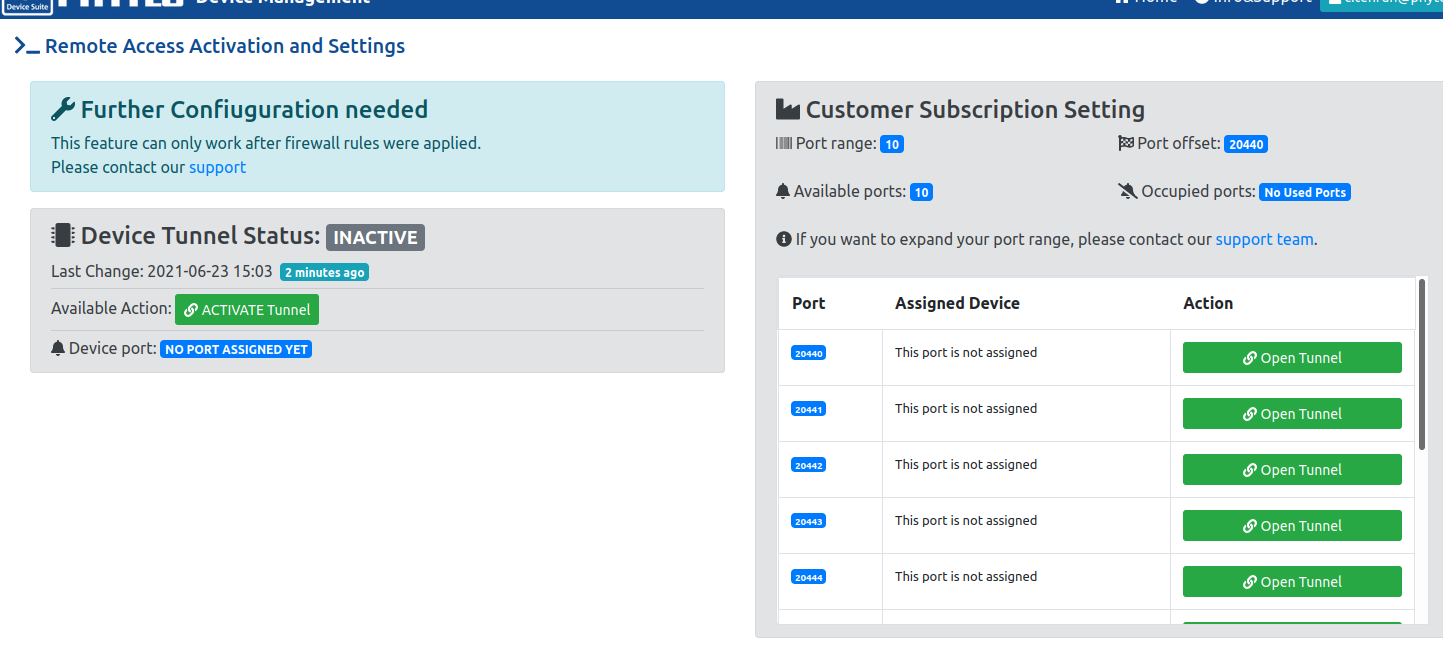
Press the "ACTIVATE Tunnel" button to create a tunnel to the device. Now the following things will happen under the hood:
- The awsclient on the device downloads the
RemoteManager.confconfiguration file to the device. - The remotemanager on the device starts an SSH connection to the Connagtive IoT Device Suite platform.
- The user can start a connection from a different PC to the Connagtive IoT Device Suite platform.
- The service on the Connagtive IoT Device Suite platform checks the IP range from the connecting PC and starts the port forwarding to the device.
Note
To use the Remote Manager, the public IP range of your PC must be registered in the Connagtive IoT Device Suite platform. For this, please contact the Connagtive support team at support@iot-suite.io.
To login as root onto your device remotely via SSH execute the following command:
host$ ssh root@IP_ADDRESS -p PORT
Replace IP_ADDRESS with the public IP address and PORT with the assigned port of your device. You can find the address and port under "Device Tunnel Status". Then either enter the static password of your device, which is root plus the device's MAC address, e.g. root502DF4010203. Or enter a previously generated one-time password, as explained before, depending on the login settings of your device.
phytec-board-info Tool
The phytec-board-info tool is a small script that displays general hardware information about the device. Execute this script and set a command-line argument according to the desired output.
target$ phytec-board-info --help
Usage: phytec-board-info OPTION

Print information about the current hardware.

One of the following options can be selected at a time:
  -c, --compatible        Device tree compatible of the machine
  -m, --machine           Hardware machine name
  -n, --simno             SIM number
  -s, --serial            Serial number
  -v, --machine-version   Hardware machine version
Rebooting After an Update
After a successful update, a reboot of the device is required. The device signals the need for a restart by blinking the main LED red. There are three options to reboot the system.
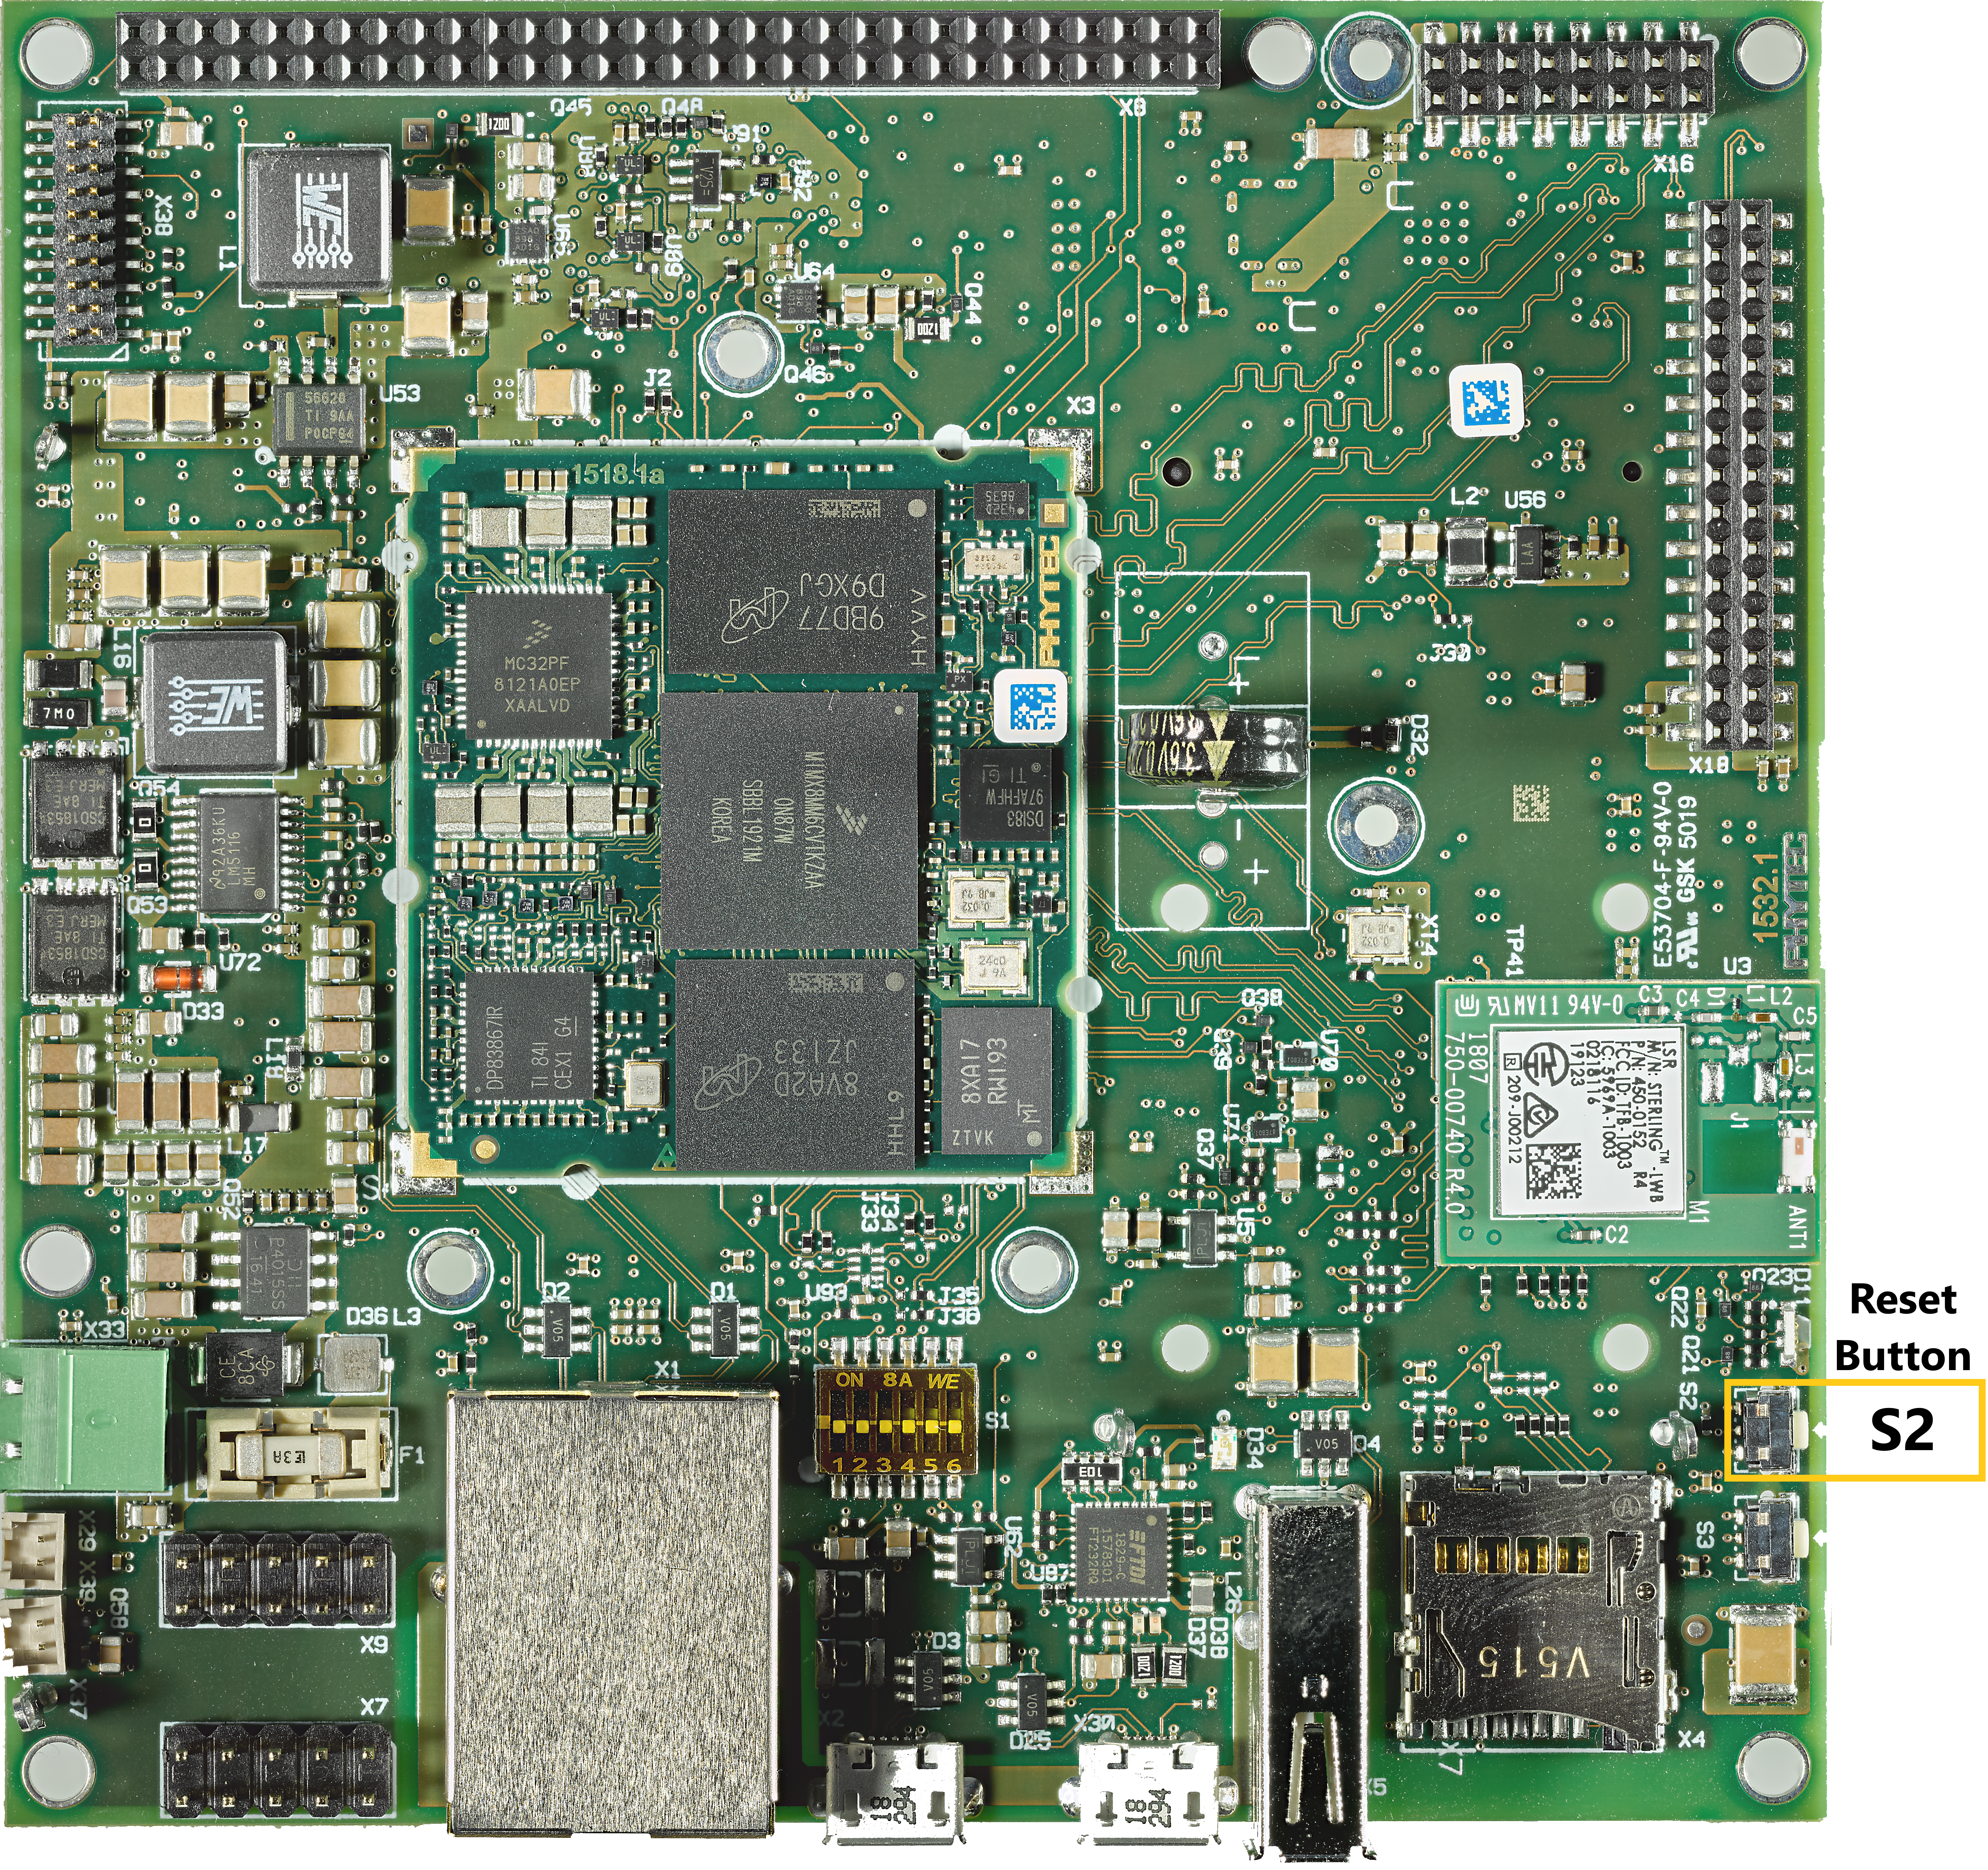
Hardware Reset
Press the reset button on your phyBOARD to initiate a reboot:
Software Rebooting
Execute the following command on your phyBOARD:
target$ reboot
Automatic Rebooting After an Update
The rauc-hawkbit-updater has an option to automatically restart the device after a successful update. This can be enabled in the rauc-hawkbit-updater configuration file in /mnt/config/hawkbit/config.cfg by setting post_update_reboot to true in the client section:
/mnt/config/hawkbit/config.cfg
[client]
...
post_update_reboot = true
Be aware, that you should not manually edit /mnt/config/hawkbit/config.cfg, as it is automatically deployed by the awsclient. To enable this option for your devices, please contact the Connagtive support at support@iot-suite.io.
Building Custom Images
It is possible to build your own custom images using Yocto. To do that you will need to check out the BSP and build it from its sources. After checking out the BSP, the source may be changed according to your needs. The full reference on this topic can be read in our Yocto Reference Manual.
Further Steps
If you are interested in using the IoT Device Suite for your own products, feel free to contact our sales team at sales@phytec.de. For general questions about this kit please contact our technical support team at support@phytec.de. We look forward to your questions!
For more detailed information about the hardware, take a look at the download page of phyCORE-i.MX8M Mini and phyBOARD-Polis. There you will find manuals about the hardware, board support packages, and other more advanced topics.
Revision History
| Release Date | Version # | Changes Made in this Manual |
09.07.2021 | L-1027e.A0 | Preliminary Manual |
| 15.07.2021 | L-1027e.A1 | Links Updated 'Further Steps' added |