Software Manual - i.MX 8M Edge Computing Guide (L-1005e.A0)
Table of Contents
Introduction
Congratulations on purchasing the Edge Computing Kit from PHYTEC. In this guide, you will be taken through the process of setting up and running this kit.
The Edge Computing Kit serves two purposes. First, it enables the user to become familiar with the Microsoft Azure cloud and its possibilities. Second, the user can use any algorithm or model created in the cloud and run it locally on the hardware.
The user has the advantage of directly starting their own data recording and analyzing it in the Azure cloud. We set up the environment to ensure smooth data mining. The use of the Azure services is explained in this guide. The possibility to run autonomous analysis on the hardware is also provided. We have prepared a straight forward model/algorithm embedding via the Azure IoT Edge solution. This guide explains how to embed the model or algorithm.
If you are looking for a solution with your own cloud or another cloud provider, please contact us. At the moment, only the Azure cloud is embedded in the kit. If asked, we can find an individual solution for you. For any additional questions, please do not hesitate to contact us at www.phytec.de.
Warning
As the service from Microsoft is relatively new, a lot of changes and updates will be implemented by Microsoft. Due to this, we mainly point to tutorials and guides from Microsoft as they will show the best way to implement various solutions. Where we encountered issues in the Microsoft guidelines, we provide our solution to the problem.
What is Artificial Intelligence and How can I Use It?
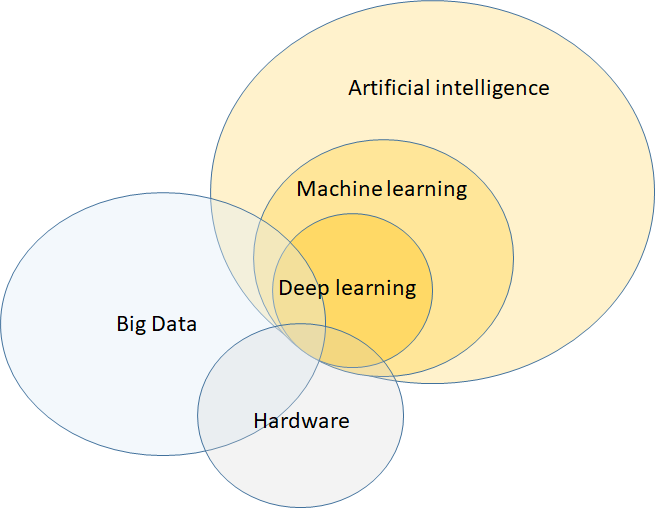
When we talk about artificial intelligence (AI), we are referring to the automation of intelligently acting machines and algorithms. In most cases when we use the term AI, we specifically mean machine learning or deep learning, both of which are subsections of AI.
Figure 1 shows the overlap of the different relationships:
Machine learning and deep learning both use input data to learn the key features of the input data. The resulting model is capable of identifying the key features in unseen input data. There is, however, a big difference between these two types of learning.
Machine learning is very effective with limited data and lower complexity and can outperform the latest deep learning algorithms within those boundaries. Deep learning demands quite a bit more training data, calculation performance, and time. The potential to outperform classic machine learning and integrate highly complex and non-linear relations between multiple features is much greater.
Generally, machine learning needs more input from the developer for successful training, while deep learning is very successful in automatically updating its internal parameter until optimization is reached. Next to the impressive results in speech and image classification, the limited demand for developer input is one of the keys to the success of deep learning.
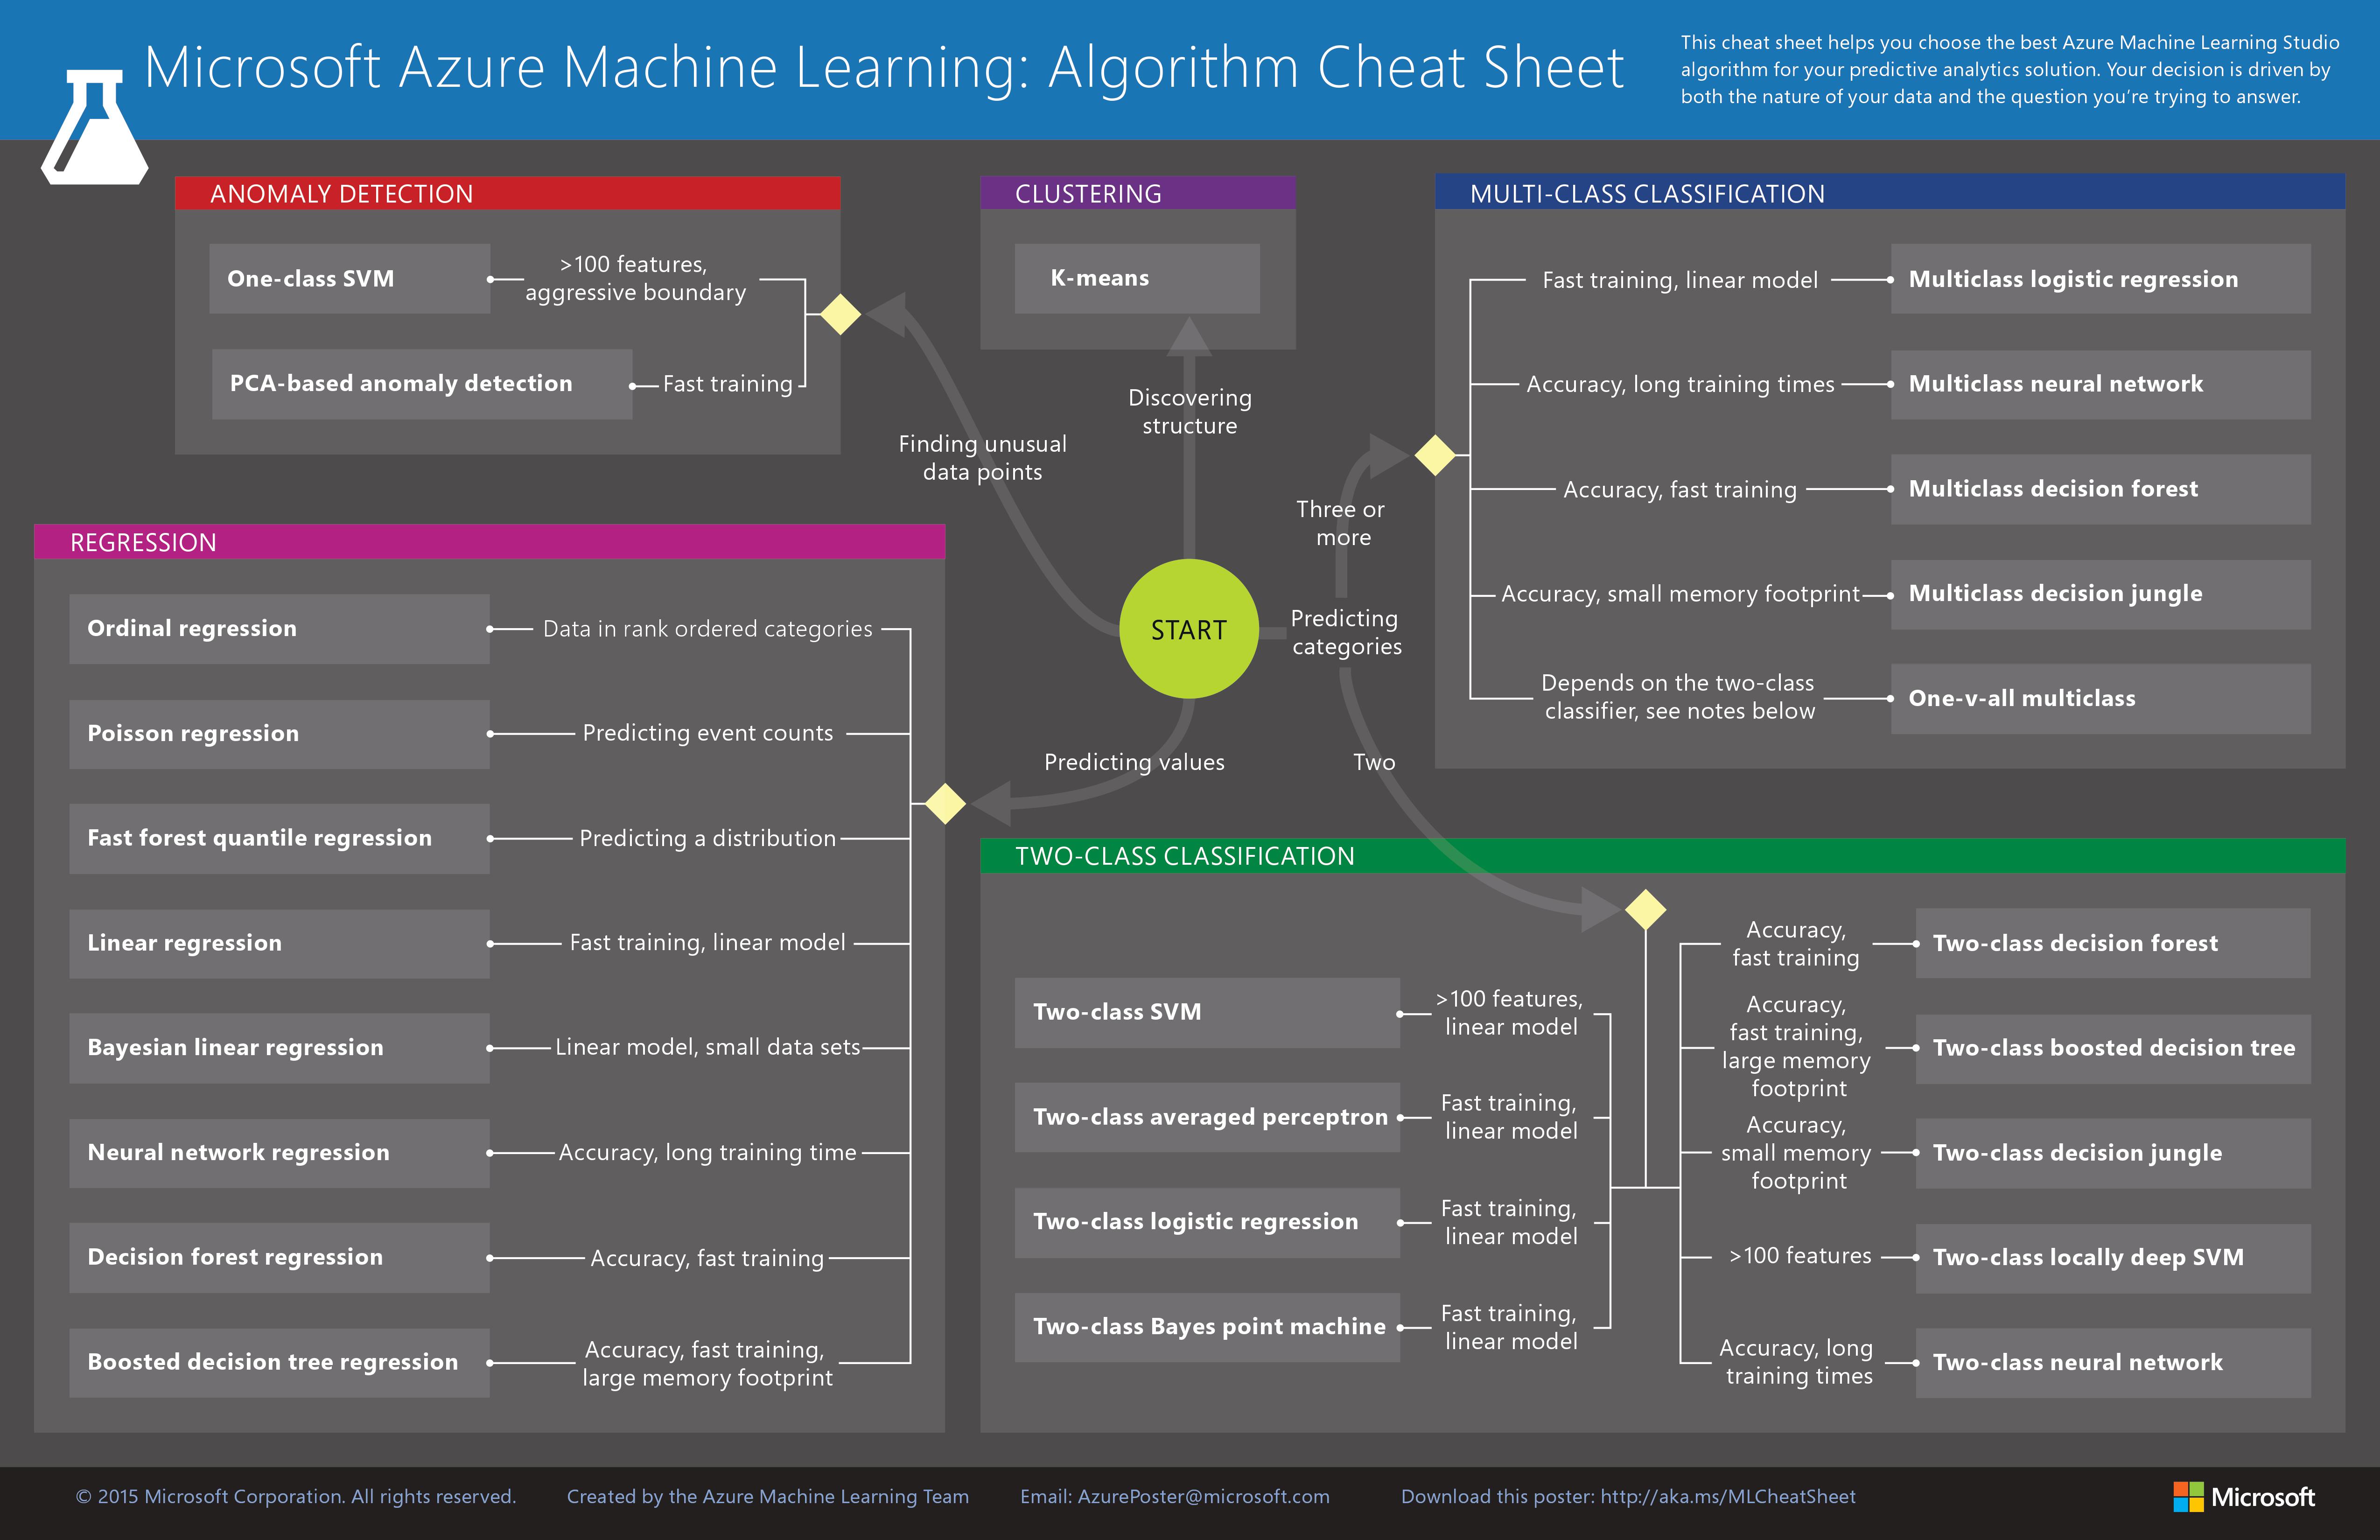
The figure below shows which algorithm to choose for your specific requirements.
Whether using either machine learning or deep learning, consider that a crucial part of the whole process is data preparation.
Generally, it should be noted that the quality of the input data is very important for succeeding in classifying anything. "Garbage In Garbage Out" is an essential point to keep in mind. Therefore, sufficient time should be planned for data preparation within an AI project. If you have running data collection in your projects already, make sure that the data is organized, stored, and tagged properly. This will reduce your amount of preparation tremendously.
With the following guide, you will learn how to implement and use AI for image recognition. Future projects can be built on this knowledge and how to use AI.
Quickstart
For instructions on how to connect, boot up, and begin the demo on your kit, head to: Edge Computing Kit Quickstart.
Download Image and Sources
The SD Card image and sources can be downloaded from our FTP server: https://download.phytec.de/Software/Linux/BSP-Yocto-IoTEdge/BSP-Yocto-IoTEdge-i.MX8M-v1.0/
AI Demo Application Usage
The kit comes with a graphical application preinstalled. This application is written in QML and C++ and uses the Qt5 framework to draw the window and user interface elements. The application runs natively, separated by the actual AI model, which runs in a container.
The displayed video is a live stream that comes directly from the camera. Every few seconds, an image is captured with the camera. This image is then used as the input for the AI model and is analyzed. The AI model outputs a prediction of the input image with the most likely matching tag. A tag is a simple name for each of the different possible image classifications. For example, an image representing an open hand may have the tag: "hand-open". The tags are defined by the user before the AI model is created. With the matching tag, the application then displays information text and the confidence of the prediction on the left side of the graphical user interface.
Setting up Azure IoT Edge
Initially, the containers are started by a custom systemd service and the Azure IoT Edge service is disabled. This is so you can run the demo without signing up for an Azure account. But this also implies that other features that Azure IoT Edge offers, do not work by default (though can be easily changed).
First, create an Azure IoT Hub and add an edge device. Detailed instructions on how to do this can be found in the Azure Documentation. Then create a deployment for the edge device using the helper script from our Git repository git.phytec.de/aidemo-customvision:
python3 prepare-deployment.py deployment-template.json
az iot edge set-modules --device-id mydevice --hub-name myhub --content deployment.json
This process is described in more detail in a later section of this guide.
To do any work on the PHYTEC AI Kit board, connect to it using SSH. This requires that your computer and AI board are on the same network.
ssh root@phycore-rk3288-4
Assuming you have created an Azure IoT Hub instance with an IoT Edge device, setting up Azure IoT Edge on your PHYTEC edge device is as simple as entering the connection string to /etc/iotedge/config.yaml.
vi /etc/iotedge/config.yaml
In the editor vi, enter the connection string by pressing the i key and replace the text <ADD DEVICE CONNECTION STRING HERE>.
provisioning:
  source: "manual"
  device_connection_string: "<ADD DEVICE CONNECTION STRING HERE>"
After you are done, press ESC and save and quit the file with :wq. Make sure that the custom systemd services for launching the model is disabled and stopped. Then enable and start the IoT Edge service that will handle the model now:
systemctl stop aidemo-customvision-model
systemctl disable aidemo-customvision-model
systemctl enable iotedge
systemctl start iotedge
The Azure IoT Edge service should start the model container and the demo application should be able to make predictions again after a short amount of time. You can inspect the status of all containers with:
docker ps -a
To view logging output of the model container, execute:
docker logs model
For a detailed logging output of the IoT Edge service use journalctl:
journalctl -fu iotedge
Create your own Model with the Custom Vision Service
Warning
If you want to have the demo run in the cloud, follow this chapter. PHYTEC cannot provide you the model in the Azure cloud due to access restrictions and security reasons.
In this guide, we will be implementing a hand gesture recognition application. We will use the Custom Vision service from Microsoft for the first steps. Although not in the scope of this guide, you may also use your own model implementation instead.
As the kit already has a preinstalled model that can recognize open and closed hands, the following instructions will result in a model recognizing 3 hand gestures: closed hand, open hand, and index finger.
Create a New Project
- Visit the Custom Vision web page
- Sign in with the same account that you use to access Azure resources
- Select New project
- Create your project with the values below
- Select Create project
| Field | Value |
|---|---|
Name | Provide a name for your project |
| Description | Optional project description |
| Resource Group | Accept the default limited trial |
| Classification Types | Multiclass (single tag per image) |
| Domains | General (compact). Only compact domains can be exported later. |
Obtaining and Uploading the Images for Training
We store the images on our FTP server and the application code we use to train and deploy our AI models within a Git repository.
Clone the repository to your local machine:
git clone https://git.phytec.de/aidemo-customvision
Download the images from our FTP server: https://download.phytec.de/Software/Linux/Applications/aidemo-customvision-hands-pictures.tar.gz
Return to your Custom Vision project and select Add images.
The Custom Vision API will prompt you to give the images a tag. Tag the image with "hand-open", "hand-closed", or "hand-finger" depending on the image type.
Repeat this process for all image types. You can also add additional images of open and closed hands to improve the performance of the classifier with the specific background you will be using. You can also add new hand gestures like thumb up to increase the usability of the application.
- After all the images are uploaded, select Train to train the classifier.
Tip
The Custom Vision service will suggest moving the model to the Azure cloud. This is not possible in the limited trial version and can only be done with a standard paid subscription.
Further Use of the Kit
The Edge Computing kit comes with limited functionality as the model is trained only for the three previously described hand gestures. In principle, almost all image classification solutions can be implemented with this kit within the performance limitations of the hardware.
Further ideas for the usage of this kit are but not limited to:
- Training the kit to play Tic-tac-toe.
- Automated recognition of your products
- Recognize if a machine is occupied by a worker
- Determine free parking spaces on your company premise
- Recognize persons in a specific area and sound an alarm for unauthorized trespassing
- Count people or goods
- Identify if a process is finished
All of the above-mentioned examples can be followed up with your own script which takes the output of the classification to activate an alarm, counter, or any other function. Our example is created with the Microsoft Azure cloud to provide open-source cloud security with many functions ready to go.
The Command-Line Tool
For convenience, we provide a command-line tool in modules/demo/app/cli.py to easily execute common commands for Azure Custom Vision projects. The command-line tool is written in Python 3 and makes use of the Azure SDK.
Prerequisites
Use pip to install the Azure SDK for Python. Be sure to use Python 3 for all installations made using pip and the application code.
sudo apt install python3 python3-pip python3-requests
pip3 install azure azureml azure-cognitiveservices-vision-customvision
You also need a set of images to train your Azure Custom Vision model. See the Azure documentation for detailed information on how to correctly capture images for training.
Usage
You can get help on all available CLI commands using the -h flag:
# Get general help and possible commands
python3 app/cli.py -h
# Get help about a specific subcommand (also named positional arguments in the help), e.g. about creating a new project
python3 app/cli.py create-project -h
First, create a new project:
python3 app/cli.py create-project "My Project"
Verify the creation of your project by listing all projects of your account:
python3 app/cli.py list-projects
Now the images can be added:
python3 app/cli.py add-images {PROJECT_ID} {PATH_TO_IMAGES} {TAG_NAME}Here, replace the project ID with the unique identifier from the project list. The path to the images can be a wildcard, e.g.
path/to/images/*.jpg, or a list of individual file paths. The tag name should be a descriptor of what the images' content is, for example, "banana" for a set of images of different bananas. Repeat this step for each set of images.After uploading all your images, the AI model can be trained:
python3 app/cli.py train-project {PROJECT_ID}The iteration that results from the training must be published to the corresponding prediction resource:
python3 app/cli.py publish-iteration {PROJECT_ID} {ITERATION_ID} {PREDICTION_RESOURCE} {PUBLISH_NAME}Now the published iteration can be used for classifying images:
python3 app/cli.py classify-remote {PROJECT_ID} {PUBLISH_NAME} path/to/image.jpg
If you want to use the AI model locally, you can export and download it. Again, by listing the available projects, you also get a list of iterations and their IDs.
python3 app/cli.py export-iteration {PROJECT_ID} {ITERATION_ID}
python3 app/cli.py download-exports {PROJECT_ID} {ITERATION_ID}
The model will be downloaded and packaged with the corresponding application and model files to create a Docker image to the current directory.
Creating your own Deployable Modules
Prerequisites
We strongly recommend using a Linux Distribution as your operating system for developing the applications. If you do not have Linux installed and can or do not want to install it on a physical hard drive, you may want to install it in a virtual machine. All commands shown in this guide assume that you know the basic operations when using a terminal.
Setting up an IoT Hub
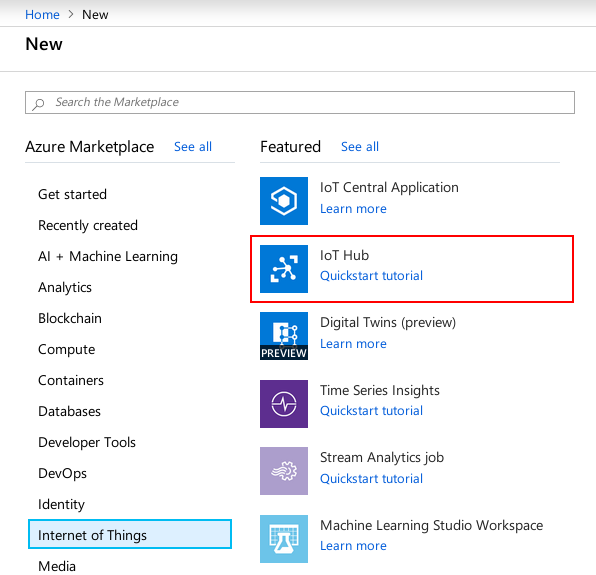
An Azure IoT Hub is a group of IoT Edge devices that can be managed to control sent messages, deploy applications, and add functions onto tracking events. We will use an IoT Hub mainly for managing the deployment of modules and messages to IoT Edge devices. Add an IoT Hub by selecting Create a resource and searching for "IoT Hub". Fill in the required fields.
For more information on IoT Hubs visit the Azure Documentation.
Adding IoT Edge Devices to an IoT Hub
Azure IoT Edge devices are the actual devices that run on the edge. In this kit, you will use PHYTEC hardware as an edge device. This edge device can use modules that are deployed from the cloud to execute applications.
To create an Azure IoT Edge device, follow the instructions from the Azure Documentation.
Note
The IoT Edge runtime is preinstalled on our devices so you can safely ignore the installation process described in the documentation.
The only thing that needs to be set up is the IoT Edge device configuration that can be found in/etc/iotedge/config.yaml. Open the file using vi:
vi /etc/iotedge/config.yaml
Move the cursor to the string and press i to enter the insert mode. Then enter your connection string.
provisioning:
  source: "manual"
  device_connection_string: "<ADD DEVICE CONNECTION STRING HERE>"

# provisioning:
#   source: "dps"
#   global_endpoint: "https://global.azure-devices-provisioning.net"
#   scope_id: "{scope_id}"
#   registration_id: "{registration_id}"
Save and close the file with :wq and hit Enter.
Restart the iotedgesystemd service:
systemctl restart iotedge
The logging output of this service can be inspected with journalctl. If everything goes well, no errors should occur here and the needed containers should be started.
journalctl -fu iotedge
You can exit journalctl by typing Ctrl+C.
Creating a Container Registry
- In your Azure portal, choose Create a Resource from the side panel.
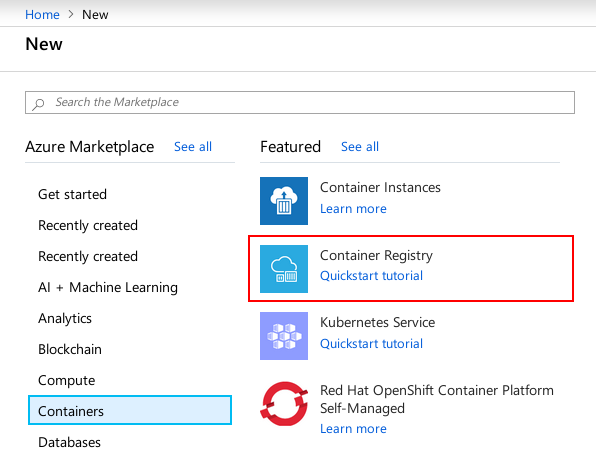
- Search for Container Registry and add one by filling in the required fields and clicking on Create.
For more information on Azure Container Registry, see the Azure Documentation.
Developing a Custom Module
Modules for Azure IoT Edge are Docker containers. You can create any application you like by creating a Docker image and have it run on your Azure IoT Edge device.
Build the Container
Build the module with Docker:
docker build -t my-module:0.1.0-arm32v7 -f arm32v7.Dockerfile .
Alternatively, you can build the image using ACR Tasks.
az acr build -r aikit -t my-module:0.1.0-arm32v7 -f arm32v7.Dockerfile .
This will automatically push the image to the container registry after it is finished.
Tip
When testing the module locally on an x86 machine, the docker image has to be built for that specific architecture. Otherwise, we will cross-compile inside the Docker container for our ARM-based IoT Edge devices. To build for x86 machines, specify the corresponding Dockerfile and adjust the tag accordingly:
docker build -t my-module:0.1.0-amd64 -f amd64.Dockerfile .
Testing the Module
It is a good idea to test your module locally if possible before implementing it on your IoT Edge device. Generally, running Docker images is as easy as:
docker run my-module:0.1.0-amd64
Tip
Running Docker images containing graphical user interfaces requires some extra environment arguments and mounts. Depending on the hardware requirements of the application, you also need to mount the corresponding devices (like /dev/video0). If unsure, you can also mount everything with --privileged. Be aware though that using the --privileged argument gives the container root-access to pretty much everything on the target device, which is a major security risk and should only be used during development.
Using Wayland on PHYTEC hardware, execute the following:
docker run -it \
    --device /dev/video0 \
    -e QT_QPA_PLATFORM=wayland \
    -e XDG_RUNTIME_DIR=/run/user/0 \
    -v /run/user/0:/run/user/0 \
    my-module:0.1.0-arm32v7
Or, if you want to test the application locally on your workstation using X11:
xhost +local:docker
docker run -it \
    --device /dev/video0 \
    -v /tmp/.X11-unix:/tmp/.X11-unix \
    -e DISPLAY=$DISPLAY \
    my-module:0.1.0-amd64
xhost -local:docker
Upload the Custom Module to your Container Registry
If you have previously built the image using a local name, like my-module, then you have to create a new tag-based on it containing the container registry name:
docker tag my-module:0.1.0-arm32v7 mycontainerregistry.azurecr.io/my-module:0.1.0-arm32v7
Upload the image to your container registry on azurecr.io:
docker login mycontainerregistry.azurecr.io
docker push mycontainerregistry.azurecr.io/my-module:0.1.0-arm32v7
Deployment of your Custom Module
Deployment of modules is done by using a manifest, usually in the JSON format, which specifies all of the modules and their properties running on the IoT Edge device. A minimal deployment manifest looks like this:
{
  "modulesContent": {
    "$edgeAgent": {
      "properties.desired": {
        "schemaVersion": "1.0",
        "runtime": {
          "type": "docker",
          "settings": {
            "minDockerVersion": "v1.25",
            "loggingOptions": "",
            "registryCredentials": {
              "mycontainerregistry": {
                "username": "mycontainerregistry",
                "password": "mypassword",
                "address": "mycontainerregistry"
              }
            }
          }
        },
        "systemModules": {
          "edgeAgent": {
            "type": "docker",
            "settings": {
              "image": "mcr.microsoft.com/azureiotedge-agent:1.0",
              "createOptions": "{}"
            }
          },
          "edgeHub": {
            "type": "docker",
            "status": "running",
            "restartPolicy": "always",
            "settings": {
              "image": "mcr.microsoft.com/azureiotedge-hub:1.0",
              "createOptions": "{\"HostConfig\":{\"PortBindings\":{\"8883/tcp\":[{\"HostPort\":\"8883\"}],\"443/tcp\":[{\"HostPort\":\"443\"}],\"5671/tcp\":[{\"HostPort\":\"5671\"}]}}}"
            }
          }
        },
        "modules": {
          "my-module": {
            "version": "1.0",
            "type": "docker",
            "status": "running",
            "restartPolicy": "always",
            "settings": {
              "image": "mycontainerregistry.azurecr.io/my-module:0.1.0-arm32v7",
              "createOptions": ""
            }
          }
        }
      }
    }
  }
}
The createOptions value contains standard Docker options for container creation. A detailed list of all available options can be found in the Docker Engine API Documentation. Make sure that you escape any quotation marks " using \", as these would otherwise confuse the parsing of the deployment JSON file.
With the manifest given, deploy the module using the Azure CLI:
az iot edge set-modules --device-id my-edge-device --hub-name my-hub --content config/deployment.arm32v7.json
After a couple of minutes, the module should be deployed on your IoT Edge device. You can verify this by going to your Azure portal and finding your IoT Edge device and module status: All resources → my-hub → IoT Edge → my-edge-device
Additional information on how to set up other properties, like routing, can be found in the Azure Documentation.
Tip
To move your Custom Vision project to the Azure cloud, you need an active Azure subscription. In the free trial phase, this is not possible.
Setting up Azure Resources
Company Azure Account
For the kit to run, you do not need a full company Azure account. If you want to use the kit more extensively, we strongly recommend subscribing to Azure with a company account.
For any paid services you can use the 200 $ free credit. To get an overview of the costs associated with Azure, refer to their pricing information: https://azure.microsoft.com/en-us/pricing/
If you already have a Microsoft Office 365 subscription, simply follow this short guide to link an Azure account to your Office 365 subscription: https://docs.microsoft.com/en-us/azure/billing/billing-use-existing-office-365-account-azure-subscription
Otherwise, you will have to create an Office 365 subscription for your company: https://docs.microsoft.com/en-us/office365/admin/setup/setup?view=o365-worldwide&tabs=BusPremium
IoT Hub
The Azure IoT Hub is needed to make your Edge device known in Azure, monitor your device, and establish a save connection.
- Select Create a resource on the Azure portal in the upper left corner.
- Select Internet of Things → IoT Hub.
- Now you can choose your subscription type, Research Group, Region, and IoT Hub Name.
- Choose Next: Size and scale to choose the F1: Free tier to use the Kit. This can be changed at any time.
- Click Review + Create.
Container Registry
Next, we need to create an Azure Container Registry to be able to store a Docker container in the Azure cloud. At a later stage, the Docker container will hold the trained model which can be deployed on the Kit hardware.
- We start again by creating a new resource.
- Choose Containers → Container Registry.
- Here, choose the unit Basic under SKU. It provides enough scale for using the Kit. This can be changed at any time.
- Click Create.
Custom Vision Service
Now we add a cognitive service to be able to run the image recognition. The service is called "Custom Vision".
- First, create a new resource:
- Search for the official "Custom Vision" service by Microsoft and create a new instance:
- Fill in the needed information and choose the F0 pricing tier as this is enough to use this Kit for now.
Blob Storage
To be able to easily save accessible data in the cloud, we can set up a Blob Storage.
- Create a new resource:
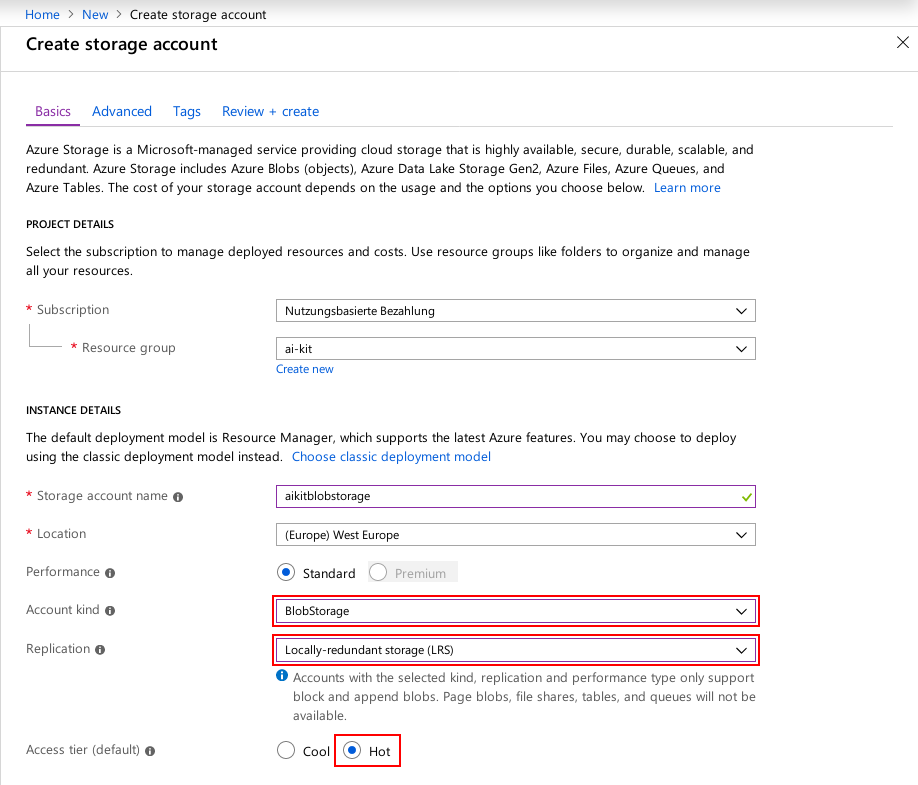
- Choose Storage and then Storage Account.
- In the creating menu, add all your information regarding subscription, location, etc.
- For Account, choose the Blob Storage. Blob Storage is an easily accessible storage format.
- For Replication, choose Locally only for this trial. As Geo redundancy is not needed at this point, You may want to change those settings for future projects.
- You can also choose between hot and cold. As we are accessing the data more frequently for the training and this tutorial, choose hot.
- Then click Review + Create
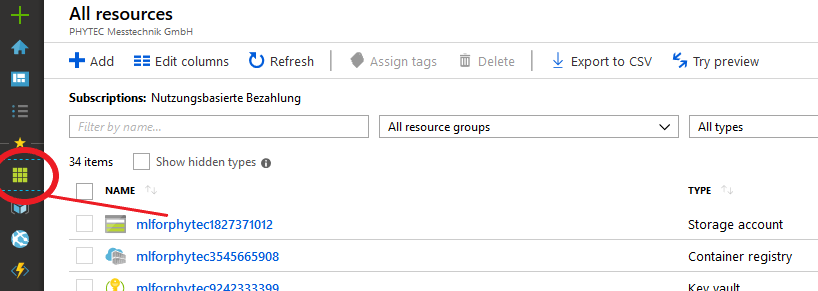
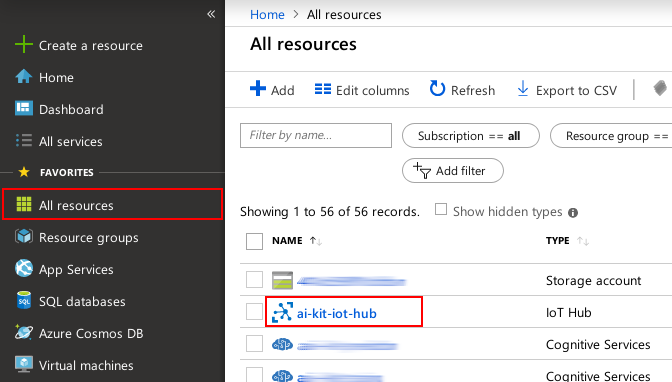
To link your data storage, you need the keys. Go to the Blob Storage via the "all resources button" and select your storage account (Figure 12).
Here you can access the key management which is needed to connect your kit to the Blob Storage. If you are deciding to further use PHYTEC hardware in your projects and will be including more than one module, we will realize the key handling via Trusted Platform Modules (TPM). TPM can refer to a standard for securely storing keys used to authenticate the platform, or it can refer to the I/O interface used to interact with the modules implementing the standard.
Setting up an IoT Edge Device
Adding IoT Edge Devices to the IoT Hub
- Select your IoT Hub in the portal.
- Select IoT Edge and Add an IoT Edge device.
- Provide a descriptive device ID. Use the default settings for auto-generating authentication keys and connecting the new device to your hub.
- Select Save.
The Azure Environment
Azure is a Microsoft cloud service with a multitude of software solutions. The Azure cloud offers everything from the storage of data, classic data analysis tools, and click&play deep learning solutions to own code embedding. You are not restricted to any specific software when writing your own code. Azure accepts many languages, frameworks, and tools such as Phyton, R, Spark, etc.
Microsoft offers more than 150 functions to analyze your data. To view all offered services we would link to the Microsoft services webpage.
The figure below shows a general overview of a data mining application that focuses on machine learning.
For the beginner, we suggest using the Azure ML studio. In the ML studio, machine learning features can be added via a graphical user interface. Data, stored in the Azure cloud, can be easily added during the model creation. Data scaling, model architecture, and output are optimized automatically.
For more experienced developers, we suggest implanting your own written code or external models. The code can be generated on one of several virtual machines which are optimized for different data analyst procedures such as machine or deep learning.
The Azure Cognitive Services offer pre-built AI solutions which can be used for quick and powerful AI implementations. One example is the kit's own implemented image recognition application, which was created using the Custom Vision service from Microsoft Azure.
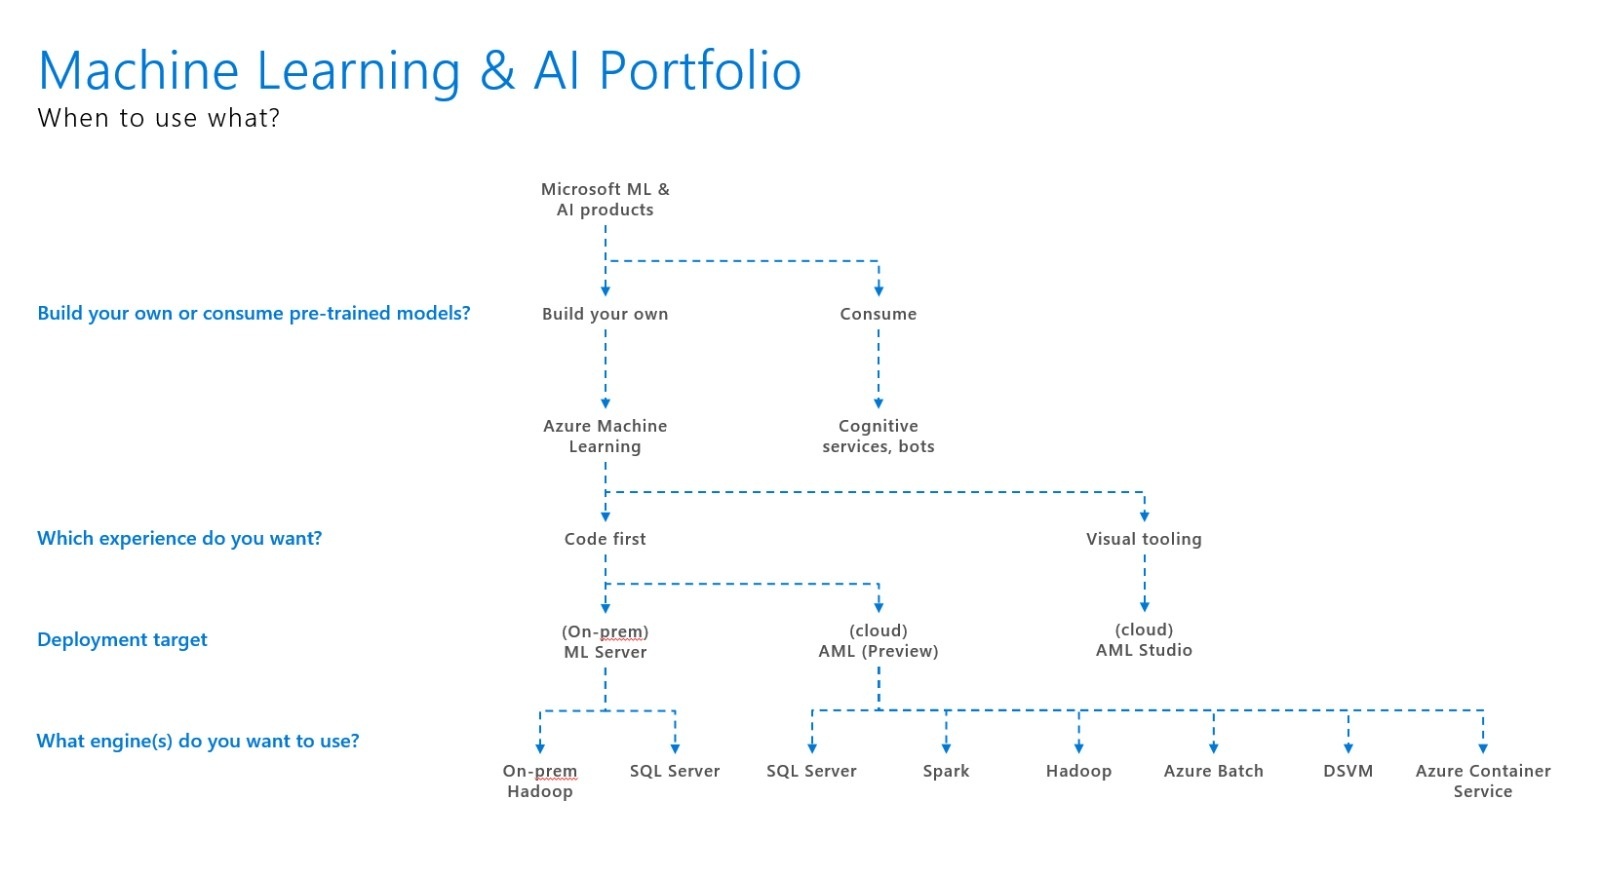
The figure below shows the possible paths based on your desired experience.
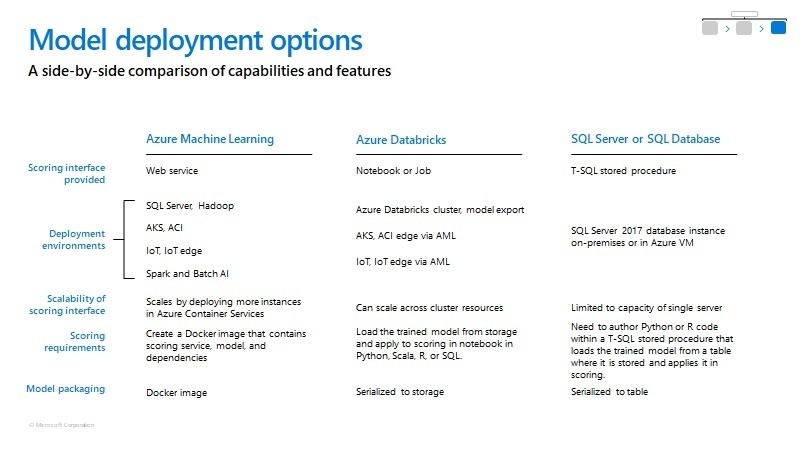
Your data analysis function or trained model can be deployed to several instances, from SQL servers to hardware deployment via IoT Edge. The deployed model can run self-sufficiently on the PHYTEC hardware and operate independently from a cloud service, reducing costs for bandwidth and virtual machine usage.
The figure below shows a graph with different options when using Azure machine learning, Apache Spark-based analytics Databricks, or SQL applications.
References
For more information, tutorials, and case studies, check out the following links:
- Github, Custom Vision + Azure IoT Edge on a Raspberry Pi 3, https://github.com/Azure-Samples/Custom-vision-service-iot-edge-raspberry-pi
- Microsoft, Tutorial: Perform image classification at the edge with Custom Vision Service, https://docs.microsoft.com/en-us/azure/iot-edge/tutorial-deploy-custom-vision
- Microsoft, Deploy Azure IoT Edge modules with Azure CLI, https://docs.microsoft.com/en-us/azure/iot-edge/how-to-deploy-modules-cli
- Microsoft, Learn how to deploy modules and establish routes in IoT Edge, https://docs.microsoft.com/en-us/azure/iot-edge/module-composition
- Microsoft, Properties of the IoT Edge agent and IoT Edge hub module twins, https://docs.microsoft.com/en-us/azure/iot-edge/module-edgeagent-edgehub
- Microsoft, Automate OS and framework patching with ACR Tasks, https://docs.microsoft.com/en-us/azure/container-registry/container-registry-tasks-overview
- Stack Exchange, Qt camera example doesn't work, https://stackoverflow.com/questions/37650773/qt-camera-example-doesnt-work
- Docker, Create a container, https://docs.docker.com/engine/api/v1.32/#operation/ContainerCreate
- Microsoft, Build in Azure with ACR Tasks, https://docs.microsoft.com/en-us/azure/container-registry/container-registry-tutorial-quick-task#build-in-azure-with-acr-tasks
- Azure pricing information, https://azure.microsoft.com/en-us/pricing/
- Link Office 356 to your Azure account, https://docs.microsoft.com/en-us/azure/billing/billing-use-existing-office-365-account-azure-subscription
- Setup Office 365 for your Business, https://docs.microsoft.com/en-us/office365/admin/setup/setup?view=o365-worldwide&tabs=BusPremium
- Install Azure IoT Edge runtime on Linux (ARM32v7/armhf), https://docs.microsoft.com/en-us/azure/iot-edge/how-to-install-iot-edge-linux-arm


