Gesamtbetrag:
zzgl. Mwst.
Hardware Manual - phyBOARD-i.MX 6UL/ULL (L-827e.A3)
Table of Contents
Preface
As a member of PHYTEC's phyCORE® product family the phyCORE‑i.MX6UL/ULL is one of a series of PHYTEC System on Modules (SOMs) that can be populated with different controllers and, hence, offers various functions and configurations. PHYTEC supports a variety of 8-/16- and 32-bit controllers in two ways:
- as the basis for Rapid Development Kits which serve as a reference and evaluation platform
- as insert-ready, fully functional phyCORE® OEM modules, which can be embedded directly into the user’s peripheral hardware design.
Implementation of an OEM-able SOM subassembly as the "core" of your embedded design allows you to focus on hardware peripherals and firmware without expending resources to "re-invent" microcontroller circuitry. Furthermore, much of the value of the phyCORE® module lies in its layout and test.
Production-ready Board Support Packages (BSPs) and Design Services for our hardware will further reduce your development time and risk and allow you to focus on your product expertise. Take advantage of Phytec products to shorten time-to-market, reduce development costs, and avoid substantial design issues and risks. With this new innovative full system solution, you will be able to bring your new ideas to market in the most timely and cost-efficient manner.
For more information go to:
http://www.phytec.de/de/leistungen/entwicklungsunterstuetzung.html
or
http://www.phytec.eu/europe/oem-integration/evaluation-start-up.html
Ordering Information
The part numbering of the phyCORE has the following structure:
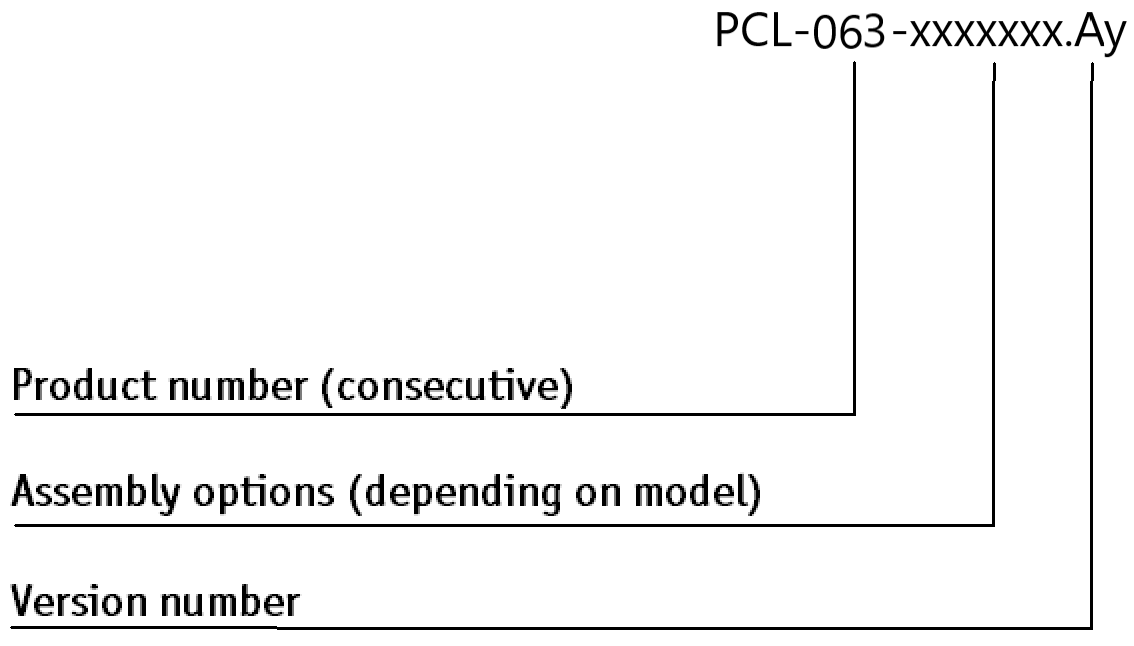
Assembly options include a choice of Controller; RAM (Size/Type); Size of NAND Flash, etc.; Interfaces available; Vanishing; Temperature Range; and other features. Please contact our sales team to get more information on the ordering options available.
Product Specific Information and Technical Support
In order to receive product-specific information on changes and updates in the best way also in the future, we recommend registering at:
http://www.phytec.de/support/registrierung.html or http://www.phytec.eu/europe/support/registration.html
For technical support and additional information concerning your product, please visit the download section of our website which provides product-specific information, such as errata sheets, application notes, FAQs, etc.
https://www.phytec.de/produkte/system-on-modules/phycore-imx-6-ul-ull/#downloads/
or
https://www.phytec.eu/en/produkte/system-on-modules/phycore-imx-6-ul-ull/?lang=en/#downloads/
Declaration of Electro Magnetic Conformity of the PHYTEC phyCORE®‑i.MX 6UL/ULL

PHYTEC System on Module (henceforth products) are designed for installation in electrical appliances or as dedicated Evaluation Boards (i.e.: for use as a test and prototype platform for hardware/software development) in laboratory environments.
Warning
PHYTEC products lacking protective enclosures are subject to damage by ESD and, therefore, must be unpacked, handled, or operated in environments in which sufficient precautionary measures have been taken with respect to ESD-dangers. Only appropriately trained personnel such as qualified electricians, technicians, and engineers should handle and/or operate these products. Moreover, PHYTEC products should not be operated without protection circuitry if connections to the product's pin header rows are longer than 3 m.
PHYTEC products fulfill the norms of the European Union’s Directive for Electro Magnetic Conformity in accordance with the descriptions and rules of usage indicated in this hardware manual (particularly in respect to the pin header row connectors, power connector, and serial interface to a host-PC).
Tip
Implementation of PHYTEC products into target devices, as well as user modifications and extensions of PHYTEC products, is subject to renewed establishment of conformity to and certification of Electro Magnetic Directives. Users should ensure conformance following any modifications to the products and implementing the products into target systems.
Product Change Management and Information Regarding Parts Populated on the SOM / SBC
With the purchase of a PHYTEC SOM / SBC you will, in addition to our hardware and software possibilities, receive free obsolescence maintenance service for the hardware we provide. Our PCM (Product Change Management) team of developers is continuously processing all incoming PCNs (Product Change Notifications) from vendors and distributors concerning parts that are used in our products. Possible impacts on the functionality of our products due to changes in functionality or obsolesce of certain parts are constantly being evaluated in order to take the suitable measures either in purchasing decisions or within our hardware/software design.
Our general philosophy here is: We never discontinue a product as long as there is a demand for it.
Therefore, we have established a set of methods to fulfill our philosophy:
Avoidance strategies:
- Avoid changes by evaluating the longevity of parts during the design-in phase.
- Ensure the availability of equivalent second source parts.
- Stay in close contact with part vendors to be aware of roadmap strategies.
Change management in the rare event of an obsolete and non-replaceable part:
- Ensure long-term availability by stocking parts through last-time buy management according to product forecasts.
- Offer long-term frame contracts to customers.
Change management in case of functional changes:
- Avoid impacts on product functionality by choosing equivalent replacement parts.
- Avoid impacts on product functionality by compensating for changes through hardware redesign or backward-compatible software maintenance.
- Provide early change notifications concerning functional, relevant changes to our products.
We refrain from providing detailed part-specific information within this manual, which can be subject to continuous changes, due to part maintenance for our products. In order to receive reliable, up-to-date, and detailed information concerning parts used for our product, please contact our support team through the contact information given within this manual.
PHYTEC Documentation
PHYTEC will provide a variety of hardware and software documentation for all of our products. This includes any or all of the following:
- Quickstart Guide: A short guide on how to set up and boot a phyCORE board along with brief information on building a BSP, the device tree, and accessing peripherals.
- Hardware Manual: A detailed description of the System on Module and accompanying carrier board.
- Yocto Guide: A comprehensive guide for the Yocto version the phyCORE uses. This guide contains an overview of Yocto; an introduction, installing and customizing the PHYTEC BSP; how to work with programs like Poky and Bitbake; and much more.
- BSP Manual: A manual specific to the BSP version of the phyCORE. Information such as how to build the BSP, booting, updating software, device tree, and accessing peripherals can be found here.
- Development Environment Guide: This guide shows how to work with the Virtual Machine (VM) Host PHYTEC has developed and prepared to run various Development Environments. There are detailed step-by-step instructions for Eclipse and Qt Creator, which are included in the VM. There are instructions for running demo projects for these programs on a phyCORE product as well. Information on how to build a Linux host PC yourself is also a part of this guide.
- Pin Muxing Table: phyCORE SOMs have an accompanying pin table (in Excel format). This table will show the complete default signal path, from processor to carrier board. The default device tree muxing option will also be included. This gives a developer all the information needed in one location to make muxing changes and design options when developing a specialized carrier board or adapting a PHYTEC phyCORE SOM to an application.
On top of these standard manuals and guides, PHYTEC will also provide Product Change Notifications, Application Notes, and Technical Notes. These will be done on a case-by-case basis. Most of the documentation can be found in the applicable download page of our products.
Tip
After finishing the Quickstart Guide, we recommend working through the Development Environment Guide. This will give you a comprehensive overview of the features and functions of both the SOM and carrier board.
Conventions, Abbreviations, and Acronyms
This hardware manual describes the PCM-063 System on Module in the following referred to as phyCORE®-i.MX 6UL/ULL. The manual specifies the phyCORE®-i.MX 6UL/ULL's design and function. Precise specifications for the NXP® Semiconductor i.MX 6UL/ULL microcontrollers can be found in the enclosed Microcontroller Data Sheet/User's Manual.
We refrain from providing detailed part-specific information within this manual, which can be subject to continuous changes, due to part maintenance for our products. Please read the paragraph "Product Change Management and information in this manual on parts populated on the SOM" within thePreface.
The BSP delivered with the phyCORE®-i.MX 6UL/ULL usually includes drivers and/or software for controlling all components such as interfaces, memory, etc. Therefore programming close to hardware at register level is not necessary in most cases. For this reason, this manual contains no detailed description of the controller's registers, or information relevant to software development. Please refer to the i.MX 6 UL/ULL Reference Manual, if such information is needed to connect customer-designed applications.
Conventions
The conventions used in this manual are as follows:
- Signals that are preceded by an "n", "/", or “#” character (e.g.: nRD, /RD, or #RD), or that have a dash on top of the signal name (e.g.: RD) are designated as active low signals. That is, their active state is when they are driven low or are driving low.
- A "0" indicates a logic zero or low-level signal, while a "1" represents a logic one or high-level signal.
- The hex numbers given for addresses of I2C devices always represent the 7 MSB of the address byte. The correct value of the LSB which depends on the desired command (read (1), or write (0)) must be added to get the complete address byte. E.g. given address in this manual 0x41 => complete address byte = 0x83 to read from the device and 0x82 to write to the device
- Tables that describe jumper settings show the default position in bold,bluetext.
- Text in blue indicates a hyperlink within, or external to the document. Click these links to quickly jump to the applicable URL, part, chapter, table, or figure.
References made to the phyCORE-Connector always refer to the high-density Samtec connector on the undersides of the phyCORE‑i.MX 6UL/ULL System on Module.
Types of Signals
Different types of signals are brought out at the phyCORE-Connector. The following table lists the abbreviations used to specify the type of a signal.
Signal Type | Description | Abbr. |
Power | Supply voltage input | PWR_I |
Ref-Voltage | Reference voltage output | REF_O |
Input | Digital input | I |
Output | Digital output | O |
IO | Bidirectional input/output | I/O |
OC-Bidir PU | Open collector input/output with pull up | OC-BI |
OC-Output | Open collector output without pull up requires an external pull up | OC |
5V Input PD | 5 V tolerant input with pull-down | 5V_PD |
LVDS Input | Differential line pairs 100 Ohm LVDS level input | LVDS_I |
LVDS Output | Differential line pairs 100 Ohm LVDS level output | LVDS_O |
TMDS Output | Differential line pairs 100 Ohm TMDS level output | TMDS_O |
USB IO | Differential line pairs 90 Ohm USB level bidirectional input/output | USB_I/O |
ETHERNET Input | Differential line pairs 100 Ohm Ethernet level input | ETH_I |
ETHERNET Output | Differential line pairs 100 Ohm Ethernet level output | ETH_O |
ETHERNET IO | Differential line pairs 100 Ohm Ethernet level bidirectional input/output | ETH_I/O |
PCIe Input | Differential line pairs 100 Ohm PCIe level input | PCIe_I |
PCIe Output | Differential line pairs 100 Ohm PCIe level output | PCIe_O |
MIPI CSI‑2 Input | Differential line pairs 100 Ohm MIPI CSI‑2 level input | CSI‑2_I |
Signal Types used in this Manual
Abbreviations and Acronyms
Many acronyms and abbreviations are used throughout this manual. Use the table below to navigate any unfamiliar terms used in this document.
| Abbreviation | Definition |
|---|---|
| BSP | Board Support Package (Software delivered with the Development Kit including an operating system (Windows, or Linux) preinstalled on the module and Development Tools) |
| CB | Carrier Board; used in reference to the phyCORE Development Kit Carrier Board |
| DFF | D flip-flop |
| EMB | External memory bus |
| EMI | Electromagnetic Interference |
| GPI | General-purpose input |
| GPIO | General-purpose input and output |
| GPO | General-purpose output |
| IRAM | Internal RAM; the internal static RAM on the NXP® Semiconductor i.MX6UL/ULL microcontroller |
| J | Solder jumpers; these types of jumpers require solder equipment to remove and place |
| JP | Solderless jumpers; these types of jumpers can be removed and placed by hand with no special tools |
| PCB | Printed circuit board |
| PDI | PHYTEC Display Interface; defined to connect PHYTEC display adapter boards, or custom adapters |
| PEB | PHYTEC Extension Board |
| PMIC | Power management IC |
| PoE | Power over Ethernet |
| POR | Power-on reset |
| RTC | Real-time clock |
| SMT | Surface mount technology |
| SOM | System on Module; used in reference to the PCL-063 / phyCORE®‑i.MX 6UL/ULL module |
| Sx | User button Sx (e.g. S1, S2, etc.) used in reference to the available user buttons, or DIP-Switches on the carrier board |
| Sx_y | Switch y of DIP-Switch Sx; used in reference to the DIP-Switch on the carrier board |
Abbreviations and Acronyms Used in this Manual
Introduction
The phyCORE‑i.MX 6UL/ULL belongs to Phytec’s phyCORE System on Module family. The phyCORE SOMs represent the continuous development of the PHYTEC System on Module technology. Like its mini-, micro-, and nanoMODUL predecessors, the phyCORE boards integrate all core elements of a microcontroller system on a subminiature board and are designed in a manner that ensures their easy expansion and embedding in peripheral hardware developments.
As independent research indicates that approximately 70 % of all EMI (Electro-Magnetic Interference) problems stem from insufficient supply voltage grounding of electronic components in high-frequency environments, the phyCORE board design features an increased pin package. The increased pin package allows dedication of approximately 20 % of all connector pins on the phyCORE boards to Ground. This improves EMI and EMC characteristics and makes it easier to design complex applications meeting EMI and EMC guidelines using phyCORE boards even in high-noise environments.
phyCORE boards achieve their small size through modern SMD technology and multi-layer design. In accordance with the complexity of the module, 0402-packaged SMD components and laser-drilled microvias are used on the boards, providing phyCORE users with access to this cutting-edge miniaturization technology for integration into their own design.
The phyCORE‑i.MX 6UL/ULL is a subminiature (35 mm x 35 mm) insert-ready System on Module populated with the NXP® Semiconductor i.MX 6UL/ULL microcontroller. Its universal design enables its insertion in a wide range of embedded applications. All controller signals and ports extend from the controller to the half-hole connector pitch (1 mm) aligning all four sides of the board, allowing it to be soldered like a "big chip" into a target application.
Precise specifications for the controller populating the board can be found in the applicable controller reference manual or datasheet. The descriptions in this manual are based on the NXP® Semiconductor i.MX 6UL/ULL. No description of compatible microcontroller derivative functions is included, as such functions are not relevant for the basic functioning of the phyCORE‑i.MX 6UL/ULL.
Features of the phyCORE-i.MX 6UL/ULL
The following list itemizes the full set of the phyCORE‑i.MX 6UL/ULL's features. However, the availability of a specific interface depends on the i.MX 6UL/ULL/ULL derivative (MCIMX6G0 to G3 and MCIMX6Y0 to Y2) populated, and the pin muxing configured in the BSP.
- Insert-ready, sub-miniature (35 mm x 35 mm) System on Module (SOM) subassembly in low EMI design, achieved through advanced SMD technology
- Populated with the NXP® Semiconductor i.MX 6UL/ULL microcontroller (MAPBGA 289 packaging)
- 528 MHz core clock frequency (up to 696 MHz)
- Boot from different memory devices (NAND Flash (standard))
- Controller signals and ports extend to half-hole connectors aligning all four sides of the board, enabling the phyCORE‑i.MX 6UL/ULL to be soldered like a "big chip" to the target application
- Single supply voltage of +3.3 V with on-board power management
- All controller-required supply voltages are generated onboard
- Improved interference safety achieved through multi-layer PCB technology and dedicated ground pins
128 MB (up to 2 GB[1]) DDR3 SDRAM
- 128 MB (up to 2 GB[1]) onboard NAND Flash
- 4 kB[1] I2C EEPROM
- 2x serial interfaces (TTL). One with 4 lines allowing simple hardware handshake
- 2x High-Speed USB OTG/host interfaces
- 2x 10/100 Mbit/s Ethernet interface. One with an Ethernet transceiver on the phyCORE‑i.MX 6UL/ULL allows for direct connection to an existing Ethernet network. Second one is available at the phyCORE-Connector with RMII signals at TTL‑level
- 1x I2C interface
- 1x SPI interface
- 1x I2S interface
- 1x SPDIF interface
- 1x PWM output
- 1x CAN interface
- 1x Parallel LCD interface (up to 24-bit)
- 1x parallel camera interface (10-bit)
- 1x SD/MMC card interfaces (4-bit)
1x JTAG interface[2]
- 1x user-programmable LED
Several dedicated GPIOs[3]
- Tamper detection (only available on processor type –G3)
- Available for different temperature grades (Product Temperature Grades)
| 1. | The maximum memory size listed is as of the printing of this manual. |
| 2. | The JTAG pins are used for other functions (SAI2 interface and SPDIF) within the included BSP. |
| 3. | Almost every controller port that connects directly to the phyCORE‑Connector |
Block Diagram

Block Diagram of the phyCORE‑i.MX 6UL/ULL
Note
The specified direction indicated refers to the standard phyCORE use of the pin.
phyCORE-i.MX 6UL/ULL Component Placement
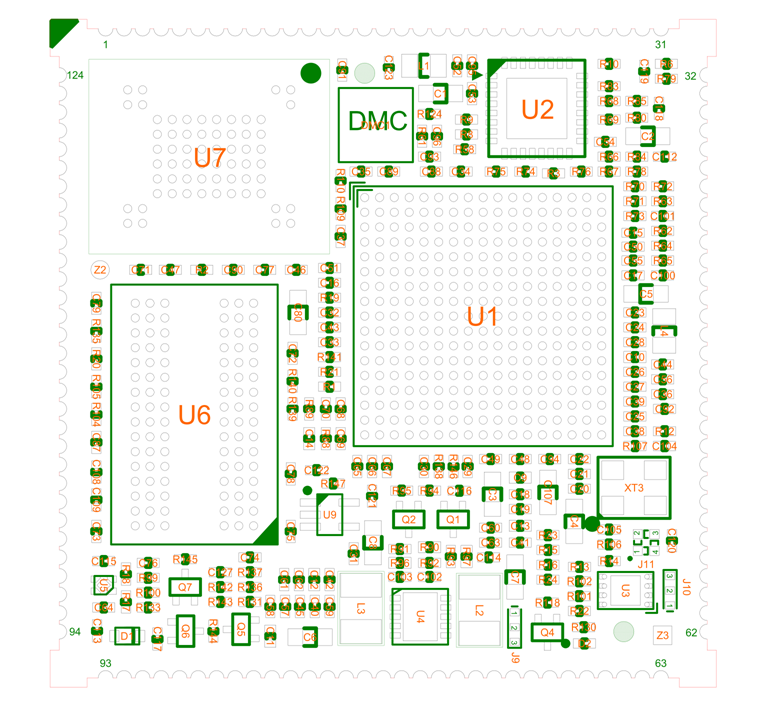
phyCORE‑i.MX 6UL/ULL Component Placement (top view)
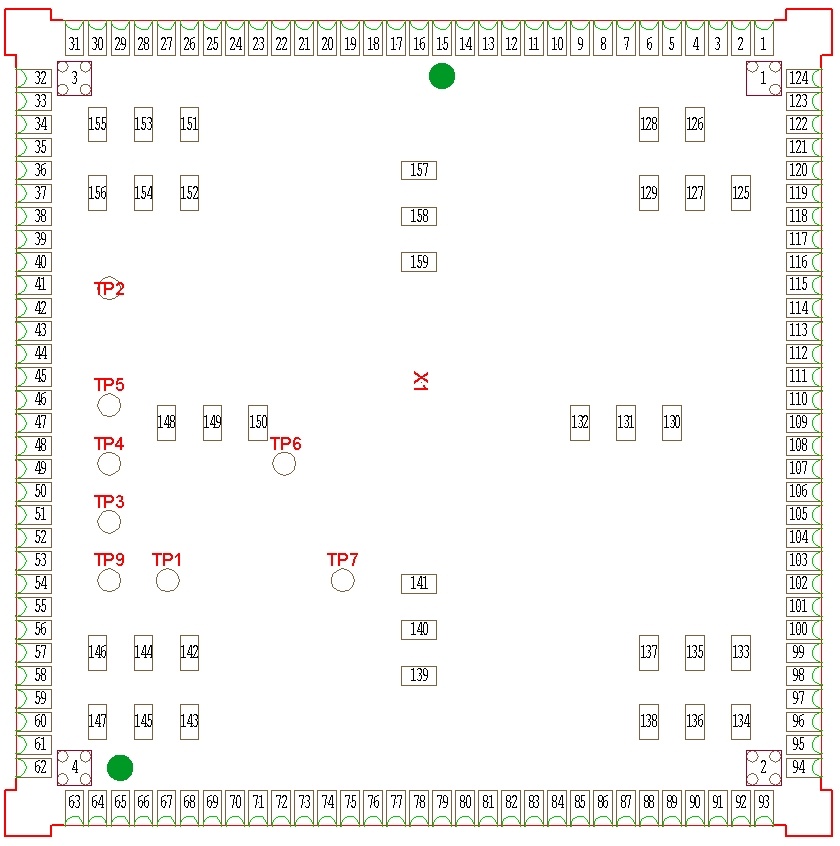
phyCORE‑i.MX 6UL/ULL Component Placement (bottom view)
Minimum Requirements to Operate the phyCORE-i.MX 6UL/ULL
The basic operation of the phyCORE‑i.MX 6UL/ULL only requires a supply of a +3.3 V input voltage and the corresponding GND connection. For information about the power consumption please refer to Primary System Power (VDD_3V3).
These supply pins are located at the phyCORE-Connector X1:
VDD_3V3: X1 90, 91, 92, 93
Connect all +3.3 V VCC input pins to your power supply and at least the matching number of GND pins.
Corresponding GND: X1 1, 32, 62, 89
Please refer to Pin Description for information on additional GND Pins located at the phyCORE-Connector X1.
Warning
We recommend connecting all available +3.3 V input pins to the power supply system on a custom carrier board housing the phyCORE‑i.MX 6UL/ULL and at least the matching number of GND pins.
In addition, proper implementation of the phyCORE‑i.MX 6UL/ULL module into a target application also requires connecting all GND pins.
Please refer to Power for more information.
Pin Description
Please note that all module connections are not to exceed their expressed maximum voltage or current. Maximum signal input values are indicated in the corresponding controller manuals/datasheets. As damage from improper connections varies according to use and application, it is the user's responsibility to take appropriate safety measures to ensure that the module connections are protected from overloading through connected peripherals.
As Pinout of the phyCORE-Connector (top view)indicates all controller signals selected extend to half-hole surface mount technology (SMT) connectors (1 mm pitch) lining all four sides of the module (referred to as phyCORE‑Connector). This allows the phyCORE‑i.MX 6UL/ULL to be soldered into any target application like a "big chip".
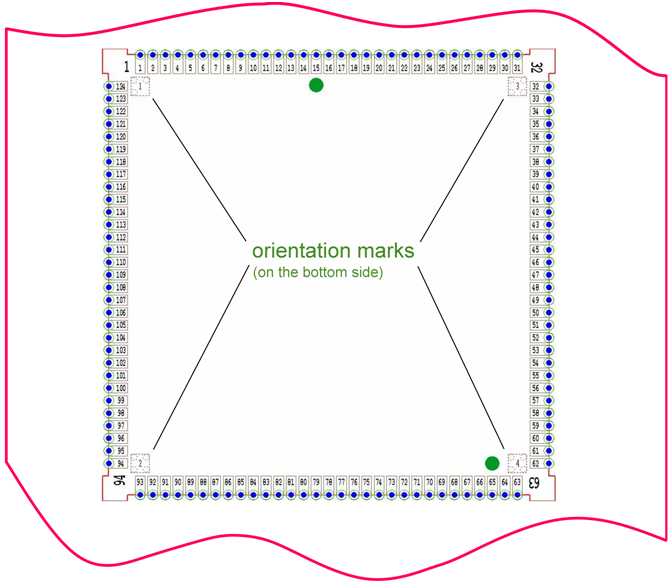
The pin numbering values for the phyCORE‑Connector increase moving around the board (Pinout of the phyCORE-Connector (top view)). Pin 1 is marked by the number 1 on the top and the bottom side, as well as by an orientation mark on the bottom side with only three pads (in contrast to the orientation marks with four pads in the other corners).
The numbering scheme of the phyCORE‑i.MX 6UL/ULL is always in relation to the PCB as viewed from above and can be aligned with the socket of the corresponding phyCORE Carrier Board/user target circuitry.
The numbering scheme is thus consistent for both the module’s phyCORE-Connector as well as the mating connector on the phyCORE Carrier Board or target hardware, thereby considerably reducing the risk of pin identification errors.
Since the pins are exactly defined according to the numbering scheme described above, the phyCORE-Connector is usually assigned a single designator for its position (X1 for example). In this manner, the phyCORE‑Connector comprises a single, logical unit regardless of the fact that it could consist of more than one physical connector.
Pinout of the phyCORE-Connector (Side 1), Pinout of the phyCORE-Connector (Side 2), Pinout of the phyCORE-Connector (Side 3), Pinout of the phyCORE-Connector (Side 4), and Pinout of the phyCORE-Connector (Pads) provides an overview of the pinout of the phyCORE-Connector X1 with signal names and descriptions specific to the phyCORE‑i.MX 6UL/ULL. It also provides the appropriate voltage domain, signal type (ST), and a functional grouping of the signals. The signal type includes also information about the signal direction[4]. A description of the signal types can be found in Types of Signals.
Pinout of the phyCORE-Connector (top view)
Warning
There was a change in the pin assignment in a former PCB revision as can be seen below. Only use the new pin-assignment corresponding to PCB-No. 1468.1 for your baseboard designs. For more information please refer to the product change notification LPN-228e_2.
Pin# | Previous pad-/signal name revision 1468.0 | Future pad-/signal name from revision 1468.1 on |
51 | NAND_CE1_B | SNVS_TAMPER9 (GPIO5_9) |
95 | GPIO1_2 | SNVS_TAMPER5 (GPIO5_5) |
74 | GPIO1_8 | GPIO1_8 default |
Important Changes of the Pin-Assignment
Warning
The NXP® Semiconductor i.MX 6UL/ULL is a multi-voltage operated microcontroller and as such special attention should be paid to the interface voltage levels to avoid unintentional damage to the microcontroller and other on-board components. Please refer to the NXP Semiconductor i.MX 6UL/ULL Reference Manual for details on the functions and features of controller signals and port pins.
As some of the signals which are brought out on the phyCORE-Connector are used to configure the boot mode for specific boot options, please make sure that these signals are not driven by any device on the baseboard during reset. The signals which may affect the boot configuration are shown inBoot Configuration Pins at the phyCORE‑Connector.
It is mandatory to avoid voltages at the IO pins of the phyCORE-i.MX 6UL/ULL which are sourced from the supply voltage of peripheral devices attached to the SOM during power-up, or power–down. These voltages can cause a current flow into the controller especially if peripheral devices attached to the interfaces of the i.MX 6UL/ULL are supposed to be powered while the phyCORE‑i.MX 6UL/ULL is in suspend mode or turned off. To avoid this the X_nRESET_OUT or X_PMIC_STBY_REQ signal (Switching Supply Voltages for External Logic) must be used to control the output enable of any driving peripheral components connected to the SOM. If the same voltage supply for the baseboard peripherals and the SOM is used (e.g. VCC3V3), there is no need to take care of unintended current flow into the SOM, since the voltages of the Peripherals and the SOM will be switched simultaneously.
Note
Most of the controller pins have multiple multiplexed functions. As most of these pins are connected directly to the phyCORE-Connector the alternative functions are available by using the i.MX 6UL/ULL's pin muxing options. Signal descriptions inPinout of the phyCORE-Connector (Side 1), Pinout of the phyCORE-Connector (Side 2), Pinout of the phyCORE-Connector (Side 3), Pinout of the phyCORE-Connector (Side 4), and Pinout of the phyCORE-Connector (Pads), however, are in regard to the specification of the phyCORE‑i.MX 6UL/ULL and the functions defined therein. Please refer to the MX 6UL/ULL Reference Manual, or the schematic to get to know about alternative functions. In order to utilize a specific pin's alternative function, the corresponding registers must be configured within the appropriate driver of the BSP.
The following tables describe the full set of signals available at the phyCORE‑Connector according to the phyCORE-i.MX 6UL/ULL specification. However, the availability of some interfaces (e.g. LCD) is controller-specific and therefore order-specific. Thus, some signals might not be available on your module.
If the phyCORE-i.MX 6UL/ULL is delivered with a carrier board (e.g. the phyBOARD‑Segin i.MX 6UL/ULL) the pin muxing might be changed within the appropriate BSP in order to support all features of the carrier board. If so, information on the differences from the pinout given in the following tables can be found in the carrier board's documentation.
Pin # | Signal (pad name) | ST | Voltage domain | Description | |
1. side | |||||
1 | GND | - | - | Ground 0 V | |
2 | X_CSI_VSYNC | I | VDD_3V3 | CSI vertical sync. | |
3 | X_CSI_HSYNC | I | VDD_3V3 | CSI horizontal sync. | |
4 | X_CSI_PIXCLK | I | VDD_3V3 | CSI pixel clock | |
5 | X_CSI_MCLK | O | VDD_3V3 | CSI master clock | |
6 | X_SD1_CLK | O | VDD_3V3 | uSDHC1 clock | |
7 | X_SD1_CMD | I/O | VDD_3V3 | uSDHC1 command | |
8 | X_SD1_D0 | I/O | VDD_3V3 | uSDHC1 data 0 | |
9 | X_SD1_D1 | I/O | VDD_3V3 | uSDHC1 data 1 | |
10 | X_SD1_D2 | I/O | VDD_3V3 | uSDHC1 data 2 | |
11 | X_SD1_D3 | I/O | VDD_3V3 | uSDHC1 data 2 | |
12 | X_ENET1_TX+ | ETH_O | VDD_3V3 | ETH1 data A+/transmit+ | |
13 | X_ENET1_TX- | ETH_O | VDD_3V3 | ETH1 data A-/transmit- | |
14 | X_ENET1_RX+ | ETH_I | VDD_3V3 | ETH1 data B+/receive+ | |
15 | X_ENET1_RX- | ETH_I | VDD_3V3 | ETH1 data B-/receive- | |
16 | X_ETH1_LED1 | I/O | VDD_3V3 | ETH1 SPEED /LED activity | |
17 | X_ETH1_LED0 | I/O | VDD_3V3 | ETH1 NWAYEN /LED link | |
18 | X_ENET_MDIO | I/O | VDD_3V3 | ETH2 management data I/O (MDIO) | |
19 | X_ENET_MDC | O | VDD_3V3 | ETH2 management data clock (MDC) | |
20 | X_LCD_ENABLE | O | VDD_3V3 | LCD enable | |
21 | X_LCD_CLK | O | VDD_3V3 | LCD clock | |
22 | X_LCD_VSYNC | O | VDD_3V3 | LCD vertical sync. | |
23 | X_LCD_RESET | O | VDD_3V3 | LCD reset | |
24 | X_LCD_HSYNC | O | VDD_3V3 | LCD horizontal sync. | |
25 | X_LCD_D0 | O | VDD_3V3 | LCD data 0[5] | |
26 | X_LCD_D1 | O | VDD_3V3 | LCD data 1[5] | |
27 | X_LCD_D2 | O | VDD_3V3 | LCD data2[5] | |
28 | X_LCD_D3 | O | VDD_3V3 | LCD data3[5] | |
29 | X_LCD_D4 | O | VDD_3V3 | LCD data4[5] | |
30 | X_LCD_D5 | O | VDD_3V3 | LCD data5[5] | |
31 | X_LCD_D6 | O | VDD_3V3 | LCD data6[5] | |
Pinout of the phyCORE-Connector (Side 1)
Pin # | Signal (pad name) | ST | Voltage domain | Description |
| 2. side | ||||
32 | GND | - | - | Ground 0 V |
33 | X_LCD_D7 | O | VDD_3V3 | LCD data7[5] |
34 | X_LCD_D8 | O | VDD_3V3 | LCD data8[5] |
35 | X_LCD_D9 | O | VDD_3V3 | LCD data9[5] |
36 | X_LCD_D10 | O | VDD_3V3 | LCD data 10[5] |
37 | X_LCD_D11 | O | VDD_3V3 | LCD data 11[5] |
38 | X_LCD_D12 | O | VDD_3V3 | LCD data 12[5] |
39 | X_LCD_D13 | O | VDD_3V3 | LCD data 13[5] |
40 | X_LCD_D14 | O | VDD_3V3 | LCD data 14[5] |
41 | X_LCD_D15 | O | VDD_3V3 | LCD data 15[5] |
42 | X_LCD_D16 | O | VDD_3V3 | LCD data 16[5] |
43 | X_LCD_D17 | O | VDD_3V3 | LCD data 17[5] |
44 | X_LCD_D18 | O | VDD_3V3 | uSDHC2 command, LCD data 18[5] |
45 | X_LCD_D19 | O | VDD_3V3 | uSDHC2 clock, LCD data 19[5] |
46 | X_LCD_D20 | O | VDD_3V3 | uSDHC2 data 0, LCD data 20[5] |
47 | X_LCD_D21 | O | VDD_3V3 | uSDHC2 data 1, LCD data 21[5] |
48 | X_LCD_D22 | O | VDD_3V3 | uSDHC2 data 2, LCD data 22[5] |
49 | X_LCD_D23 | O | VDD_3V3 | uSDHC2 data 3, LCD data 23[5] |
50 | X_CSI_FIELD | I | VDD_3V3 | CSI field / camera control |
51 | X_GPIO5_9 | I/O | VDD_SNVS | GPIO5_9[6] |
52 | X_ENET2_TX_D0 | O | VDD_3V3 | ETH2 RMII transmit data 0 |
53 | X_ENET2_TX_D1 | O | VDD_3V3 | ETH2 RMII transmit data 1 |
54 | X_ENET2_TX_EN | O | VDD_3V3 | ETH2 RMII transmit enable |
55 | X_ENET2_TX_CLK | O | VDD_3V3 | ETH2 RMII reference clock |
56 | X_ENET2_RX_D0 | I | VDD_3V3 | ETH2 RMII receive data 0 |
57 | X_ENET2_RX_D1 | I | VDD_3V3 | ETH2 RMII receive data 1 |
58 | X_ENET2_RX_ER | I | VDD_3V3 | ETH2 RMII receive error |
59 | X_ENET2_RX_EN | I | VDD_3V3 | ETH2 RMII receive enable |
60 | X_I2C1_SCL | I/O | VDD_3V3 | I2C1 clock |
61 | X_I2C1_SDA | I/O | VDD_3V3 | I2C1 data |
62 | GND | - | - | Ground 0 V |
Pinout of the phyCORE-Connector (Side 2)
Pin # | Signal (pad name) | ST | Voltage domain | Description |
Side 3 | ||||
63 | X_UART5_TX | O | VDD_3V3 | UART5 serial data transmit |
64 | X_UART5_RX | I | VDD_3V3 | UART5 serial data receive |
65 | X_USB_OTG1_D- | USB_I/O | i.MX 6UL internal | USB OTG1 data- |
66 | X_USB_OTG1_D+ | USB_I/O | i.MX 6UL internal | USB OTG1 data+ |
67 | X_USB_OTG1_VBUS | PWR_I | 5 V | USB OTG1 VBUS input |
68 | X_USB_OTG1_CHD_B | OC | i.MX 6UL internal | USB OTG1 charge detect |
69 | X_USB_OTG2_D- | USB_I/O | i.MX 6UL internal | USB OTG2 data- |
70 | X_USB_OTG2_D+ | USB_I/O | i.MX 6UL internal | USB OTG2 data+ |
71 | X_USB_OTG2_VBUS | PWR_I | 5 V | USB OTG2 VBUS input |
72 | X_CCM_CLK1_P | I/O | VDD_HIGH_CAP | Differential high-speed clock+ |
73 | X_CCM_CLK1_N | I/O | VDD_HIGH_CAP | Differential high-speed clock- |
74 | X_UART5_RTS_B | I | VDD_3V3 | UART5 serial request to send input (low active, usually used as CTS)8 |
75 | X_UART5_CTS_B | O | VDD_3V3 | UART5 serial clear to send output (low active, usually used as RTS) |
76 | X_USB_OTG2_ID | I | VDD_3V3 | USB OTG2 ID pin |
77 | X_PWM3_OUT | O | VDD_3V3 | PWM3 output |
78 | X_GPIO1_3 | I | VDD_3V3 | ADC1_IN3 input |
79 | X_JTAG_TDI/SAI2_TX_BCLK | O | VDD_3V3 | SAI2[7]transmit bit clock |
80 | X_JTAG_TCK/SAI2_RXD | I | VDD_3V3 | SAI2[7] receive data |
81 | X_JTAG_MOD | O | VDD_3V3 | SPDIF output line signal |
82 | X_JTAG_TDO/SAI2_TX_SYNC | O | VDD_3V3 | SAI2[7] transmit frame sync |
83 | X_JTAG_TMS/SAI2_MCLK | O | VDD_3V3 | SAI2[7] master clock |
84 | X_nJTAG_TRST_B/SAI2_TXD | O | VDD_3V3 | SAI2[7] transmit data |
85 | X_GPIO5_3 | I | VDD_SNVS | GPIO5_3 |
86 | X_GPIO5_2 | O | VDD_SNVS | GPIO5_2 (CAN enable) |
87 | X_GPIO5_1 | I | VDD_SNVS | GPIO5_1 |
88 | X_GPIO5_0 | I | VDD_SNVS | GPIO5_0 |
89 | GND | - | - | Ground 0 V |
90 | VDD_3V3 | PWR_I | 3.3 V | 3.3 V primary voltage supply input |
91 | VDD_3V3 | PWR_I | 3.3 V | 3.3 V primary voltage supply input |
92 | VDD_3V3 | PWR_I | 3.3 V | 3.3 V primary voltage supply input |
93 | VDD_3V3 | PWR_I | 3.3 V | 3.3 V primary voltage supply input |
Pinout of the phyCORE-Connector (Side 3)
Pin # | Signal (pad name) | ST | Voltage domain | Description |
Side 4 | ||||
94 | VDD_SNVS | PWR_I | 3.3 V | Backup voltage supply input[8] |
95 | X_GPIO5_5 | I/O | VDD_3V3 | GPIO5_5[6] |
96 | X_GPIO1_1 | I/O | VDD_3V3 | GPIO1_1 |
97 | X_USB_OTG1_ID | I | VDD_3V3 | USB OTG1 ID pin |
98 | X_nRESET_OUT | O | VDD_SNVS | Reset output (low active) |
99 | X_ONOFF | I | VDD_SNVS | i.MX 6UL/ULL ONOFF (Button) input |
100 | X_nRESET_IN | I | VDD_3V3 | Reset input (low active) |
101 | X_SNVS_PMIC_ON_REQ | O | VDD_SNVS | PMIC On Request |
102 | X_PMIC_STBY_REQ | O | VDD_SNVS | PMIC Standby Request |
103 | X_BOOT_MODE1 | I | VDD_SNVS | Boot mode input 1 |
104 | X_BOOT_MODE0 | I | VDD_SNVS | Boot mode input 0 |
105 | X_UART1_RX | I | VDD_3V3 | UART1 serial data receive |
106 | X_GPIO1_18 | O | VDD_3V3 | GPIO1_18 |
107 | X_UART1_TX | O | VDD_3V3 | UART1 serial data transmit |
108 | X_nSD1_CD | I | VDD_3V3 | SD1 card detect (low active) |
109 | X_ECSPI3_CLK | I/O | VDD_3V3 | ECSPI3 clock |
110 | X_ECSPI3_MOSI | I/O | VDD_3V3 | ECSPI3 master output / slave input |
111 | X_ECSPI3_SS0 | I/O | VDD_3V3 | ECSPI3 chip select 0 |
112 | X_ECSPI3_MISO | I/O | VDD_3V3 | ECSPI3 master input / slave output |
113 | X_FLEXCAN1_RX | I | VDD_3V3 | FLEXCAN1 receive |
114 | X_FLEXCAN1_TX | O | VDD_3V3 | FLEXCAN1 transmit |
115 | X_CSI_D0 | I | VDD_3V3 | CSI data 0 |
116 | X_CSI_D1 | I | VDD_3V3 | CSI data 1 |
117 | X_CSI_D2 | I | VDD_3V3 | CSI data 2 |
118 | X_CSI_D3 | I | VDD_3V3 | CSI data 3 |
119 | X_CSI_D4 | I | VDD_3V3 | CSI data 4 |
120 | X_CSI_D5 | I | VDD_3V3 | CSI data 5 |
121 | X_CSI_D6 | I | VDD_3V3 | CSI data 6 |
122 | X_CSI_D7 | I | VDD_3V3 | CSI data 7 |
123 | X_CSI_D8 | I | VDD_3V3 | CSI data 8 |
124 | X_CSI_D9 | I | VDD_3V3 | CSI data 9 |
Pinout of the phyCORE-Connector (Side 4)
Pin # | Signal (pad name) | ST | Voltage domain | Description |
| Pads on the bottom side | ||||
125 | GND | - | - | Ground 0 V |
126 | GND | - | - | Ground 0 V |
127 | GND | - | - | Ground 0 V |
128 | GND | - | - | Ground 0 V |
129 | GND | - | - | Ground 0 V |
130 | GND | - | - | Ground 0 V |
131 | GND | - | - | Ground 0 V |
132 | GND | - | - | Ground 0 V |
133 | GND | - | - | Ground 0 V |
134 | GND | - | - | Ground 0 V |
135 | GND | - | - | Ground 0 V |
136 | GND | - | - | Ground 0 V |
137 | GND | - | - | Ground 0 V |
138 | GND | - | - | Ground 0 V |
139 | GND | - | - | Ground 0 V |
140 | RTC_XTALI | analog | VDD_SNVS_CAP | RTC XTALI |
141 | RTC_XTALO | analog | VDD_SNVS_CAP | RTC XTALO |
142 | GND | - | - | Ground 0 V |
143 | GND | - | - | Ground 0 V |
144 | GND | - | - | Ground 0 V |
145 | GND | - | - | Ground 0 V |
146 | GND | - | - | Ground 0 V |
147 | GND | - | - | Ground 0 V |
148 | GND | - | - | Ground 0 V |
149 | GND | - | - | Ground 0 V |
150 | GND | - | - | Ground 0 V |
151 | GND | - | - | Ground 0 V |
152 | GND | - | - | Ground 0 V |
153 | GND | - | - | Ground 0 V |
154 | GND | - | - | Ground 0 V |
155 | GND | - | - | Ground 0 V |
156 | GND | - | - | Ground 0 V |
157 | GND | - | - | Ground 0 V |
158 | GND | - | - | Ground 0 V |
159 | GND | - | - | Ground 0 V |
Pinout of the phyCORE-Connector (Pads)
| 4. | The specified direction indicated refers to the pins' use |
| 5. | Supplies VDD_SNVS_IN and is also supplied |
| 6. | Caution! The function of this pin changed from PCB revision 1468.0 to 1468.1. |
| 7. | Synchronous Audio Interface (SAI) |
| 8. | Supplies VDD_SNVS_IN and is also supplied by |
Jumpers
For configuration purposes, the phyCORE‑i.MX 6UL/ULL has several solder jumpers, some of which have been installed prior to delivery. Typical Jumper Pad Numbering Scheme illustrates the numbering of the solder jumper pads, while Jumper Locations (top view) indicates the location and the default configuration of the solder jumpers on the board.
Jumper Settings provides a functional summary of the solder jumpers which can be changed to adapt the phyCORE‑i.MX 6UL/ULL to your needs. It shows their default positions, and possible alternative positions and functions. A detailed description of each solder jumper can be found in the applicable chapter listed in the table.
Jumpers not listed should not be changed as they are installed with regard to the configuration of the phyCORE‑i.MX 6UL/ULL.
Typical Jumper Pad Numbering Scheme
If manual jumper modification is required, please ensure that the board, as well as surrounding components and sockets, remain undamaged while desoldering. Overheating the board can cause the solder pads to loosen, rendering the module inoperable. If soldered jumpers need to be removed, the use of a desoldering pump, desoldering braid, an infrared desoldering station, desoldering tweezers, hot air rework station, or other desoldering method is strongly recommended. Follow the instructions carefully for whatever method of removal is used.
Warning
If any modifications to the module are performed, regardless of their nature, the manufacturer guarantee is null and void.

Jumper Locations (top view)
Please pay special attention to the “TYPE” column to ensure you are using the correct type of jumper (0 Ohms, 10k Ohms, etc…). The jumpers are 0402 packages with a 1/8 W or better power rating. The jumpers (J = solder jumper) have the following functions:
Jumper | Description | Type | Section |
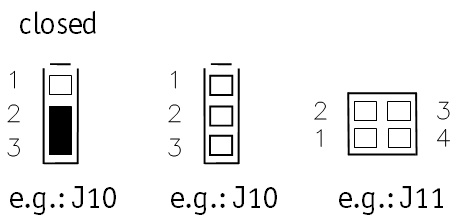
J10 | J10 configures the chip to enable signal E1 of the serial memory at U3. In the high-nibble of the address, I2C memory devices have the slave ID 0x5. The low nibble of the address for the memory area, as well as for the additional ID page is defined with the chip enable signals E2, E1, E0, and the R/W bit. |
| EEPROM Write Protection Control (R102) |
2+3 | E0 = 0, E1 = 1, E2= 0, => 0x2 / 0x3 (W/R) are selected as the low-nibble of the EEPROM's address | ||
1+2 | E0 = 0, E1 = 0, E2= 0, => 0x0 / 0x1 (W/R) | ||
J11 | J11 selects the signals which are connected to phyCORE-Connector pin 74 and to USER_LED. It is changeable for the G3 controller version where GPIO5_4 can not be used as GPIO. |
| Universal Asynchronous Interface and User LED |
1+4, 2+3 | Pin 74 = GPIO1_8 (UART5_RTS_B) | ||
1+2, 3+4 | Pin 74 = SNVS_TAMPER4 (GPIO5_4) |
Jumper Settings
Power
The phyCORE‑i.MX 6UL/ULL operates off of a single power supply voltage.
The following sections discuss the primary power pins on the phyCORE‑Connector X1 in detail.
Primary System Power (VDD_3V3)
The phyCORE‑i.MX 6UL/ULL operates off of primary voltage supply with a nominal value of +3.3 V. On-board switching regulators generate the DDR3L voltage 1.35 V and the core voltage 1.4 V which is switchable to 1.3 V or 0.925 V for power saving reasons.
For proper operation the phyCORE‑i.MX 6UL/ULL must be supplied with a voltage source of 3.3 V ±5 % connected to the VCC pins of phyCORE-Connector X1.
VDD_3V3: X1 90, 91, 92, 93
Connect all +3.3 V VCC input pins to your power supply and at least the matching number of GND pins.
Corresponding GND: X1 1, 32, 62, 89
Please refer to Pin Description for information on additional GND Pins located at the phyCORE‑Connector X1.
Scenario | Mean | Peak | Mean Power |
1) During boot | 290 mA | ||
2) Idle-mode in Linux without ETH | 132 mA | 170 mA | 0.436 W |
3) Idle-mode in Linux with ETH | 156 mA | 190 mA | 0.515 W |
4) Idle with following 100 % CPU load without ETH | 214 mA | ||
5) 100 % CPU load without EHT | 175 mA | 214 mA | 0.578 W |
6) 100 % CPU load with ETH | 199 mA | 234 mA | 0.657 W |
7) Full load with several tasks | 290 mA | 345 mA | 0.957 W |
8) Suspend mem without ETH | 43 mA | 72 mA | 0.142 W |
9) Suspend mem with ETH | 49 mA | 78 mA | 0.162 W |
10) Suspend standby with ETH | 60 mA | 90 mA | 0.198 W |
11) Suspend freeze with ETH | 98 mA | 126 mA | 0.323 W |
Current Consumption
The above values are to be seen as an orientation for dimensioning the power supply of the SOM. In order to ensure the proper functionality of the SOM, we recommend that the power supply is design to provide approximately 20 % higher currents. We also recommend that the final application is revalidated in regards to adequate current supply using application-specific use case scenarios.
Warning
As a general design rule, we recommend connecting all GND pins neighboring signals which are being used in the application circuitry. For maximum EMI performance, all GND pins should be connected to a solid ground plane.
Voltage Regulator (U4)
The phyCORE-i.MX 6UL/ULL provides an on-board dual output step-down DC-to-DC converter at position U4 to generate two voltages required by the microcontroller and the on-board components.
Power Domains
External voltages:
| VDD_3V3 | 3 V main supply voltage |
| X_USB_OTG1_VBUS | USB1 Bus voltage must be supplied with 5 V if USB1 is used |
| X_USB_OTG2_VBUS | USB2 Bus voltage must be supplied with 5 V if USB2 is used |
| VDD_SNVS | Backup supply (isolated from VDD_3V3 by diode D1) |
Internally generated voltages: VDD_ARM_SOC (1.4 V, 1.3 V, 0.925) and VDD_DDR3_1V35 (1.35 V).
| VDD_ARM_SOC | i.MX 6UL/ULL Core and SOC voltage is switchable from 1.4 V to 1.3 V and 0.925 V |
| VDD_DDR3_1V35 (1.35 V) | i.MX 6UL/ULL DDR interface (NVCC_DRAM), RAM devices 1.3 V and 0.925 V |
| VDD_SNVS (3.3 V) | i.MX 6UL/ULL backup supply (isolated from VDD_3V3 over by |
| VDD_3V3 (3.3 V) | i.MX 6UL/ULL pad supply (VDD_HIGH_IN, VDD_ADC_3P3NVCC, ADC_VREFH, NVCC_UART, NVCC_NAND, NVCC_SD1, NVCC_GPIO, NVCC_LCD, NVCC_CSI, NVCC_ENET), Voltage supervisor, I2C EEPROM, NAND Flash, Ethernet PHY |
Switching Supply Voltages for External Logic
The phyCORE’s logic circuitry is directly supplied from the module's main input voltage VDD_3V3 (3.3 V). If the external components on a customer baseboard are supplied with the same 3.3 V source as the module, there is no need for special power-up or power-down sequences. Otherwise, it is mandatory for the i.MX 6UL/ULL that external devices are supplied later than the module itself. Please use signal X_PMIC_STBY_REQ or X_RESET_OUT which is brought out at pin 102 on the phyCORE connector X1 to switch supply voltages on a carrier board. Use of X_PMIC_STBY_REQ or X_RESET_OUT ensures that external components are only supplied when the supply voltages of the i.MX 6UL/ULL are stable.
That way, voltages at the IO pins of the phyCORE-i.MX 6UL/ULL which are sourced from the supply voltage of peripheral devices attached to the SOM are avoided. These voltages can cause a current flow into the controller especially if peripheral devices attached to the interfaces of the i.MX 6UL/ULL are supposed to be powered while the phyCORE‑i.MX 6UL/ULL is in suspend mode or turned off. The bus switches' output enable to the SOM can be controlled by signals X_PMIC_STBY_REQ or X_RESET_OUT to prevent these voltages from occurring.
Use of level shifters supplied with voltages switched by the signals X_PMIC_STBY_REQ, or X_RESET_OUT allows converting the signals according to the needs of the custom target hardware. Alternatively, signals can be connected to an open drain circuitry with a pull-up resistor attached to VDD_3V3.
Backup Power (VDD_SNVS)
To back up the i.MX 6UL/ULL's low power domain (SNVS_LP) and its RTC, a secondary voltage source of 2.4 V to 3.6 V can be attached to the phyCORE‑i.MX 6UL/ULL at pin 94 of X1. VDD_SNVS is supplied by VDD_3V3 over diode D1 to if no backup supply is available. If a backup supply is connected to pin 94 of X1 diode D1 ensures that only VDD_SNVS_IN is supplied when the primary system power (VDD_3V3) is removed.
Note
If a non-rechargeable source is used a diode should be placed in the VDD_SNVS path on the carrier board!
Reset
Pin 98 at X1 on the phyCORE‑Connector is designated as reset output. Pin 100 at X1 on the phyCORE‑Connector is designated as a reset input.
The reset input signal X_nRESET_IN is connected to the voltage supervisor U5 on the phyCORE module. This device monitors the VDD_3V3 input voltage and reacts to other reset triggers, e.g. of an external button, too. The reset delay time is typ. 200 ms.
The reset output signal X_nRESET_OUT is brought out to allow resetting devices on the carrier board. Please consider that the X_nRESET_OUT is not affected by a software reset. In the case that an additional software triggered reset is required we recommend the usage of an available SOM GPIO.
System Configuration and Booting
Although most features of the i.MX 6UL/ULL microcontroller are configured and/or programmed during the initialization routine, other features, which impact program execution, must be configured prior to initialization via pin termination.
The system start-up configuration includes:
- Boot mode selection
- Boot device selection
- Boot device configuration
The internal ROM code is the first code executed during the initialization process of the i.MX 6UL/ULL after POR. The ROM code detects the boot mode by using the boot mode pins (BOOT_MODE[1:0]), while the boot device is selected and configured by determining the state of the eFUSEs and/or the corresponding GPIO input pins (BOOT_CFGx[7:0]).
Boot Mode Selection
The boot mode of the i.MX 6UL/ULL microcontroller is determined by the configuration of two boot mode inputs BOOT_MODE[1:0] during the reset cycle of the operational system. These inputs are brought out at the phyCORE‑Connector X1 X_BOOT_MODE[1:0] (pins 103 and 104).
The table below shows the possible settings of pins X_BOOT_MODE0 (X1 pin 104) and X_ BOOT_MODE1 (X1 pin 103) and the resulting boot configuration of the i.MX 6UL/ULL.
Boot Mode | X_ BOOT_MODE1 | X_ BOOT_MODE0 | Boot Source |
0 | 0 | 0 | Bootconfig from eFUSEs |
1 | 0 | 1 | Serial Downloader |
2 | 1 | 0 | Internal Boot[9] |
3 | 1 | 1 | reserved |
Boot Modes of the phyCORE‑i.MX 6UL/ULL
The BOOT_MODE[1:0] lines have 4.7 kΩ pull‑up and 10 kΩ pull-down resistors populated on the module. Hence leaving the two pins unconnected sets the controller to boot mode 2, internal boot.
For serial boot (boot mode = 1) the ROM code polls the communication interface selected, initiates the download of the code into the internal RAM, and triggers its execution from there. Please refer to the i.MX 6UL/ULL Reference Manual for more information.
In boot mode 0 and 2, the ROM code finds the bootstrap in permanent memories such as NAND-Flash or SD-Cards and executes it. The selection of the boot device and the configuration of the interface required are accomplished with the help of the eFUSEs and/or the corresponding GPIO input pins.
| 9. | Default boot mode when pins X_BOOT_MODE[1:0] are left unconnected. |
Boot Device Selection and Configuration
In normal operation (boot mode 0, or 2), the boot ROM uses the state of BOOT_MODE and eFUSEs to determine the boot device.
During development, it is advisable to set the boot type to “Internal boot” (BOOT_MODE[1:0]=1012 to allow choosing and configuring the boot device by using GPIO pin inputs. The input pins are sampled at boot, and override the values of the corresponding eFUSEs BOOT_CFGx[7:0] if the BT_FUSE_SEL fuse is not blown.
Boot Configuration Pins at the phyCORE‑Connector lists the eFUSEs BOOT_CFGx[7:0] and the corresponding input pins.
Warning
The boot mode configuration resistors must be placed on the carrier board for development! Later on, if the eFUSEs are used, the resistors can be unpopulated. Boot Configuration Pins at the phyCORE‑Connector lists the eFUSEs BOOT_CFGx[7:0] and the corresponding input pins. Use 10 kΩ pull‑up and pull-down resistors on the carrier board to configure eFUSEs BOOT_CFGx[7:0] in accordance with the module features. Options for the Boot Configuration shows some available options for the boot configuration.
Please make sure that the signals shown in Boot Configuration Pins at the phyCORE‑Connector are not driven by any device on the baseboard during reset, to avoid accidental change of the boot configuration. Because of this, we recommend booting from eFUSE for volume production and using only the internal boot mode for the development process[10].
Please refer to the i.MX 6UL/ULL Reference Manual for further information about the eFUSEs and the impact of the settings at the BCFG pins.
Configuration Pin | Pin # | Signal | ST | SL | Description |
BCFG1[0] | 25 | X_LCD_D0 | I | 3.3 V | LCD_DATA_00 |
BCFG1[1] | 26 | X_LCD_D1 | I | 3.3 V | LCD_DATA_01 |
BCFG1[2] | 27 | X_LCD_D2 | I | 3.3 V | LCD_DATA_02 |
BCFG1[3] | 28 | X_LCD_D3 | I | 3.3 V | LCD_DATA_03 |
BCFG1[4] | 29 | X_LCD_D4 | I | 3.3 V | LCD_DATA_04 |
BCFG1[5] | 30 | X_LCD_D5 | I | 3.3 V | LCD_DATA_05 |
BCFG1[6] | 31 | X_LCD_D6 | I | 3.3 V | LCD_DATA_06 |
BCFG1[7] | 33 | X_LCD_D7 | I | 3.3 V | LCD_DATA_07 |
BCFG2[0] | 34 | X_LCD_D8 | I | 3.3 V | LCD_DATA_08 |
BCFG2[1] | 35 | X_LCD_D9 | I | 3.3 V | LCD_DATA_09 |
BCFG2[2] | 36 | X_LCD_D10 | I | 3.3 V | LCD_DATA_10 |
BCFG2[3] | 37 | X_LCD_D11 | I | 3.3 V | LCD_DATA_11 |
BCFG2[4] | 38 | X_LCD_D12 | I | 3.3 V | LCD_DATA_12 |
BCFG2[5] | 39 | X_LCD_D13 | I | 3.3 V | LCD_DATA_13 |
BCFG2[6] | 40 | X_LCD_D14 | I | 3.3 V | LCD_DATA_14 |
BCFG2[7] | 41 | X_LCD_D15 | I | 3.3 V | LCD_DATA_15 |
BCFG4[0] | 42 | X_LCD_D16 | I | 3.3 V | LCD_DATA_16 |
BCFG4[1] | 43 | X_LCD_D17 | I | 3.3 V | LCD_DATA_17 |
BCFG4[2] | 44 | X_LCD_D18 | I | 3.3 V | LCD_DATA_18 |
BCFG4[3] | 45 | X_LCD_D19 | I | 3.3 V | LCD_DATA_19 |
BCFG4[4] | 46 | X_LCD_D20 | I | 3.3 V | LCD_DATA_20 |
BCFG4[5] | 47 | X_LCD_D21 | I | 3.3 V | LCD_DATA_21 |
BCFG4[6] | 48 | X_LCD_D22 | I | 3.3 V | LCD_DATA_22 |
BCFG4[7] | 49 | X_LCD_D23 | I | 3.3 V | LCD_DATA_23 |
Boot Configuration Pins at the phyCORE‑Connector
Boot Configuration | BCFG1 [7:0] | BCFG2 [7:0] | BCFG4 [7:0] |
NAND 1Gb (64 pages p. block, 4 address bytes) | 10010010 | 00000000 | 00000000 |
NAND 2/4Gb (64 pages p. block, 5 address bytes) | 10010011 | 00000000 | 00000000 |
eMMC (usdhc 2 interface) | 01100000 | 01001000 | 00000000 |
SD-Card (usdhc 1 interface) | 01000010 | 00100000 | 00000000 |
Options for the Boot Configuration
| 10. | For series production, PHYTEC offers to order the phyCORE‑i.MX 6UL/ULL |
System Memory
The phyCORE‑i.MX 6UL/ULL provides three types of on-board memory:
DDR3 SDRAM: 128 GB DDR3 SDRAM (up to 2 GB) [1]
- NAND Flash: 128 MB (up to 2 GB)[1]
- I²C-EEPROM: 4 k[1]
- eMMC (optional): 4 GB ≤
The following sections detail each memory type used on the phyCORE‑i.MX 6UL/ULL.
| 1. | The maximum memory size listed is as of the printing of this manual. |
DDR3-SDRAM (U6)
The RAM memory of the phyCORE‑i.MX 6UL/ULL is comprised of one 16-bit wide DDR3-SDRAM chip (U6). The chip is connected to the special DDR interface called Multi-Mode DDR Controller (MMDC) of the i.MX 6UL/ULL microcontroller.
The DDR3 memory is accessible starting at address 0x8000 0000.
Typically the DDR3-SDRAM initialization is performed by a boot loader or operating system following a power-on reset and must not be changed at a later point by any application code. When writing custom code independent of an operating system or boot loader, the SDRAM must be initialized by accessing the appropriate SDRAM configuration registers on the i.MX 6UL/ULL controller. Refer to the i.MX 6UL/ULL Reference Manual for accessing and configuring these registers.
NAND Flash Memory (U7)
Use of Flash as non-volatile memory on the phyCORE‑i.MX 6UL/ULL provides an easily reprogrammable means of code storage.
The NAND Flash memory at U7 is connected to the General Purpose Media Interface (GPMI).
The Flash devices are programmable with 3.3 V. No dedicated programming voltage is required.
As of the printing of this manual these NAND Flash devices generally have a life expectancy of at least 100,000 erase/program cycles and a data retention rate of 10 years.
Any parts that are footprint (VFBGA-N63) and functionally compatible may be used with the phyCORE-i.MX 6UL/ULL.
I2C EEPROM (U3)
The phyCORE‑i.MX 6UL/ULL is populated with a non-volatile 4 kB I2C[11]EEPROM at U3. This memory can be used to store configuration data or other general-purpose data. This device is accessed through I2C port 1 on the i.MX 6UL/ULL. The control registers for I2C port 1 are mapped between addresses 0x021A 0000 and 0x021A 3FFF. Please see the i.MX 6UL/ULL Reference Manual for detailed information on the registers.
One solder jumper J10 is provided to configure chip enable signal E1 which allows changing the address for the memory area, as well as for the additional ID page. Refer to Configuring Chip Enable Signal E1 (J10) for details on setting this jumper.
Write protection to the device is accomplished by a high level on signal Write Control when resistor R102 is removed. If resistor R101 is mounted write protection can also be changed by the EEPROM_WP signal[12](GPIO5_06). Refer to Configuring Chip Enable Signal E1 (J10) for further details.
| 11. | See the manufacturer’s datasheet for interfacing and operation. |
| 12. | This feature is not available if the phyCORE-i.MX 6UL/ULL is |
Configuring Chip Enable Signal E1 (J10)
The 4 kB I²C EEPROM populating U3 on the phyCORE-i.MX 6UL/ULL module has the capability of configuring the address for the memory area and the additional ID page using chip-enabled signals E0 to E2. The four upper address bits of the device are fixed at ‘1010’ (see M24C32 datasheet). Chip enable signals E0 and E2 are fixed connected to GND. The remaining chip enables signal E1 is configurable using jumper J10.
The table below shows the resulting seven-bit I²C memory area and ID page address for the two possible jumper configurations.
U3 I²C Addresses | J10 |
memory address 1010 000 (0x50) | 1 + 2 |
memory address 1010 010 (0x52) | 2 + 3 |
U3 EEPROM I²C Addresses via J10
EEPROM Write Protection Control (R102)
Resistor R102 controls write access to the EEPROM (U3) device. Closing this 0 Ω jumper enables write access to the device, while removing this resistor will cause the EEPROM to enter write-protect mode, thereby disabling write access to the device.
The following configurations are possible:
EEPROM Write Protection State | R102 |
Write access allowed | closed |
EEPROM is write-protected. | open |
EEPROM Write Protection States via R10217
eMMC (U12)
If the eMMC Module is used with PL1515 the second usdhc2 interface is not available for other functionalities.
SD/MM Card Interfaces
The phyCORE bus features two SD / MM Card interfaces. On the phyCORE‑i.MX 6UL/ULL the interface signals extend from the controllers first and second Ultra Secured Digital (uSDHC1 / uSDHC2) Host Controller to the phyCORE-Connector.
The table belowshows the location of the different interface signals on the phyCORE-Connector. The MMC/SD/SDIO Host Controller is fully compatible with the SD Memory Card Specification 3.0 and SD I/O Specification version 3.0. SDC / MMC interface SD2 (uSDHC2 of the i.MX 6UL/ULL), supports 8 data channels and SD1 (uSDHC1 of the i.MX 6UL/ULL) 4 data channels. Both interfaces have a maximum data rate of up to 104 MB/s (refer to the i.MX 6UL/ULLReference Manual for more information).
Pin # | Signal | ST | Voltage Domain | Description |
6 | X_SD1_CLK | O | VDD_3V3 | uSDHC1 clock |
7 | X_SD1_CMD | O | VDD_3V3 | uSDHC1 command |
8 | X_SD1_D0 | I/O | VDD_3V3 | uSDHC1 data 0 |
9 | X_SD1_D1 | I/O | VDD_3V3 | uSDHC1 data 1 |
10 | X_SD1_D2 | I/O | VDD_3V3 | uSDHC1 data 2 |
11 | X_SD1_D3 | I/O | VDD_3V3 | uSDHC1 data 3 |
108 | X_nSD1_CD | I | VDD_3V3 | uSDHC1 card detection |
44 | X_LCD_D18 | O | VDD_3V3 | uSDHC2 command[13] |
45 | X_LCD_D19 | O | VDD_3V3 | uSDHC2 clock[13] |
46 | X_LCD_D20 | I/O | VDD_3V3 | uSDHC2 data 0[13] |
47 | X_LCD_D21 | I/O | VDD_3V3 | uSDHC2 data 1[13] |
48 | X_LCD_D22 | I/O | VDD_3V3 | uSDHC2 data 2[13] |
49 | X_LCD_D23 | I/O | VDD_3V3 | uSDHC2 data 3[13] |
40 | X_LCD_D14 | I/O | VDD_3V3 | uSDHC2 data 4[13] |
41 | X_LCD_D15 | I/O | VDD_3V3 | uSDHC2 data 5[13] |
42 | X_LCD_D16 | I/O | VDD_3V3 | uSDHC2 data 6[13] |
43 | X_LCD_D17 | I/O | VDD_3V3 | uSDHC2 data 7[13] |
Location of the SD / MM Card Interface Signals
The interfaces do not provide dedicated card-detect or write-protect signals. The card-detect and write-protect function can be implemented easily by using GPIOs of the i.MX 6UL/ULL.
| 13. | WARN: short cite used before fully qualified cite |
Serial Interfaces
The phyCORE‑i.MX 6UL/ULL provides numerous dedicated serial interfaces some of which are equipped with a transceiver to allow direct connection to external devices:
- 2x High-speed UARTs (TTL, derived from UART1 and UART5 of the i.MX 6UL/ULL) with up to 4 MHz and one with hardware flow control (RTS and CTS signals)
- 2x High-speed USB OTG/host interfaces (extended directly from the i.MX 6UL/ULL’s USB PHY (USBPHY1, USBPHY2))
- 2x 10/100 Mbit Ethernet interface. One with an Ethernet transceiver on the phyCORE‑i.MX 6UL/ULL allowing for direct connection to an existing Ethernet network. The second one is available at the phyCORE-Connector with RMII signals at TTL‑level (only available on SOM with i.MX 6UL/ULL versions -Y2, -G2, and -G3)
- 1x I2C interface (derived from I2C port 1 of the i.MX 6UL/ULL)
- 1x Serial Peripheral Interface (SPI) interface (extended from the third SPI module (eCSPI3) of the i.MX 6UL/ULL)
- 1x I2S audio interface (originating from the i.MX 6UL/ULL’s Synchronous Audio Interface (SAI))
- 1x CAN 2.0B interface (extended directly from the i.MX 6UL/ULL FLEXCAN1 module)
The following sections of this chapter detail each of these serial interfaces.
Note
Most of the controller pins have multiple multiplexed functions. As most of these pins are connected directly to the phyCORE-Connector the alternative functions are available by using the i.MX 6UL/ULL's pin muxing options. Interface descriptions in the following sections however are in regard to the specification of the phyCORE‑i.MX 6UL/ULL and the functions defined therein. Please refer to the i.MX 6UL/ULL Reference Manual, or the schematic to get to know about alternative functions. In order to utilize a specific pin's alternative function, the corresponding registers must be configured within the appropriate driver of the BSP.
Universal Asynchronous Interface
The phyCORE‑i.MX 6UL/ULL provides two high-speed universal asynchronous interfaces with up to 4 MHz and one with additional hardware flow control (RTS and CTS signals). The following table shows the location of the signals on the phyCORE-Connector. Please note that UART5 is not available on the processor type -G0 and –Y0.
The signals extend from UART1 respectively UART5 of the i.MX 6UL/ULL directly to the phyCORE-Connector without conversion to the RS-232 level. External RS-232 transceivers must be attached by the user if RS-232 levels are required.
Pin # | Signal | ST | Voltage Domain | Description |
105 | X_UART1_RX | I | VDD_3V3 | UART1 serial data receive |
107 | X_UART1_TX | O | VDD_3V3 | UART1 serial data transmit |
63 | X_UART5_TX | O | VDD_3V3 | UART5 serial data transmit |
64 | X_UART5_RX | I | VDD_3V3 | UART5 serial data receive |
75 | X_UART5_CTS_B | O | VDD_3V3 | UART5 serial clear to send output (low active, usually used as RTS) |
74 | X_UART5_RTS_B | I | VDD_3V3 | UART5 serial request to send input (low active, usually used as CTS) |
Location of the UART Signals
USB OTG/Host Interfaces
The phyCORE‑i.MX 6UL/ULL provides two high-speed USB OTG/host interfaces that use the i.MX 6UL/ULL embedded HS USB PHY. An external USB Standard-A (for USB host), USB Standard-B (for USB device), or USB mini-AB (for USB OTG) connector is all that is needed to interface the phyCORE‑i.MX 6UL/ULL USB OTG/host functionality. The applicable interface signals can be found on the phyCORE‑Connector X1 as shown below. Please note that USB2 is not available on the processor type -G0 and -Y0.
Pin # | Signal | ST | Voltage Domain | Description |
97 | X_USB_OTG_ID | I | VDD_3V3 | USB OTG1 ID Pin |
65 | X_USB_OTG1_D- | USB_I/O | i.MX 6UL internal | USB OTG1 data- |
66 | X_USB_OTG1_D+ | USB_I/O | i.MX 6UL internal | USB OTG1 data+ |
67 | X_USB_OTG1_VBUS | PWR_I | 5 V | USB OTG1 VBUS input |
68 | X_USB_OTG1_CHD_B | OC | i.MX 6UL internal | USB OTG1 charger detection |
69 | X_USB_OTG2_D- | USB_I/O | i.MX 6UL internal | USB OTG2 data- |
70 | X_USB_OTG2_D+ | USB_I/O | i.MX 6UL internal | USB OTG2 data+ |
71 | X_USB_OTG2_VBUS | PWR_I | 5 V | USB OTG2 VBUS input |
76 | X_USB_OTG2_ID | I | VDD_3V3 | USB OTG2 ID Pin |
Location of the USB OTG/Host Signals
Warning
X_USB_OTG_VBUS must be supplied with 5 V for proper USB functionality.
Ethernet Interface
Connection of the phyCORE‑i.MX 6UL/ULL to the world wide web or a local area network (LAN) is possible using the onboard Ethernet PHY at U2. It is connected to the RMII interface of the i.MX 6UL/ULL. The PHY operates with a data transmission speed of 10 Mbit/s or 100 Mbit/s. The second Ethernet interface of the i.MX 6UL/ULL is available as an RMII interface at the phyCORE‑Connector to allow the connection of an external PHY (RMII Interface).
Ethernet PHY (U2)
With an Ethernet PHY mounted at U2, the phyCORE‑i.MX 6UL/ULL has been designed for use in 10Base-T and 100Base-T networks. The 10/100Base-T interface with its LED signals extends to the phyCORE‑Connector X1.
Pin # | Signal | ST | Voltage Domain | Description |
12 | X_ENET1_TX+ | ETH_O | VDD_3V3 | ETH1 data A+/transmit+ |
13 | X_ENET1_TX- | ETH_O | VDD_3V3 | ETH1 data A-/transmit- |
14 | X_ENET1_RX+ | ETH_I | VDD_3V3 | ETH1 data B+/receive+ |
15 | X_ENET1_RX- | ETH_I | VDD_3V3 | ETH1 data B-/receive- |
16 | X_ETH1_LED1 | I/O | VDD_3V3 | ETH1 SPEED /LED activity |
17 | X_ETH1_LED0 | I/O | VDD_3V3 | ETH1 NWAYEN /LED link |
Location of the Ethernet PHY Signals
The on-board Ethernet PHY supports HP Auto-MDIX technology, eliminating the need for the consideration of a direct-connect LAN or cross-over patch cable. It detects the TX and RX pins of the connected device and automatically configures the PHY TX and RX pins accordingly. The Ethernet PHY also features an Auto-negotiation to automatically determine the best speed and duplex mode.
The Ethernet PHY is connected to the ENET1 RMII interface of the i.MX 6UL/ULL. Please refer to the i.MX 6UL/ULL Reference Manual for more information about this interface.
In order to connect the module to an existing 10/100 Base-T network, some external circuitry is required. The required termination resistors on the analog signals (ETH1_A±, ETH1_B±) are integrated into the chip, so there is no need to connect external termination resistors to these signals. Connection to external Ethernet magnetics should be done using very short signal traces. The A+/A- and B+/B- signals should be routed as 100 Ohm differential pairs. The same applies to the signal lines after the transformer circuit. The carrier board layout should avoid any other signal lines crossing the Ethernet signals.
Warning
Please see the datasheet of the Ethernet PHY when designing the Ethernet transformer circuitry, or request the schematic of the applicable carrier board (phyBOARD‑Segin i.MX 6UL/ULL) as reference.
MAC Address
In a computer network such as a local area network (LAN), the MAC (Media Access Control) address is a unique computer hardware number. For a connection to the Internet, a table is used to convert the assigned IP number to the hardware’s MAC address.
In order to guarantee that the MAC address is unique, all addresses are managed in a central location. Phytec has acquired a pool of MAC addresses. The MAC address of the phyCORE‑i.MX 6UL/ULL is located on the bar code sticker attached to the module. This number is a 12-digit HEX value.
RMII Interface
The second Ethernet interface of the i.MX 6UL/ULL (ENET2) is brought out as an RMII interface at the phyCORE‑Connector X1 to enable a connection of an external PHY and thus allowing to set up a second Ethernet interface on a carrier board. Please note that the second Ethernet interface (ENET2) is not available on the processor type -Y0, -G0, and -G1.
Pin # | Signal | ST | Voltage Domain | Description |
52 | X_ENET2_TX_D0 | O | VDD_3V3 | ENET2 RMII transmit data 0 |
53 | X_ENET2_TX_D1 | O | VDD_3V3 | ENET2 RMII transmit data 1 |
54 | X_ENET2_TX_EN | O | VDD_3V3 | ENET2 RMII transmit enable |
55 | X_ENET2_TX_CLK | O | VDD_3V3 | ENET2 RMII reference clock |
56 | X_ENET2_RX_D0 | I | VDD_3V3 | ENET2 RMII receive data 0 |
57 | X_ENET2_RX_D1 | I | VDD_3V3 | ENET2 RMII receive data 1 |
58 | X_ENET2_RX_ER | I | VDD_3V3 | ENET2 RMII receive error |
59 | X_ENET2_RX_EN | I | VDD_3V3 | ENET2 RMII receive enable |
18 | X_ENET_MDIO | I/O | VDD_3V3 | ENET management data I/O (MDIO) |
19 | X_ENET_MDC | O | VDD_3V3 | ENET management data clock (MDC) |
Location of the ENET2 Interface RMII Signals
SPI Interface
The Serial Peripheral Interface (SPI) interface is a four-wire, bidirectional serial bus that provides a simple and efficient method for data exchange among devices. The phyCORE provides one SPI interface on the phyCORE‑Connector X1. The SPI interface provides one chip select signal. The Enhanced Configurable SPI (eCSPI) of the i.MX 6UL/ULL has up to four separate modules (eCSPI1, eCSPI2, eCSPI3 and eCSPI4) which support data rates of up to 52 Mbit/s. The interface signals of the third module (eCSPI3) are made available on the phyCORE-Connector. These modules are master/slave configurable. The following table lists the SPI signals on the phyCORE-Connector.
Pin # | Signal | ST | Voltage Domain | Description |
109 | X_ECSPI3_CLK | I/O | VDD_3V3 | ECSPI3 clock |
110 | X_ECSPI3_MOSI | I/O | VDD_3V3 | ECSPI3 master output/slave input |
111 | X_ECSPI3_SS0 | I/O | VDD_3V3 | ECSPI3 chip select 0 |
112 | X_ECSPI3_MISO | I/O | VDD_3V3 | ECSPI3 master input/slave output |
SPI Interface Signal Location
I2C Interface
The Inter-Integrated Circuit (I2C) interface is a two-wire, bidirectional serial bus that provides a simple and efficient method for data exchange among devices. The i.MX 6UL/ULL contains up to four identical and independent Multimaster fast-mode I2C modules. The interface of the first module (I2C1) is available on the phyCORE-Connector.
Note
When using the I2C1 interface it must be considered that the on-board I²C EEPROM is connected to this interface, too (I2C EEPROM (U3)). Pull up resistors are already populated on the module. To ensure the proper functioning of the I2C interface external pull resistors matching the load at the interface should not be connected on your carrier board. If too many devices or signal length increases very much, use an I²C buffer to extend the I²C bus.
The following table lists the I2C port 1 on the phyCORE-Connector.
Pin # | Signal | ST | Voltage Domain | Description |
60 | X_I2C1_SCL | I/O | VDD_3V3 | I2C1 clock |
61 | X_I2C1_SDA | I/O | VDD_3V3 | I2C1 data |
I2C Interface Signal Location
Audio Interfaces
I2S (SAI)
The Synchronous Audio Interface (SAI) of the phyCORE‑i.MX 6UL/ULL is a full-duplex, serial interface that allows communication with a variety of serial devices, such as standard codecs, digital signal processors (DSPs), microprocessors, peripherals, and popular industry audio codecs that implement the inter-IC sound bus standard (I2S) and Intel AC’97 standard. The i.MX 6UL/ULL provides up to three instances of the SAI module.
The main purpose of this interface is to connect to an external codec, such as I2S. The Synchronous Audio Interface is intended to be used in synchronous mode. Hence, the receive data timing is determined by SAI2_TX_BCLK and SAI2_TX_SYNC. The five signals extending from the i.MX 6UL/ULL's SAI2 module to the phyCORE-Connector are SAI2_RX_DATA, SAI2_TX_BCLK, SAI2_MCLK, SAI2_TX_SYNC, and SAI2_TX_DATA.
Note
Use of the i.MX 6UL/ULL's JTAG interface pins for the I2S interface is the default muxing option within the BSP delivered with the phyCORE‑i.MX 6UL/ULL. Please refer to the i.MX 6UL/ULL Reference Manual for more muxing options about this interface or consider that fact in the carrier board design if a JTAG interface is also to be implemented.
Pin # | Signal | ST | Voltage Domain | Description |
79 | X_JTAG_TDI/SAI2_TX_BCLK | O | VDD_3V3 | SAI2 transmit bit clock (SAI2_TX_BCLK) |
80 | X_JTAG_TCK/SAI2_RXD | I | VDD_3V3 | SAI2 receive data (SAI2_RXD) |
82 | X_JTAG_TDO/SAI2_TX_SYNC | O | VDD_3V3 | SAI2 transmit frame synchronization (SAI2_TX_SYNC) |
83 | X_JTAG_TMS/SAI2_MCLK | O | VDD_3V3 | SAI2 master clock (SAI2_MCLK) |
84 | X_nJTAG_TRST/SAI2_TXD | O | VDD_3V3 | SAI2 transmit data (SAI2_TX_DATA) |
I2S Interface Signal Location
SPDIF
The Sony/Philips Digital Interface (SPDIF) audio block is a stereo transceiver that allows the processor to receive and transmit digital audio. The following table shows the location of the SPDIF output signal on the phyCORE‑Connector.
Pin # | Signal | ST | Voltage Domain | Description |
81 | X_JTAG_MOD | O | VDD_3V3 | SPDIF transmit |
SPDIF Interface Signal Location
Note
Use of the i.MX 6UL/ULL's JTAG_MOD pin as SPDIF output is the default muxing option within the BSP delivered with the phyCORE‑i.MX 6UL/ULL. Please refer to the i.MX 6UL/ULL Reference Manual for more muxing options about this interface or consider that fact in the carrier board design if a JTAG interface is also to be implemented.
CAN Interface
The CAN interface of the phyCORE‑i.MX 6UL/ULL is connected to the first FLEXCAN module (FLEXCAN1) of the i.MX 6UL/ULL which is a full implementation of the CAN protocol specification version 2.0B. It supports standard and extended message frames and programmable bit rates of up to 1 Mb/s.
Note
The CAN interface is not available on the processor type -G0 and -Y0.
The following table shows the position of the signals on the phyCORE‑Connector.
Pin # | Signal | ST | Voltage Domain | Description |
86 | X_SNVS_TAMPER2 | O | VDD_3V3 | GPIO5_2 (CAN enable) |
113 | X_FLEXCAN1_RX | I | VDD_3V3 | FLEXCAN 1 receive |
114 | X_FLEXCAN1_TX | O | VDD_3V3 | FLEXCAN 1 transmit |
CAN Interface Signal Location
General Purpose I/Os
The table below lists all pins not used by any other of the interfaces described explicitly in this manual and which therefore can be used as GPIO without harming other features of the phyCORE‑i.MX 6UL/ULL.
Pin | Signal | ST | Voltage Domain | Description |
88 | X_GPIO5_0 | I/O | VDD_SNVS | Tamper detection pin 0; GPIO5_0 |
87 | X_GPIO5_1 | I/O | VDD_SNVS | Tamper detection pin 1; GPIO5_1 |
85 | X_GPIO5_3 | I/O | VDD_SNVS | Tamper detection pin 3; GPIO5_3 |
51 | X_GPIO5_9 | I/O | VDD_SNVS | Tamper detection pin 9; GPIO5_9 |
96 | X_GPIO1_1 | I/O | VDD_3V3 | GPIO1_1 |
95 | X_GPIO5_5 | I/O | VDD_SNVS | GPIO5_5 |
78 | X_GPIO1_3 | I/O | VDD_3V3 | GPIO1_3 |
Location of GPIO Pins
Besides these pins, most of the i.MX 6UL/ULL signals which are connected directly to the module connector can be configured to act as GPIO, due to the multiplexing functionality of most controller pins.
Warning
Tamper detection pins are not available for GPIO functionality on the i.MX 6UL/ULL version G3.
User LED
The phyCORE‑i.MX 6UL/ULL provides one green user LED (D2) on board[14]. It can be controlled by setting GPIO5_4 to the desired output level. A high-level turns the LED on, a low-level turns it off.
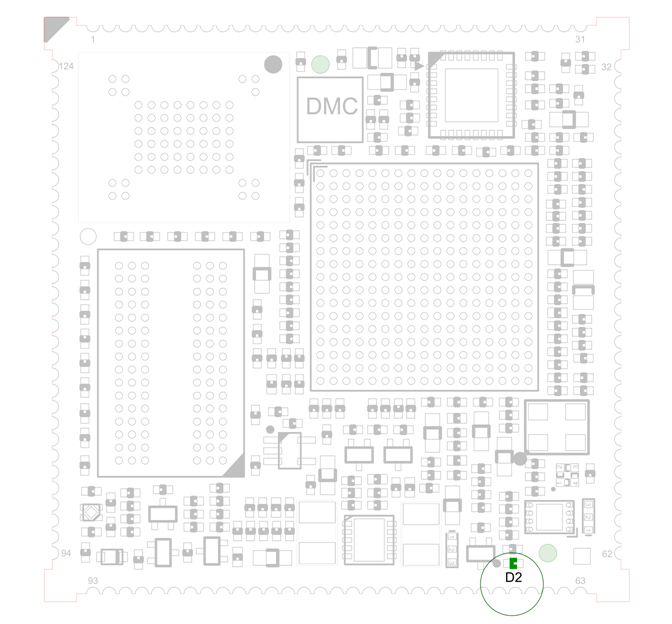
User LED Location (top view)
| 14. | If the phyCORE-i.MX 6UL/ULL is equipped with the i.MX 6UL/ULL version G3 supporting tamper detection, |
Debug Interface
The phyCORE‑i.MX 6UL/ULL is equipped with a JTAG interface for downloading program code into the external flash, internal controller RAM, or for debugging programs currently executing.
Note
On the phyCORE-i.MX 6UL/ULL the JTAG pins are used for other functions (SAI2 interface and SPDIF) within the included BSP. This must be considered if a debug interface is to be implemented in addition to an audio and/or SPDIF interface. Please refer to the i.MX 6UL/ULL Reference Manual for more muxing options about this interface or consider that fact in the carrier board design.
The table below shows the location of the JTAG pins on the phyCORE-Connector X1.
Pin # | Signal | ST | Voltage Domain | Description |
83 | X_JTAG_TMS/SAI2_MCLK | I | VDD_3V3 | JTAG TMS |
82 | X_JTAG_TDO/SAI2_TX_SYNC | O | VDD_3V3 | JTAG TDO |
80 | X_JTAG_TCK/SAI2_RXD | I | VDD_3V3 | JTAG clock input |
84 | X_JTAG_TRSTB/SAI2_TXD | I | VDD_3V3 | JTAG reset input (low active) |
79 | X_JTAG_TDI/SAI2_TX_BCLK | I | VDD_3V3 | JTAG TDI |
81 | X_JTAG_MOD | I | VDD_3V3 | JTAG MOD |
Debug Interface Signal Location at phyCORE‑Connector X1
RTC
The i.MX 6UL processor also includes an integrated RTC. By default, the RTC is sourced by the internal 32 kHz oscillator. To get a higher accuracy it is possible to connect an external crystal or oscillator (with 32 kHz or 32.768 kHz) to the phyCORE-i.MX 6UL SOM. The following table shows the location of the RTC_XTALI/O pins on the phyCORE-Connector X1.
The internal oscillator is automatically multiplexed in the clocking system when the system detects a loss of clock. Please refer to the i.MX 6UL/ULL Reference Manual for more information about connecting an external clock source to the RTC.
Pin # | Signal | ST | Voltage Domain | Description |
140 | RTC_XTALI | analog | VDD_SNVS_CAP | RTC XTALI |
141 | RTC_XTALO | analog | VDD_SNVS_CAP | RTC XTALO |
RTC XTAL Signal Location at phyCORE‑Connector X1
Warning
If an external crystal is used, R146 must be removed from the phyCORE-i.MX 6UL/ULL SOM (phyCORE‑i.MX 6UL/ULL Component Placement (top view)).
Please consider that the two signals are located underneath the module beside the GND‑pads (phyCORE‑i.MX 6UL/ULL Component Placement (bottom view))!
Display Interface
Parallel Display Interface
The signals from the LCD interface of the i.MX 6UL/ULL are brought out at the phyCORE‑Connector X1. Thus an LCD display with up to 24-bit bus width can be connected directly to the phyCORE‑i.MX 6UL/ULL. The table below shows the location of the applicable interface signals.
Pin # | Signal | ST | Voltage Domain | Description |
20 | X_LCD_ENABLE | O | VDD_3V3 | LCD enable |
21 | X_LCD_CLK | O | VDD_3V3 | LCD clock |
22 | X_LCD_VSYNC | O | VDD_3V3 | LCD vertical sync |
23 | X_LCD_RESET | O | VDD_3V3 | LCD reset |
24 | X_LCD_HSYNC | O | VDD_3V3 | LCD horizontal sync |
25 | X_LCD_D0 | O | VDD_3V3 | LCD data 0 |
26 | X_LCD_D1 | O | VDD_3V3 | LCD data 1 |
27 | X_LCD_D2 | O | VDD_3V3 | LCD data 2 |
28 | X_LCD_D3 | O | VDD_3V3 | LCD data 3 |
29 | X_LCD_D4 | O | VDD_3V3 | LCD data 4 |
30 | X_LCD_D5 | O | VDD_3V3 | LCD data 5 |
31 | X_LCD_D6 | O | VDD_3V3 | LCD data 6 |
32 | GND | - | - | Ground 0 V |
33 | X_LCD_D7 | O | VDD_3V3 | LCD data 7 |
34 | X_LCD_D8 | O | VDD_3V3 | LCD data 8 |
35 | X_LCD_D9 | O | VDD_3V3 | LCD data 9 |
36 | X_LCD_D10 | O | VDD_3V3 | LCD data 10 |
37 | X_LCD_D11 | O | VDD_3V3 | LCD data 11 |
38 | X_LCD_D12 | O | VDD_3V3 | LCD data 12 |
39 | X_LCD_D13 | O | VDD_3V3 | LCD data 13 |
40 | X_LCD_D14 | O | VDD_3V3 | LCD data 14 |
41 | X_LCD_D15 | O | VDD_3V3 | LCD data 15 |
42 | X_LCD_D16 | O | VDD_3V3 | LCD data 16 |
43 | X_LCD_D17 | O | VDD_3V3 | LCD data 17 |
44 | X_LCD_D18 | O | VDD_3V3 | LCD data 18 |
45 | X_LCD_D19 | O | VDD_3V3 | LCD data 19 |
46 | X_LCD_D20 | O | VDD_3V3 | LCD data 20 |
47 | X_LCD_D21 | O | VDD_3V3 | LCD data 21 |
48 | X_LCD_D22 | O | VDD_3V3 | LCD data 22 |
49 | X_LCD_D23 | O | VDD_3V3 | LCD data 23 |
Parallel Display Interface Signal Location
Warning
Please consider that the LCD data signals shown in Parallel Display Interface Signal Locationare boot configuration pins that must not be driven by any device on the baseboard during reset, to avoid accidental change of the boot configuration. Please refer to System Configuration and Booting or to the i.MX 6UL/ULL Reference Manual for more information about the boot configuration.
Supplementary Signals
Pin # | Signal | ST | Voltage Domain | Description |
77 | X_PWM3_OUT | O | VDD_3V3 | PWM3 output (e.g. to control the brightness) |
Supplementary Signals to Support the Display Connectivity
Camera Interfaces
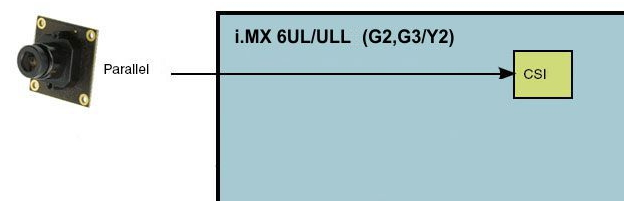
The phyCORE-i.MX 6UL/ULL SOM offers one interface to connect digital cameras[15]. The signals of the parallel CMOS Sensor Interface (CSI) are available together with an I2C interface at the phyCORE‑Connector to allow for camera connectivity according to PHYTEC's phyCAM‑S+, or phyCAM‑P standard.
Camera Connectivity of the i.MX 6UL/ULL (Y2, G2, and G3)
On the phyCORE-i.MX 6UL/ULL SOM CMOS Serial Interface is brought out as parallel interfaces with 10 data bits, HSYNC, VSYNC, MCLK, and PIXCLK. The upper CSI data bits D23 ... D10 are used for other features of the phyCORE‑i.MX 6UL/ULL.
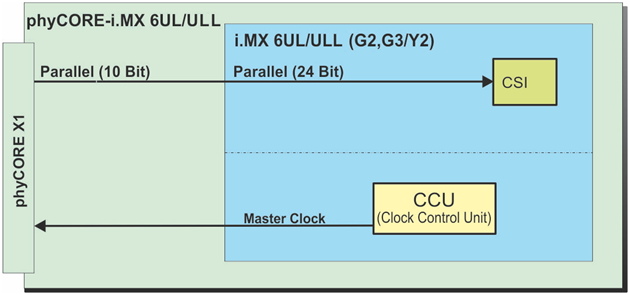
Parallel Camera Interfaces at the phyCORE‑Connector
The camera interface of the phyCORE‑i.MX 6UL/ULL includes all signals and is prepared to be used as phyCAM‑P, or phyCAM‑S(+) interface on an appropriate carrier board. Please refer to Utilizing the Camera Interfaces on a Carrier Board for more information on how to use the camera interfaces on a carrier board with different interface options.
| 15. | Only i.MX 6UL/ULL microcontroller versions Y2, G2, and G3 are equipped with one parallel CMOS Sensor Interface (CSI) to process the signals from the parallel camera interface. |
Parallel Camera Interface (CSI)
The camera parallel interface CSI is available at the phyCORE‑Connector with 10 data bits, HSYNC, VSYNC, MCLK, PIXCLK, and I²C Bus. The following table shows the location of the parallel CSI camera signals at the phyCORE‑Connector.
Pin # | Signal | ST | Voltage Domain | Description |
115 | X_CSI_D0 | I | VDD_3V3 | CSI data 0 |
116 | X_CSI_D1 | I | VDD_3V3 | CSI data 1 |
117 | X_CSI_D2 | I | VDD_3V3 | CSI data 2 |
118 | X_CSI_D3 | I | VDD_3V3 | CSI data 3 |
119 | X_CSI_D4 | I | VDD_3V3 | CSI data 4 |
120 | X_CSI_D5 | I | VDD_3V3 | CSI data 5 |
121 | X_CSI_D6 | I | VDD_3V3 | CSI data 6 |
122 | X_CSI_D7 | I | VDD_3V3 | CSI data 7 |
123 | X_CSI_D8 | I | VDD_3V3 | CSI data 8 |
124 | X_CSI_D9 | I | VDD_3V3 | CSI data 9 |
2 | X_CSI_VSYNC | I | VDD_3V3 | CSI vertical sync |
3 | X_CSI_HSYNC | I | VDD_3V3 | CSI horizontal sync |
4 | X_CSI_PIXCLK | O | VDD_3V3 | CSI pixel clock |
5 | X_CSI_MCLK | O | VDD_3V3 | CSI Camera MCLK |
Signals that can be optionally be used with the camera ports | ||||
60 | X_I2C1_SCL | OC_BI | VDD_3V3 | I2C1 clock |
61 | X_I2C1_SDA | OC_BI | VDD_3V3 | I2C1 data |
50 | X_CSI_FIELD | I | VDD_3V3 | CSI Control1 (Field)[16] |
Parallel Camera Interface CSI Signal Location
Using the phyCORE's camera interface, together with an I²C bus facilitates easy implementation of a CMOS camera interface, e.g. a phyCAM-P or a phyCAM-S+ interface, on a custom carrier board (Utilizing the Camera Interfaces on a Carrier Board).
| 16. | Recommended to implement special control features for the camera interface circuitry on the carrier board |
Utilizing the Camera Interfaces on a Carrier Board
On PHYTEC carrier boards the interface is used directly as a parallel interface according to the phyCAM-P standard. On the target application board, it is also possible to convert the signals with an LVDS deserializer as a serial interface following the phyCAM‑S+ standard.

Use of the Parallel CSI as phyCAM‑P Interface
Use of the Parallel CSI as phyCAM‑S+ Interface
More information on the PHYTEC camera interface standards phyCAM‑P and phyCAM-S+ and how to implement them on a custom carrier board can be found in the corresponding manual L-748. The schematics of the phyBOARD‑Segin i.MX 6UL/ULL on which the parallel camera interface is brought out as a phyCAM‑P interface can also serve as a reference design.
Tamper Detection
The phyCORE-i.MX 6UL/ULL supports the tamper detection feature of the i.MX 6UL processor version G3. With the tamper detection feature, it is possible to recognize when the device encounters unauthorized opening or tampering. Six of the ten tamper detection inputs are used internally in the phyCORE‑i.MX 6UL/ULL. The remaining four inputs are available on phyCORE‑Connector X1. The following table shows their location on the connector.
Warning
The tamper detection inputs are multiplexed with the GPIO5 interface (GPIO5_0 to GPIO5_9). Hence, these inputs can not be used as GPIO if the phyCORE-i.MX 6UL/ULL is equipped with the i.MX 6UL version G3.
Pin # | Signal | ST | Voltage Domain | Description |
74[17] | X_GPIO5_4 | I | VDD_SNVS | Tamper detection pin 4 (GPIO5_4) |
85 | X_GPIO5_3 | I | VDD_SNVS | Tamper detection pin 3 (GPIO5_3) |
86 | X_GPIO5_2 | I | VDD_SNVS | Tamper detection pin 2 (GPIO5_2) |
87 | X_GPIO5_1 | I | VDD_SNVS | Tamper detection pin 1 (GPIO5_1) |
88 | X_GPIO5_0 | I | VDD_SNVS | Tamper detection pin 0 (GPIO5_0) |
Tamper Detection Signal Location
When not in use, the tamper detection signal is pulled-down internally. In order to implement tamper protection, this signal should be connected to a tamper detection contact in the application which is normally closed pulling the tamper detection signal to the power domain VDD_SNVS on the phyCORE‑i.MX 6UL/ULL (i.MX 6UL/ULL: VDD_SNVS_IN).
For proper operation of the tamper detection, an always-ON power supply (coin cell battery, or memory backup capacitor) must be connected to the VDD_SNVS power input at pin 94 of the phyCORE‑Connector.
If the tamper detection feature is enabled by software then the opening of the tamper contact can, e.g., result in:
- switching system power ON with a tamper detection alarm interrupt asserted (for software reaction)
- activating security-related hardware (e.g. automatic and immediate erasure of the Zeroizable Master Key and deny access and erase secure memory contents)
| 17. | For controller variants other than G3 this pin is used as X_UART5_RTS_B (see description of jumper J11). |
Technical Specifications
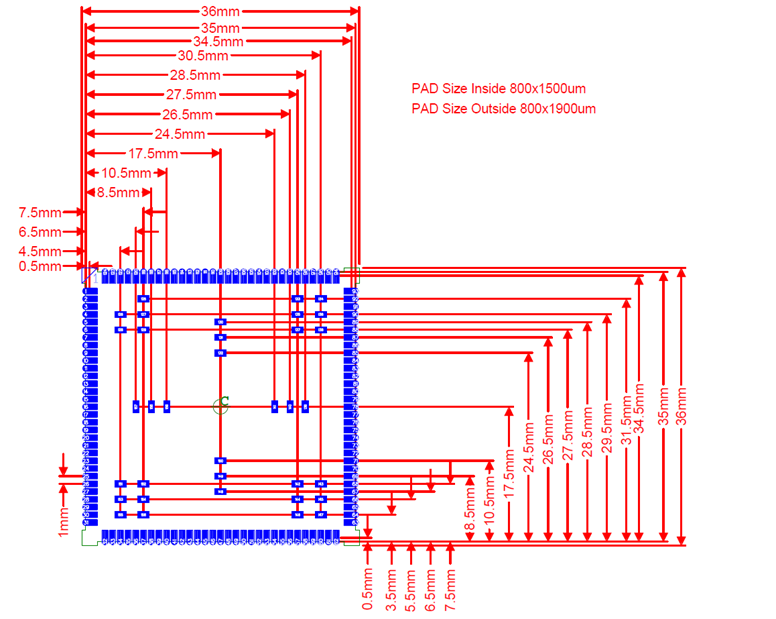
Physical Dimensions (bottom view)
The physical dimensions of the square phyCORE‑i.MX 6UL/ULL are represented above. The module’s profile is max. 2.9 mm thick, with a maximum component height of 1.2 mm (microcontroller) on the top side of the PCB. The board itself can be easily soldered directly onto your carrier board.
Note
To facilitate the integration of the phyCORE‑i.MX 6UL/ULL into your design, the footprint of the phyCORE‑i.MX 6UL/ULL is available for download (section 18.1).
Additional specifications:
Dimensions: | 36 mm x 36 mm |
Weight: | approx. 6.2 g[18] |
Storage temperature: | -40 °C to +125 °C |
Operating temperature: | refer to Product Temperature Grades |
Humidity: | 95 % r.F. not condensed |
Operating voltage: | VCC 3.3 V +/- 5 % |
Power consumption: | Linux prompt only: typical 0.5 W Full load: typical 1 W Conditions: 512 MB DDR3-SDRAM, 512 MB NAND Flash, Ethernet, G2 528 MHz CPU frequency, 20 °C, 3.3 V |
Technical Specifications
These specifications describe the standard configuration of the phyCORE‑i.MX 6UL/ULL as of the printing of this manual.
| 18. | Depending on the configuration of the module. |
Product Temperature Grades
Warning
The right temperature grade of the Module depends very much on the use case. It is mandatory to determine if the use case suites the temperature range of the chosen module (see below). If necessary a heat spreader can be used for temperature compensation.
The feasible operating temperature of the SOM highly depends on the use case of your software application. Modern high-performance microcontrollers and other active parts such as the ones described within this manual are usually rated by qualifications based on tolerable junction or case temperatures. Therefore, making a general statement about maximum or minimum ambient temperature ratings for the described SOM is not possible. However, the above-mentioned parts are available still at different temperature qualification levels by the producers. We offer our SOM's in different configurations making use of those temperature qualifications. To indicate which level of temperature qualification is used for active and passive parts of a SOM configuration we have categorized our SOMs into three temperature grades. The table below describes these grades in detail. These grades describe a set of components that in combination add up to a useful set of product options with different temperature grades. This enables us to make use of cost optimizations depending on the required temperature range.
In order to determine the right temperature grade and whether the maximum or minimum qualification levels are met within an application the following conditions must be defined by considering the use case:
- Determined the processing load for the given software use case
- Maximum temperature ranges of components (see table below)
- Power consumption resulting from a baseload and the calculating power required (in consideration of peak loads as well as time periods for system cooldown)
- Surrounding temperatures and existing airflow in case the system is mounted into a housing
- Heat resistance of the heat dissipation paths within the system along with the considered usage of a heat spreader or a heat sink to optimize heat dissipation
Product Temp. Grade | Controller Temp Range (Junction Temp) | RAM (Case Temp) | Others (Ambient) |
I | Industrial -40 °C to +105 °C / Automotive -40 °C to+125 °C | Industrial | Industrial |
X | Extended Commercial | Industrial | Industrial |
C | Commercial 0 °C to +95 °C | Consumer | Consumer |
Product Temperature Grades
Connectors on the phyCORE-i.MX 6UL/ULL
The phyCORE-i.MX 6UL/ULL SOM can be directly soldered onto your carrier board. The dimensions of the half-hole connector and its footprint underneath can be found in Physical Dimensions (bottom view). Four orientation marks in each corner on the bottom side can be used for automatic SMD production. The orientation mark which has just three pads indicates the location of pin number 1.
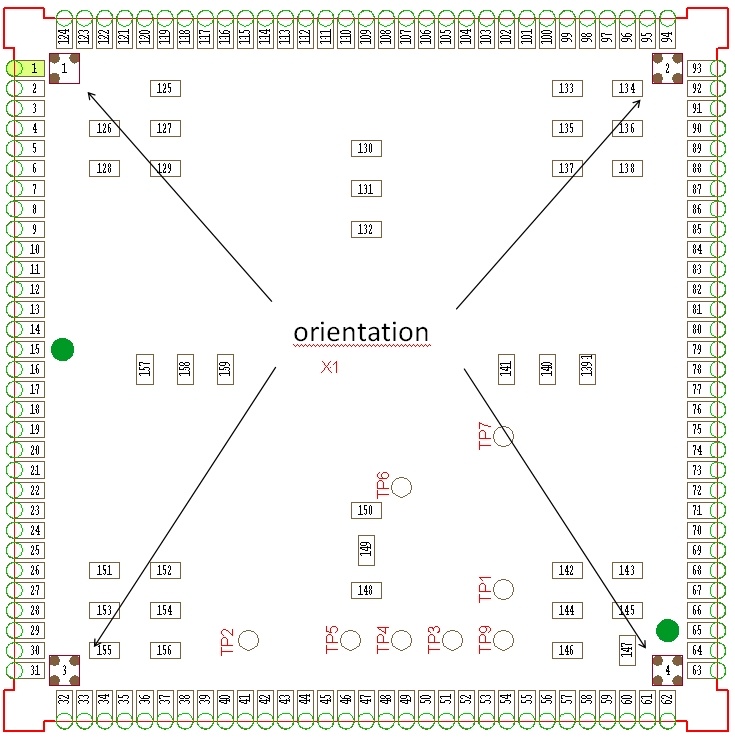
Reference Points (bottom view)
Note
To facilitate the integration of the phyCORE‑i.MX 6UL/ULL into your design, the footprint of the phyCORE‑i.MX 6UL/ULL is available for download (Integrating the phyCORE-i.MX 6UL/ULL).
Hints for Integrating and Handling the phyCORE-i.MX 6UL/ULL
Integrating the phyCORE-i.MX 6UL/ULL
Design Rules
Successful integration in user target circuitry greatly depends on the adherence to the layout design rules for the GND connections of the phyCORE module. For maximum EMI performance, we recommend as a general design rule to connect all GND pins to a solid ground plane. But at least all GND pins neighboring signals which are being used in the application circuitry should be connected to GND.
Additional information and Reference Design
Besides this hardware manual, much information is available to facilitate the integration of the phyCORE‑i.MX 6UL/ULL into customer applications.
- the design of the phyBOARD‑Segin i.MX 6UL/ULL can be used as a reference for any customer application
- many answers to common questions can be found at
- the link “Carrier Board” within the category Dimensional Drawing leads to the layout data as shown inPhysical Dimensions (bottom view). It is available in different file formats. The use of this data integrates the phyCORE-i.MX 6UL/ULL SOM as a single component of your design.
- different support packages are available to support you in all stages of your embedded development. Please visit https://www.phytec.de/support/support-pakete/, or https://www.phytec.eu/en/support/support-pakete/, or contact our sales team for more details.
Handling the phyCORE-i.MX 6UL/ULL
Modifications on the phyCORE Module
Removal of various components, such as the microcontroller and the standard quartz, is not advisable given the compact nature of the module. Should this nonetheless be necessary, please ensure that the board, as well as surrounding components and sockets, remain undamaged while de-soldering. Overheating the board can cause the solder pads to loosen, rendering the module inoperable. Carefully heat neighboring connections in pairs. After a few alternations, components can be removed with the solder-iron tip. Alternatively, a hot air gun can be used to heat and loosen the bonds.
Warning
If any modifications to the module are performed, regardless of their nature, the manufacturer guarantee is voided.
Revision History
| Date | Version | Changes in this Manual |
|---|---|---|
25.01.2017 | Manual | First edition. |
26.07.2017 | Manual | Update to PCB-Version 1468.2 |
18.07.2022 | Manual | Moved to Online |