Gesamtbetrag:
zzgl. Mwst.
i.MX 6 / i.MX 8 Security Manual (L-1004e.A2)
Table of Contents
Security
With increasing digitization and networking, the protection of embedded systems against unauthorized access and targeted attacks is more important than ever. Guaranteeing this type of security, along with functional security, is a major challenge in electronics design. PHYTEC supports you in minimizing risks by considering security requirements during the development of our hardware and board support packages. On top of these deployment-ready solutions, we support you with individual project consulting on complex security principles.
Security is a process encompassing all parts of a device and all development phases of its lifetime.
Compatible Controllers and Features
The following table lists the compatible controller as well as any other necessary information to use this manual.
Note
Please make sure your controller can be found on these tables before beginning.
NXP i.MX6 and i.MX6UL/ULL
| NXP i.MX6 | NXP i.MX6UL / ULL | |
|---|---|---|
| Example Distro | yogurt-secure (warrior) (based on Linux Mainline) | yogurt-secure (dunfell) (based on Linux Mainline) |
| Bootloader | barebox | barebox |
Secure Boot
| from PD20.1.0 (warrior)
| from PD21.1.0 (dunfell)
|
Secure Key Storage
| from PD20.1.0 (warrior)
| from PD21.2.0 (hardknott)
|
Secure Storage
| from PD20.1.0 (warrior)
| from PD21.2.0 (hardknott)
|
Secure Update
| from PD20.1.0 (warrior)
| from PD21.1.0 (dunfell)
|
Access Control: Protection Shield Level
| from PD20.1.0 (warrior)
| from PD21.1.0 (dunfell)
|
| HardeningExample for selected machine features | from PD21.1.0 (hardknott) | from PD21.2.0 (hardknott) |
NXP i.MX8 Series
| NXP i.MX8M Mini / Nano | NXP i.MX8M Plus | NXP i.MX8M | |
|---|---|---|---|
| Example Distro | yogurt-vendor secure (zeus) (based on NXP Vendor BSP) | yogurt-vendor secure (zeus) (based on NXP Vendor BSP) | yogurt-vendor secure (zeus) (based on NXP Vendor BSP) |
| Bootloader | u-boot | u-boot | u-boot |
Secure Boot
| from PD21.1.0 (zeus)
| from PD21.1.0 (zeus)
| from PD21.1.0 (zeus)
|
Secure Key Storage
| from PD22.1.0 (hardknott)
| from PD22.1.0 (hardknott)
| |
Secure Storage
| from PD22.1.0 (hardknott)
| from PD22.1.0 (hardknott)
| |
Secure Update
| from PD21.1.0 (zeus)
| from PD21.1.0 (zeus)
| from PD21.1.0 (zeus) |
Access Control: Protection Shield Level
| from PD21.1.0 (zeus)
| from PD21.1.0 (zeus)
| from PD21.1.0 (zeus)
|
| Hardening Example for selected machine features | - | - |
Short Crypto Refresher
| Function | Description |
|---|---|
| Symmetric cryptography | The same key for encryption or decryption |
| Public key cryptography | Two mathematically dependent keys for encryption or decryption. The public key is used for encryption while the private key is used for decryption. |
| Hash | One-way function, fixed output size (SHA*) |
| HMAC | Data authentication using hash and shared secret |
| Signature | Data authentication using public-key cryptography (keys & certificates, RSA & ECDSA) |
| Unauthenticated encryption | Attackers can‘t read private data but could modify it (AES-CBC, AES-XTS, ...) |
| Authenticated encryption | Attacker can‘t read private data and modification is detected (AEAD: AES GCM, AEGIS) |
| Trusted Keys | Symmetric key with variable length and is a key type of the existing kernel keyring service. Require the availability of a Trust Source for greater security like a TPM or TEE (from Kernel 5.13 and backported in Mainline Kernel 5.10) |
| Encrypted Keys | Symmetric key with variable length and is a key type of the existing kernel keyring service. |
Recommended Security Requirements
As of the writing of this manual, recommendations apply for key lengths, certificates, and hash values. These recommendations come from BSI (Bundesamt für Sicherheit in der Informationstechnik) and NIST (National Institute of Standards and Technology).
Security Features in PHYTEC Standard BSP
In the technical and connected world, it is important to build in "security by design” approach that thwarts intrusion into your product, data, and intellectual property at multiple levels.
Here are the Security features from the Standard BSP.
Basic Security
Basic Security is the fundament of the security measures implementations and includes support for basic modules such:
- True Number Generator and Cryptographic support
- Secure Boot
- Secure Key Storage and Usage
- Secure Storage
- Secure Updates
Parts from Access Control as Example
Access Control regulates the access of users and services to the device and components in the device according to the least privilege access principle.
- Secure Console
- Secure Shell
- User and Role Management
More Additional Security Features (not part of this BSP)
Network Security
Network Security enables secure connections to connected devices or servers via Ethernet, WLAN, and LTE, but also secures access to the device from outside.
- TLS Connection
- Remote Access
- Server, Cloud Integration Tools
- Intrusion Protection
- Firewall
- Container
Interface Security
Interface Security secures the interfaces
- USB
- Field Bus
against third-party access and enables the secure connection of intended devices.
Hardening
Hardening refers to the reduction of software components and kernel configuration to a necessary minimum.
Physical Security
Physical Security secures the device from direct physical access to protect the corresponding application and data from external access.
- Secure Debug
- Tamper Protection
- Housing
- Encapsulation of the circuit board
Provisioning
Provisioning includes the activation of hardware security features like Secure Boot and the generation of specific keys and X509 certificates on the device in secure manufacturing like PHYTEC secure production area.
Introduction to Yocto and Board Support Packages
This document assumes that you are familiar with our Yocto BSPs. The basics of our BSPs are explained in the document Yocto Reference Manual.
More information about the products are explained in the Harware Manual and BSP Reference Manual
| Controller with Link to Download folder |
|---|
| NXP i.MX8M |
| NXP i.MX8M Plus |
| NXP i.MX8M Mini |
| NXP i.MX6UL / ULL |
| NXP i.MX6 |
Distro ampliphy-secure and ampliphy-vendor-secure
What is Distro ampliphy-secure and ampliphy-vendor-secure?
Note
Distro ampliphy-secure and ampliphy-vendor secure are sampleYocto distros like ampliphy with additional security preconfigurations.
Additional security measurements for production usage are necessary and depend on your threat model.
PHYTEC services can support your implementation.
The following DISTR_FEATURES are activated in the distro ampliphy-secure and ampliphy-vendor-secure
| DISTRO_FEATURES | Description |
|---|---|
| secureboot |
|
| fileencryption |
|
| trustedkey |
|
protectionshield |
|
| hardening |
|
| kernelmodsign |
|
Image phytec-security-image is configured for filesystem encryption with FIT-Image, which includes a ramdisk and a boot initialization script.
Note
This example for filesystem encryption only works with eMMC, but not with NAND nor NOR Flash.
Enable ampliphy-secure and ampliphy-vendor-secure
Change the distro in build/conf/local.conf from ampliphy to ampliphy-secure or from ampliphy-vendor to ampliphy-vendor-secure
build/conf/local.conf
MACHINE ?= "phyboard-mira-imx6-5"
DISTRO ?= "ampliphy-secure"
Secure Boot
Why Secure Boot?
Chain of Trust
Secure boot is used to ensure that only trustworthy, signed software can be executed on the controller. This is the first stage of the Chain-of-Trust. With the Chain-of-Trust, signed programs are always started by other previously verified programs. This ensures that even the end application is at the highest layer of trustworthiness

Process flow i.MX6*:
- Trusted ROM-bootloader verifies software image before they are executed
- bootloader verifies Linux-kernel image and device tree (fit-image)
- Linux-kernel verifies file-system and customer application data
Process flow i.MX8*:
- The Trusted ROM-bootloader verifies firmware blobs (DDR and HDMI on some variants) and uses HABv4 to verify u-boot SPL.
- u-boot SPL loads u-boot proper from the FIT image and ATF (ARM Trusted Firmware) and optionally OP-TEE. It verifies those images using HABv4.
- Then, u-boot loads and verifies the FIT-image containing a Linux kernel, DTB, and ramdisk. This FIT image is signed using HABv4 keys.
- If built with signed kernel modules (standard), Linux will only load kernel modules signed with a proper private key.
| i.MX6 / i.MX6UL / i.MX6ULL | i.MX8MM / i.MX8MP | |
|---|---|---|
| Bootloader | Barebox | u-boot |
| Keys |
|
|
| Verification | Bootloader verified by HABv4 FIT-Image verified by Bootload with FIT-Image Public Key Linux kernel modules verified by Linux | DDR/HDMI images (signed by NXP) U-Boot SPL, U-Boot, ATF, TEE, and FIT-Image verified by HABv4 Linux kernel modules verified by Linux |
Getting Started
NXP Controller
Information about Secure Boot on NXP Controller: https://www.nxp.com/search?keyword=AN4581
HABv4 RVT guidelines and recommendations: https://www.nxp.com/search?keyword=AN12263
- Code Signing Tools (CST) in version 3.3.1 or newer (install recipes are available in the BSP)
- Account required on NXP website: https://www.nxp.com/search?keyword=IMX_CST
- Download the
cst-3.3.1.tar.gzfile - Unpack the
cst-3.3.1.tar.gzfile tocst-3.3.1.tarfile. - Place the
cst-3.3.1.tarfile in the yocto download folder
Note
On 12.3.2021 NXP had changed the cst tool version 3.3.1 (published on 14.08.2020) without updating the version.
If you get a checksum/hash error for nxp-cst, then please update the recipe meta-phytec/recipes-devtools/nxp-cst/nxp-cst_3.3.1.bb or update your cst version 3.3.1.
Additional NXP removes older versions of the cst tool.
Enable Secure Boot Support in Yocto
Enable Secure Boot in your own distro
To enable secure boot, add the DISTRO_FEATURE "secureboot" to your distro configuration file conf/distro/xyz.conf:
DISTRO_FEATURES += "secureboot"
DISTRO_FEATURES_NATIVE += "secureboot"
DISTRO_FEATURES_NATIVESDK += "secureboot"
Active image signing during the build process. The class "secureboot" needs to be inherited in your distro configuration:
INHERIT += "secureboot"
Configuration Class-Path to the certificates
The path to the keys and certificates used for code-signing during the build process can be changed in the secureboot.bbclass file:
CERT_PATH ??= "${OEROOT}/../../phytec-dev-ca"For more information about keys and certificates, refer to Change PKI-Tree from phytec-dev-ca to the own PKI
Bootloader
i.MX6 and i.MX6UL/ULL with Barebox
| Standard Boot | Secure Boot | |
|---|---|---|
| Bootloader |
|
|
| Bootloader Environment |
|
|
| Bootloader Image Boot |
|
|
| eMMC image bootloader |
|
|
i.MX8MM and i.MX8MP with u-boot
| Standard Boot | Secure Boot | |
|---|---|---|
| Bootloader |
|
|
| Bootloader Environment |
|
|
| Bootloader Image Boot |
|
|
| eMMC image bootloader |
|
|
Configuration Class - Signing Bootloader
All variables to adjust the bootloader signing process can be found in secureboot.bbclass:
BOOTLOADER_SIGN ??= "true"
BOOTLOADER_SIGN[type] = "boolean"

BOOTLOADER_SIGN_IMG_PATH ??= "${CERT_PATH}/nxp_habv4_pki/crts/IMG1_1_sha256_4096_65537_v3_usr_crt.pem"
BOOTLOADER_SIGN_CSF_PATH ??= "${CERT_PATH}/nxp_habv4_pki/crts/CSF1_1_sha256_4096_65537_v3_usr_crt.pem"
BOOTLOADER_SIGN_SRKFUSE_PATH ??= "${CERT_PATH}/nxp_habv4_pki/crts/SRK_1_2_3_4_table.bin"
BOOTLOADER_SIGN: enable the bootloader signing
BOOTLOADER_SIGN_IMG_PATH, BOOTLOADER_SIGN_CSF_PATH, BOOTLOADER_SIGN_SRKFUSE_PATH: paths to the certificates and SRKFUSE-table required to sign the bootloader
Linux Kernel in the FIT-Image
FIT-Image Generation
First, add a FIT-Image recipe in your BSP layer. A possible location for this recipe could be recipes-images/fitimage/
You can find two example recipes for Fit-Image generation in the meta-ampliphy layer at sources/meta-ampliphy/recipes-images/fitimage/.
phytec-simple-fitimage.bb: Example for a FIT-image with kernel and device tree of a selected machinephytec-secureboot-ramdisk-fitimage.bb: example for a FIT-image with the kernel, device tree of a selected machine, and a ramdisk with file encryption support enabled
To create a fit-image during the build process you need to inherit the Fit-Image class in your build configuration:
INHERIT += "fitimage"
- To create the manifest file, you may either use the built-in class mechanism or provide a custom manifest.
- For using the built-in bundle generation, you need to specify some variables:
FITIMAGE_SLOTS: Use this to list all slot classes for which the FIT-Image should contain images. A value of"kernel fdt", for example, will create a manifest with images for two slot classes - kernel and devicetree.FITIMAGE_SLOT_<slotclass>: For each slot class, set this to the image (recipe) name which builds the artifact you intend to place in the slot class.FITIMAGE_SLOT_<slotclass>[type]: For each slot class, set this to the type of image you intend to place in this slot. Possible types are: kernel, fdt, or ramdisk.FITIMAGE_SLOT_<slotclass>[file]: For slot type kernel and fdt, set this to the file of image you intend to place in this slot.FITIMAGE_SLOT_<slotclass>[fstype]: For slot type ramdisk, set this to the filesystem type of image you intend to place in this slot.
Configuration Class - Signing FIT-Image
In the configuration class secureboot.bbclass, you can set all relevant variables for signing the FIT-Image.
classes/secureboot.bbclass
FITIMAGE_SIGN ??= "true"
FITIMAGE_SIGN[type] = "boolean"

FITIMAGE_SIGNER ??= "customer"
FITIMAGE_PUBKEY_SIGNATURE_PATH ??= "${WORKDIR}/signature_node.dtsi"

FITIMAGE_SIGN_KEY_PATH ??= "${CERT_PATH}/fit/FIT-4096.key"
FITIMAGE_HASH ??= "sha256"
FITIMAGE_SIGNATURE_ENCRYPTION ??= "rsa4096"
FITIMAGE_SIGNER_VERSION_mx6 ??= "vPD20.0.0"FITIMAGE_SIGN: Activation of the FIT-Image signingFITIMAGE_SIGNER: Name of the FIT-Image signer, which is part of the FIT-Image certificateFITIMAGE_PUBKEY_SIGNATURE_PATH: Automatically created manifest with public key of the FITIMAGE_SIGN_KEY_PATH for storing in the bootloader device treeFITIMAGE_SIGN_KEY_PATH: Path to the signing keyFITIMAGE_HASH: Hash function for the FIT-Image artifacts. SHA1 and SHA256 are supportedFITIMAGE_SIGNATURE_ENCRYPTION: Key type for FIT-Image certificate signing. RSA2048 and RSA4096 are supportedFITIMAGE_SIGNER_VERSION: Version of the signer, which is part of the FIT-Image certificate
Start the Build Process
Refer to Start the Build.
The phytec-security-image has support for FIT-Image creation with an example for file encryption eMMC only, not for NAND/NOR Flash. The phytec-security-image includes a FIT-Image with Kernel, devicetree, and ramdisk.
BSP Images
All images generated by Bitbake are deployed to yocto/build/deploy/images/<MACHINE>. The following list shows all additionally generated files for the i.MX 6 SoC, phyboard-mira-imx6-5 machine with activated Secure Boot:
- Barebox:
barebox-s.bin,barebox-us.bin - FIT-Image:
fitImage.fitimgwith kernel, device tree, and ramdisk - FIT-Image manifest:
phytec-secureboot-ramdisk-fitimage-phyboard-mira-imx6-5.its - RAM-disk:
phytec-secureboot-ramdisk-image-phyboard-mira-imx6-5.cpio.gz - Root filesystem:
phytec-security-image-phyboard-mira-imx6-5.tar.gz - eMMC image:
phytec-security-image-phyboard-mira-imx6-5.sdcardwithbarebox-s.bin
Booting and Updating the System
Refer to BSP Reference Manual for booting from different flashes and updating the software. Please use the signed bootloader images and Kernel or FIT-Images to program to the flash. The eMMC image is ready to use with a signed bootloader.
Activate Secure Boot on the Device
The final step to activate secure boot on your device is to burn the secure eFuse configuration.
Warning
The secure eFuse configuration can only be written once and is irreversible!
The SRK fuses contain the hash value of the SRK public keys. In open devices, they are never used. In closed devices, they are used to validate the public key contained in signed firmware images. Before closing the device, you must store the hash of the public keys in the SRK OTP bits on the device. This will allow the ROM loader to validate the public key included in signed firmware images.
When building the yocto-secure distro for the first time, the bootloader image is signed with PHYTEC's development keys. Yocto stores these development keys to yocto/phytec-dev-ca. Please refer to Change PKI-Tree from phytec-dev-ca to the own PKI.
For NXP i.MX Controllers with HABv4 (i.MX6, i.MX7, i.MX8M, i.MX8M mini, i.MX8M Plus), you will need the SRK_1_2_3_4_fuse.bin file. An example file is located in yocto/phytec-dev-ca/nxp_habv4_pki/crts/SRK_1_2_3_4_fuse.bin.
Note
Create and use your own keys and certificates for signing your images. Burn the right key into the Controller eFuse. Please refer Create Your Own PKI Tree.
eMMC boot partition to enable boot
| i.MX6* with Barebox | i.MX8M* with u-boot | |
|---|---|---|
| Set eMMC as active device | barebox$ detect mmc3 | uboot$ mmc dev 2 |
| Show active boot partition | barebox$ devinfo mmc3 You will receive: ... Parameters: boot: boot0 (type: enum) (values: "disabled", "boot0", "boot1", "user") nt_signature: 9a54880c (type: uint32) probe: 0 (type: bool) disabled is default for user partition | uboot$ mmc partconf 2 You will receive: EXT_CSD[179], PARTITION_CONFIG: BOOT_ACK: 0x0 BOOT_PARTITION_ENABLE: 0x1 PARTITION_ACCESS: 0x0 0x0 Device not boot enabled(default) 0x1Boot partition1 enabled for boot 0x2Boot partition2 enabled for boot 0x7User area enabled for boot |
| Set user area for boot | barebox$ mmc3.boot=disabled | uboot$ mmc partconf 2 0 7 0 |
Program the SRK eFuse
| Task | i.MX6* with Barebox | i.MX8M* with u-boot |
|---|---|---|
Check the Current State of Your Device | barebox$ hab -i You will receive: Current SRK hash: 0000000000000000000000000000000000000000000000000000000000000000 devel mode | u-boot$ hab_status
Secure boot disabled HAB Configuration: 0xf0, HAB State: 0x66 No HAB Events Found! |
Get the eFuse from the right SRK_1_2_3_4_fuse.bin! | barebox$ cp /mnt/tftp/SRK_1_2_3_4_fuse.bin . | host$ hexdump -e '/4 "0x"' -e '/4 "%X""\n"' SRK_1_2_3_4_fuse.bin You will receive: 0x9A842534 0xB0491AB4 0xD5B6A07B 0xFD92DCE7 0xC10DC87C 0xD8BD04A9 0x704E9FE4 0x9B025359 |
Burn the eFuse with the right SRK_1_2_3_4_fuse.bin! | barebox$ hab -p -s SRK_1_2_3_4_fuse.bin You will receive: ocotp0: reloading shadow registers... ocotp0: reloading shadow registers... ocotp0: reloading shadow registers... ocotp0: reloading shadow registers... ocotp0: reloading shadow registers... ocotp0: reloading shadow registers... ocotp0: reloading shadow registers... ocotp0: reloading shadow registers... barebox@PHYTEC phyCORE-i.MX6 Quad with eMMC:/ | uboot$ fuse prog 6 0 0x9A842534 uboot$ fuse prog 6 1 0xB0491AB4 uboot$ fuse prog 6 2 0xD5B6A07B uboot$ fuse prog 6 3 0xFD92DCE7 uboot$ fuse prog 7 0 0xC10DC87C uboot$ fuse prog 7 1 0xD8BD04A9 uboot$ fuse prog 7 2 0x704E9FE4 uboot$ fuse prog 7 3 0x9B025359 |
Verify new SRK eFuse | barebox$ hab -i You will receive: Current SRK hash: 3425849ab41a49b07ba0b6d5e7dc92fd7cc80dc1a904bdd8e49f4e705953029b devel mode | uboot$ fuse read 6 0 4 You will receive: Reading bank 6: Word 0x00000000: 9a842534 b0491ab4 d5b6a07b fd92dce7 uboot$ fuse read 7 0 4 You will receive: Reading bank 7: Word 0x00000000: c10dc87c d8bd04a9 704e9fe4 9b025359 |
Lock the device
Warning
This step is irreversible and could brick your device.
Before closing the device:
- Verify you have built a signed bootloader image.
- Reset your board and verify there are no HAB events.
- Verify the SRK eFuses have been burned. The SRK OTP bits are not verified on open devices. For a closed device to boot, all the SRK OTP bits must be burned. An open device booting with no HAB events will stop booting after being closed if the SRK OTP bits are invalid, not burned, or only partially burned.
| Task | i.MX6* with Barebox | i.MX8M* with u-boot |
|---|---|---|
Lockdown your device | barebox$ hab -p -l You will receive: ocotp0: reloading shadow registers... ocotp0: reloading shadow registers... Device successfully locked down | uboot$ fuse prog 1 3 0x2000000 You will receive: Warning: Programming fuses is an irreversible operation!
This may brick your system.
Use this command only if you are sure of what you are doing!
Really perform this fuse programming? <y/N> |
Burn SRK_LOCK
If you can successfully reboot after locking the device in the previous step, you should also burn the SRK_LOCK FUSE.
Note
On i.MX6, this step was already performed by the "hab" command of the previous step.
| Task | i.MX8M* with u-boot |
|---|---|
Burn SRK_LOCK | fuse prog 0 0 0x200 You will receive: Warning: Programming fuses is an irreversible operation!
This may brick your system.
Use this command only if you are sure of what you are doing!
Really perform this fuse programming? <y/N> |
Next Steps after Lockdown
Warning
After you have closed the device, consider the following points with regards to how firmware authentication can potentially be skipped:
- JTAG could be used to boot the processor and avoid the secure boot. See Secure JTAG
- Bootloader will drop to a console after an unsuccessful firmware authentication for debugging purposes. That console can still be used to boot, so it should be disabled in production firmware. See Protection Shield Level
- Direct External Memory Boot could bypass firmware authentication. PHYTEC recommends burning the DIR_BT_DIS fuse on closed devices to prevent this.
Revoke NXP SRK Key
Although securing the device involves programming the hash of four public keys into the eFuses, only one key (number 1 by default) is used in the secure boot process. If the key gets compromised, it can be revoked and a different key used.
To use a different key for the signature of bootloader images, change the following variables in sources/meta-ampliphy/classes/secureboot.bbclass:
BOOTLOADER_SIGN_IMG_PATH ??= "${CERT_PATH}/nxp_habv4_pki/crts/IMG1_1_sha256_4096_65537_v3_usr_crt.pem"
BOOTLOADER_SIGN_CSF_PATH ??= "${CERT_PATH}/nxp_habv4_pki/crts/CSF1_1_sha256_4096_65537_v3_usr_crt.pem"
The following keys are available:
| Key Slot | IMG Certificate | CSF Certificate | SRK_REVOKE[2:0] |
|---|---|---|---|
| 0 | IMG1_1_sha256_4096_65537_v3_usr_crt.pem | CSF1_1_sha256_4096_65537_v3_usr_crt.pem | 001 |
| 1 | IMG2_1_sha256_4096_65537_v3_usr_crt.pem | CSF2_1_sha256_4096_65537_v3_usr_crt.pem | 010 |
| 2 | IMG3_1_sha256_4096_65537_v3_usr_crt.pem | CSF3_1_sha256_4096_65537_v3_usr_crt.pem | 100 |
| 3 | IMG4_1_sha256_4096_65537_v3_usr_crt.pem | CSF4_1_sha256_4096_65537_v3_usr_crt.pem | not revocable |
Example: Revoke Key Slot 0 on i.MX6
| i.MX6 and i.MX6UL | i.MX8M series |
|---|---|
barebox$ mw -l -d /dev/imx-ocotp 0xBC 0x0001 | uboot$ fuse prog 9 3 0x1 |
Note
- The SRK Revocation does not modify the SRK hash values, only the SRK_REVOKE fuse has to be programmed.
- In a closed configuration, HAB, by default, sets the SRK_REVOKE_LOCK sticky bit in the OCOTP controller to write protect this eFuse field.
- To instruct HAB not to lock the SRK_REVOKE field, the CSF commands in the bootloader need to be reconfigured.
For more information, refer to https://www.nxp.com/docs/en/application-note/AN4581.pdf or NXP CST User's Guide.
Secureboot on i.MX8M series without FIT images
In previous releases, secureboot on the i.MX8M controller series signed the kernel and DTB. Support for authenticated ramdisks did not exist. We recommend the usage of signed FIT images starting with release TODO. Users who still wish to use that old mechanism should perform the following changes in their build configuration:
Disable FITIMAGE signing
FITIMAGE_SIGN = "false"
Set IMX_BOOT_FILES variable
IMAGE_BOOT_FILES_secureboot = "Image-signed oftree"
Rebuild u-boot-imx, imx-boot-phytec and linux-imx.
Kernel module signing
When the kernel module signing facility is enabled, Linux can enforce that only modules that have been signed with a specific key can be loaded. Keys with invalid signatures won't be allowed to load. This makes it harder for attackers to load malicious or manipulated modules.
This is enforced by the kernel and does not require userland support.
Enable kernel module signing facility
To enable the kernel module signing facility, add the following DISTRO_FEATURE to your configuration file in conf/distro/xyz.conf
DISTRO_FEATURES += "kernelmodsign"
Warning
By default, the kernel modules will be signed with PHYTEC's public, example development key. Unless you create your own key, this feature does not offer any protection.
Secure Key Storage
A fundamental aspect of security is integrity and confidentiality. Many applications require the embedded device to keep sensitive data. The standard solution to this problem is to use encryption to protect the data and ensure that only authorized users have access to the encryption key. When a user interacts directly with a system, the encryption key can be protected with a password, pin code or fingerprint that is provided by the user. However, many embedded devices work without user interaction, so this is not an option in those cases.
In the BSP are three different variants of Secure Key Storage implemented which depend on the Hardware support. The available Hardware support is activated with MACHINE_FEATURE.
| Type of Secure Key Storage | Hardware support | MACHINE_FEATURE |
|---|---|---|
| NXP CAAM |
| caam |
| Trusted Execution Environment TEE |
| optee |
| Trusted Platform Module TPM |
| tpm |
Machines built with the MACHINE_FEATURE already have all necessary prerequisites enabled.
Supported Types of Secure Key Storage
NXP i.MX CAAM
The NXP i.MX6, i.MX6UL and i.MX8M series processors include hardware encryption through NXP's Cryptographic Accelerator and Assurance Module (CAAM, also known as SEC4). The CAAM combines functions to create a modular and scalable acceleration and assurance engine.
More information about the CAAM module can be found in the corresponding NXP reference Manual: https://www.nxp.com/docs/en/reference-manual/i.MX_Reference_Manual_Linux.pdf
For the
| CAAM Blob implementation | NXP i.MX6 | NXP i.MX6 UL | NXP i.MX8M series |
|---|---|---|---|
Mailinglist: NXP secure key (red blob) More information about the patches can be found here: https://patchwork.kernel.org/project/linux-security-module/list/?submitter=181647) | The kernel 4.19.100 of the BSP PD20.1.0 (warrior) includes patches picked from Mailinglist to introduce a new key type, "secure key", into the kernel's keyring. this key type is required to use the NXPs CAAM module for sorting the filesystem encryption key as blob. Additionally, yogurt-secure includes patches to use this new key type directly with dm-crypt. | The secure key is part of the NXP Vendor kernel. From Kernel 5.4 with yocto zeus is not useable. | |
| Mailinglist: Pengutronix trusted caam (red blob) backported Patches trusted key framework and patches from list for trusted caam https://patchwork.kernel.org/project/linux-security-module/list/?series=505005 | from PD21.1.0 (hardknott) | from PD21.2.0 (hardknott) | |
NXP CAAM's Secure Key based on CAAM's black key mechanism More information about the mechanism can be found https://www.nxp.com/webapp/Download?colCode=AN12714 The implementation is part of the NXP Vendor BSP. | from PD21.2.0 (hardknott) for i.MX8MM/MN |
Prerequisites and ceveats
Secureboot is required for trusted CAAM Key blob functionality. If Secure Boot Keys are burned, the keys are locked and after a reset, the CAAM unit creates internal keys for signing and encryption CAAM blobs.
This keys are internal in the CAAM and can not read out and overwritten.
Trusted Execution Environment: OP-TEE
Since the hardknott release, ampliphy-secure includes experimental OP-TEE support for the i.MX8MM and i.MX8MN. This allows users who are interested in utilizing OP-TEE to test it on their device. However, OP-TEE is not yet suitable for production use.
Warning
Currently, OP-TEE cannot be used to properly protect secrets due to an incomplete isolation between the normal and secure TrustZone world.
More information https://optee.readthedocs.io/en/latest/architecture/platforms/nxp.html
PHYTEC includes OP-TEE only as a preview in ampliphy-secure. As an example application, once ready OP-TEE can then be used to protect the trusted key, as described in the next chapter.
OP-TEE is divided into the following components:
- OP-TEE kernel: The kernel acting as a secure world OS. This kernel is signed by HABv4.
- tee-supplicant: Helper daemon allowing OP-TEE to read/write from/to secure storage. In practise, this means OP-TEE will save encrypted and authenticated data in the filesystem.
- xtest: Utilities to test OP-TEE.
Prerequisites and ceveats
Secureboot and hardware unique key
Secureboot is required for OP-TEE to prevent a malicious OP-TEE kernel from loading. It is furthermore required to allow generation of a hardware unique key which OP-TEE can use to dervive a key for secure storage encryption and other use cases.
Trusted application Key-Pair
OP-TEE signs trusted applications (see https://optee.readthedocs.io/en/latest/architecture/porting_guidelines.html#trusted-application-private-public-keypair ) in order to ensure their authenticity and integrity. By default OP-TEE uses a pregenerated key, which you must replace with your own before using OP-TEE in production.
Removing OP-TEE from your build
If you wish to remove OP-TEE from your build, add the following code to your local.conf:
MACHINE_FEATURES_remove = "optee"
Testing OP-TEE
xtest
When OP-TEE is enabled during the build, the "xtest" utility will be shipped. Executing xtest will run a couple of tests supplied by the OP-TEE project to ensure it's working as intended.
Memory isolation: devmem2
OP-TEE will load itself into a defined region in RAM. This region is reserved in Linux does not attempt to allocate memory in this area. OP-TEE modifies the device-tree of Linux during startup to ensure this.
During runtime, the following nodes will be visible in the device-tree:
# dtc -I dtb -O dts /proc/device-tree
# ...
reserved-memory {
                #address-cells = <0x02>;
                #size-cells = <0x02>;
                ranges;

                linux,cma {
                        linux,cma-default;
                        alloc-ranges = <0x00 0x40000000 0x00 0x40000000>;
                        compatible = "shared-dma-pool";
                        size = <0x00 0x28000000>;
                        reusable;
                };

                optee_shm@0x57c00000 {
                        reg = <0x00 0x57c00000 0x00 0x400000>;
                        no-map;
                };

                optee_core@0x56000000 {
                        reg = <0x00 0x56000000 0x00 0x1c00000>;
                        no-map;
                };
        };
optee_core denotes the secure world memory region. It is not accessible, even to the Linux kernel. optee_shm is the shared region between normal and secure world, allowing normal world client applications to exchange data with OP-TEE trusted applications.
Memory access policy encorcement can be tested using the "devmem2" utility.
root@phyboard-polis-imx8mn-1:firmware# devmem2 0x5600000

Memory mapped at address 0xffff88e2c000.
Bus error
root@phyboard-polis-imx8mn-1:firmware# echo $?
135
root@phyboard-polis-imx8mn-1:firmware# devmem2 0x57c00000
/dev/mem opened.
Memory mapped at address 0xffffb4f3c000.
Read at address  0x57C00000 (0xffffb4f3c000): 0xA0A28501
root@phyboard-polis-imx8mn-1:firmware# echo $?
The 0x5600000 adress is the optee_core region. Access is being blocked by the TZASC policy setup by OP-TEE, therefore a "Bus error" is thrown. The shared region on the other hand
is accessible.
Trusted Platform Module (TPM) 2.0
Trusted Platform Module (TPM) is an international standard for a secure cryptoprocessor, a dedicated microcontroller designed to secure hardware through integrated cryptographic keys.
The TPM 2.0 is:
- specified from the Trusted Computing Group (TCG) https://trustedcomputinggroup.org/resource/pc-client-platform-tpm-profile-ptp-specification/
- TCG and Common Criteria (CC) certified EAL4+
- updateable for the Firmware
- available from different manufactures.
- used to create and store keys and certificates that can be used for filesystem encryption, device identification, and authentication.
- a safe on the device, because the persistent keys are in the TPM and the key blobs can only be encrypted with the specific TPM.
The Linux kernel has driver support for the TPM's and the TPM is the standard trusted key in kernel keyring service.
The middleware for the TPM is Open Source (https://github.com/tpm2-software) and has support for openssl, PKCS#11, and more.
More information about the software stack for the TPM 2.0: https://tpm2-software.github.io/
A practical guide for using the TPM 2.0: https://link.springer.com/content/pdf/10.1007%2F978-1-4302-6584-9.pdf
The following list is a selection of PHYTEC boards with soldered TPM. The TPM is not on a module, but on the carrier board.
- phyBOARD-Polis with NXP i.MX8M Mini
- phyBOARD-Pollux with NXP i.MX8M Plus
- phyGATE-Tauri-S with NXP i.MX6ULL (without NXP CAAM)
- phyGATE-Tauri-L wih NXP i.MX8M Mini
Manual initialization of TPM for filesystem encryption
All commands are in the ramdisk userspace. Refer First Boot or Recover a Device to stop the boot in the ramdisk.
The following commands are part of the tool phySecureKeyStorage, if a trusted TPM key will be initialized.
- Before using for the first time or to completely reset a TPM
kernel$ tpm2_clear
- Create the primary RSA key pair
kernel$ tpm2_createprimary --hierarchy=o --key-algorithm=rsa --key-context=prim.ctx
- Save the primary RSA key pair to the TPM persistent memory
kernel$ tpm2_evictcontrol --hierarchy=o --object-context=prim.ctx 0x81000001
More information about Disk Encryption with TPM: https://tpm2-software.github.io/2020/04/13/Disk-Encryption.html
Manual initialization of TPM for Device Identification
In this example, the TPM will initialize and a self-signed certificate will be stored.
# TPM Remote Attestation
kernel$ tss2_provision
# Init Token for Device Certificate
kernel$ pkcs11-tool --module /usr/lib/libtpm2_pkcs11.so.0 --init-token --label=iotdm --so-pin=${TPM_SOPIN}
# Set user pin
kernel$ pkcs11-tool --module /usr/lib/libtpm2_pkcs11.so.0 --label="iotdm" --init-pin --so-pin ${TPM_SOPIN} --pin ${TPM_PIN}
# Create Keypair for Device Certificate
kernel$ pkcs11-tool --module /usr/lib/libtpm2_pkcs11.so.0 --label="iotdm-keypair" --login --pin=${TPM_PIN} --keypairgen --usage-sign --key-type EC:prime256v1 -d 1
# Create self-signed certificate
kernel$ openssl req -config "${CA_DIR}/csrtpm.cnf" -new -x509 -engine pkcs11 -keyform engine -key "pkcs11:model=SLB9670;manufacturer=Infineon;token=iotdm;object=iotdm-keypair;type=private;pin-value=${TPM_PIN}" -out ecc.crt
# Write Device Cert to TPM
kernel$  pkcs11-tool --module /usr/lib/libtpm2_pkcs11.so.0 -w ecc.crt -y cert -a iotdm-cert --pin ${TPM_PIN} -d 2
The csrtpm.cnf
openssl_conf = openssl_init

[openssl_init]
engines = engine_section

[engine_section]
pkcs11 = pkcs11_section

[pkcs11_section]
engine_id = pkcs11
MODULE_PATH = /usr/lib/libtpm2_pkcs11.so.0
PIN=myuserpin
init = 0
Kernel Key Retention Service for filesystem encryption
"The Linux key-management facility is primarily a way for various kernel components to retain or cache security data, authentication keys, encryption keys, and other data in the kernel."
Linux kernel is a kernel’s facility for “passwords caching”, which stores them in a computer’s memory (RAM) during an active user’s/system session.
The Linux keyring accessing is via syscalls from the user space into the kernel space. Applications to access are keyctl, systemd-ask-password and others.
The documentation about the Kernel Key Retention service can be found on https://www.kernel.org/doc/html/latest/security/keys/core.html
The following description and implementation based on the https://www.kernel.org/doc/html/latest/security/keys/trusted-encrypted.html
The following implementation is in the different BSP available:
- to warrior only i.MX6: NXP CAAM secure key (red blob) secure_key.blob file name
- from hardknott: trusted with the blob file name key trusted_key.blob independent from the trusted source tpm|caam|tee
- from hardknott and only in NXP vendor-based BSP: NXP CAAM secure key (black blob) with tksecure_key.bb as blob file name.
| depend on MACHINE_FEATURE | i.MX6 / i.MX6UL | i.MX8M Series | |
|---|---|---|---|
| trusted key: tpm | tpm2 | x | x |
| trusted key: caam | caam | x | |
| trusted key: tee | optee | Implementation | x |
| NXP CAAM secure key (black blob) | caam | x |
Secure Key Storage initialization with phySecureKeyStorage Tool
The tool physecurekeystorage-install is part of the ramdisk userspace and included in the BSP from yocto hardknott. Refer First Boot or Recover a Device to stop the boot in the ramdisk.
If the tool is not part of your BSP, then you can find the tool in: https://git.phytec.de/meta-ampliphy/tree/recipes-physecurity/secure-key-storage
The physecurekeystorage-install tool can initialize all supported secure key storages of your machine, but always only one can be active.
For example, the phyBOARD-Polis-imx8mm supports Trusted TEE, Trusted TPM, and Secure CAAM, but initialised is only Trusted TPM.
PHYTEC Install Script v1.0 for Secure Key Storage

Usage:  physecurekeystorage-install [PARAMETER] [ACTION]

Example:
    physecurekeystorage-install --newkeystorage trustedtpm
    physecurekeystorage-install --deletekeystorage
    physecurekeystorage-install --loadkeystorage

One of the following action can be selected:
    -n | --newkeystorage <value>  Create new Secure Key Storage
                            trustedcaam or securecaam (black blob NXP BSP)
                            trustedtee
                            trustedtpm
    -d | --deletekeystorage Erase the existing Secure Key Storage
    -l | --loadkeystorage   Load the existing Secure Key Storage
    -h | --help             This Help
    -v | --version          The version of physecurekeystorage-install
Manual initialization of Trusted Key
All commands are in the ramdisk userspace. Refer First Boot or Recover a Device to stop the boot in the ramdisk.
depend on the support for your machine and support from kernel version 5.10 and yocto hardknott
- Load kernel module trusted with source=tpm|caam|tee.
| CAAM | TEE | TPM |
|---|---|---|
kernel$ modprobe trusted source=caam | kernel$ modprobe trusted source=tee | kernel$ modprobe trusted source=tpm |
- Load kernel module encrypted-keys
kernel$ modprobe encrypted-keys
Save your selection tpm|caam|tee in the trusted_key.config for automatically file encryption
CAAM TEE TPM kernel$ echo "trustedsource=caam" > /mnt_secrets/secrets/trusted_key.config
kernel$ echo "trustedsource=tee" > /mnt_secrets/secrets/trusted_key.config
kernel$ echo "trustedsource=tpm" > /mnt_secrets/secrets/trusted_key.config
Create a trusted key as the main for the encrypted key.
CAAM / TEE TPM kernel$ keyctl add trusted kmk "new 64" @u
kernel$ keyctl add trusted kmk "new 64 keyhandle=0x81000001" @u
- Create an individual filesystem encryption key for every device
kernel$ keyctl add encrypted rootfs "new trusted:kmk 64" @u
- Show the created trusted main and filesystem encryption key:
kernel$ keyctl show @u
Keyring
 596826626 --alswrv      0 65534  keyring: _uid.0
 149477604 --alswrv      0     0   \_ trusted: kmk
 989535843 --alswrv      0     0   \_ encrypted: rootfs
Key Blob export to the filesystem /mnt_secrets/secrets:
kernel$ keyctl pipe 149477604 > /mnt_secrets/secrets/trusted_key.blob
kernel$ keyctl pipe 989535843 > /mnt_secrets/secrets/encrypted_key.blob
Load a trusted and encrypted key to the kernel keyring service
kernel$ keyctl add trusted kmk  "load `cat /mnt_secrets/secrets/trusted_key.blob`" @u
kernel$ keyctl add encrypted rootfs  "load `cat /mnt_secrets/secrets/encrypted_key.blob`" @u
Manual initialization of NXP CAAM secure key (black blob)
All commands are in the ramdisk userspace. Refer First Boot or Recover a Device to stop the boot in the ramdisk.
- Create a tksecure key
kernel$ caam-keygen create tksecure_key ccm -s 32
The created keys are in the folder /mnt_secrets/secrets/
- Import the black key to key retention service with keyctl
kernel$ cat /mnt_secrets/secrets/tksecure_key | keyctl padd logon rootfs: @u
Show the imported black key
kernel$ keyctl show
Session Keyring
 316318612 --alswrv      0 65534  keyring: _uid_ses.0
 233653881 --alswrv      0 65534   \_ keyring: _uid.0
  37920340 --alsw-v      0     0       \_ logon: rootfs:
Load an NXP CAAM secure key (black blob) to the kernel keyring service
kernel$ caam-keygen import /mnt_secrets/secrets/tksecure_key.bb importkey
kernel$ cat /mnt_secrets/secrets/importkey | keyctl padd logon rootfs: @u
Manual initialization of NXP CAAM secure key (red blob) (discontinued)
All commands are in the ramdisk userspace. Refer First Boot or Recover a Device to stop the boot in the ramdisk.
only supported in Kernel 4.19 with yocto warrior for i.MX6
- One individual filesystem encryption key for every device:
kernel$ keyctl add secure rootfs "new 64" @u
The same filesystem encryption key for many devices
Create the filesystem encryption key one-time and copy to an external device:
kernel$ cat /dev/hwrng | tr -dc a-f0-9 | head -c${1:-128} > keyfile128Note
For a 64 bit key, import a 128 bit ASCII key to the kernel keyring.
Import the key to the kernel keyring:
kernel$ keyctl add secure rootfs "load_plain `cat keyfile128`" @u
Both variants can be used with our implementation. The symmetric filesystem encryption key is stored, encrypted with an individual device key in the processor (NXP CAAM unit). The result is named key blob.
The type of the key blob created is red. Red key blobs store the encrypted filesystem encryption key for usage at runtime in the RAM. The alternative is black key blob, which stores the encrypted filesystem encryption key for usage in secure memory. Black key blobs are not supported in the driver at the moment.
- Show the created or imported filesystem encryption key:
kernel$ keyctl show
Session Keyring
1064738065 --alswrv      0 65534  keyring: _uid_ses.0
 635505777 --alswrv      0 65534   \_ keyring: _uid.0
 347540047 --als-rv      0     0       \_ secure: rootfs
The key type of the filesystem encryption key in the kernel keyring is secure. This is a new key type, which is not part of the mainline kernel at the moment.
- Key Blob export to the filesystem /mnt_secrets/secrets:
kernel$ mkdir /mnt_secrets/secrets
kernel$ keyctl pipe 347540047 > /mnt_secrets/secrets/secure_key.blob
Load an NXP CAAM secure key (red blob) to the kernel keyring service
kernel$ keyctl add secure rootfs "load `cat /mnt_secrets/secrets/secure_key.blob`" @u
OpenSSL
OpenSSL is a robust, commercial-grade, full-featured software library for general-purpose cryptography and secure communication.
OpenSSL with TPM 2.0
The source/meta-ampliphy-/recipes-image/packagegroups/packagegroup-openssl-tpm2.bb makes the TPM 2.0 accessible via the standard OpenSSL API and command-line tools.
This packagegroup uses the tpm2-tss-engine as a cryptographic engine for OpenSSL for Trusted Platform Module (TPM 2.0).
Example usage:
Cryptographic Token Interface PKCS#11
Also known as "Cryptoki". An API defining a generic interface to cryptographic tokens. Often used in single sign-on, public-key cryptography, and disk encryption systems. RSA Security has turned over further development of the PKCS #11 standard to the OASIS PKCS 11 Technical Committee.
The source/meta-ampliphy-/recipes-image/packagegroups/packagegroup-pkcs11-tpm2.bb makes the TPM 2.0 accessible via PKCS#11 interface with pkcs11-tool and OpenSSL (with engine pkcs11) with the
- /usr/lib/libtpm2_pkcs11.so.0 for TPM 2.0
- /usr/lib/opensc-pkcs11.so for Smart Cards
Usage
- pkcs11-tool or p11kit with TPM 2.0:https://github.com/tpm2-software/tpm2-pkcs11
- openssl with TPM 2.0: Initialize TPM for Device Identification
Secure Storage
Secure storage is a combination of authenticated and encrypted filesystem that adds another layer of security to your product. It uses the kernel's cryptographic support to encrypt all the data you store in the root filesystem. Attempting to access this data without the correct encryption key returns random, meaningless bytes.
The first implementation of secure storage in the PHYTEC BSP was the root filesystem encryption.
Newer BSP from yocto hardknott are with integrity support:
| integrity | encrypted | integrity and encrypted | |||||||||||||||||
|---|---|---|---|---|---|---|---|---|---|---|---|---|---|---|---|---|---|---|---|
|
|
| |||||||||||||||||
| supported from hardknott with file integrity support | first example implementation version, which is supported in newer BSP, too | supported from hardknott with file integrity support |
This manual describes the integrity or/and encryption of the complete root filesystem.
Note that on-the-fly encryption and decryption do introduce a small performance penalty in read and write speeds.
Alternative for the complete root filesystem with integrity and encryption are:
Partition encryption:
To protect some sensitive files but not pay the cost of encrypting the complete rootfs, you can keep the rootfs partition authenticated unencrypted and set up a specific authenticated encrypted partition where the sensitive files will be stored.File-specific encryption:
Only separate folders and files will be encrypted.
Note
- ampliphy-secure is an example of how integrity and encryption on embedded devices work. It uses encryption with integrity for a complete partition on eMMC.
- Encrypting the entire root partition should be considered. However, this can only be done on the device.
- An integrity check with dm-integrity is a highly recommended addition to the filesystem encryption.
Filesystem with integrity vs authenticated filesystem
The actual standard BSP includes integrity support with hash sha-256, which has protection against data error.
A really authenticated file system should use HMAC with signed hashes., which has protection against device turned off data manipulation from attackers.
For this variant is an additional symmetric key necessary.
Requirements for Filesystem Encryption
- File integrity and encryption support for block device (SD card, eMMC) or MTD device (NAND, NOR)
- Secure Key Storage to securely store the authentication and encryption key
- Secure Boot must be activated and the device must be locked for proper secure key storage.
- Protection Shield Level should be activated for access control on runtime.
Boot Process flow
- bootloader verifies FIT-Image with linux-kernel image, device tree, and ramdisk before they are executed
- Linux kernel executes the ramdisk (read-only filesystem)
- The bootscript loads the authenticated encrypted filesystem encryption key with the CAAM|TEE|TPM unit in the RAM and encrypts the filesystem. After the encryption, the root filesystem will be switched and the boot process continues.
Starting the Build Process
Filesystem integrity and encryption are included in the DISTRO_FEATURE secureboot and securestorage.
You can choose in the sources/meta-ampliphy/conf/distro/common-secure.inc between
- fileauthorenc: use integrity or encrypted filesystem
- fileauthandenc: use integrity and encrypted filesystem
This configuration is important for the RAUC update system because the use integrity and encrypted filesystem are stacked and the number of device-mappers is doubled as to use integrity or encrypted filesystem.
DISTRO_FEATURES += "securestorage"
#possible types: fileauthorenc , fileauthandenc
SECURE_STORAGE_TYPE = "fileauthandenc"
OVERRIDES_append = ":securestorage:${SECURE_STORAGE_TYPE}"
You will find an example on how to enable filesystem with integrity and encryption in your distro in meta-ampliphy:
- phytec-secureboot-ramdisk-fitimage
- phytec-secureboot-ramdisk-image
Filesystem integrity and encryption has several dependencies:
| Dependency | File Example | Description | Depends On | Example |
|---|---|---|---|---|
| Trigger for eMMC image with file encryption support | recipes-images/images/security/fileencryption.inc with file integrity support: recipes-images/images/security/ramdisk-fitimage.inc |
| ||
| Image for encrypted partition | recipes-images/images/phytec-security-image.bb |
|
|
|
| FIT-Image with ramdisk for boot | recipes-images/fitimage/phytec-secureboot-ramdisk-fitimage.bb |
| ||
| Ramdisk for encryption handling | recipes-images/images/phytec-secureboot-ramdisk-image.bb |
|
|
|
| Install boot init script and encryption packages | recipes-core/secureboot/secureboot-fileencrypt.bb with file integrity support: |
|
|
|
Boot init script for encryption handling on the target | recipes-core/secureboot/secureboot-fileencrypt/secureboot-fileencrypt.sh with file integrity support: |
|
|
|
Build All Necessary Images and eMMC Image
host$ bitbake phytec-security-image
When you change something on the boot init script, then you should clean at least the recipes for ramdisk and FIT-Image, too. If you need a new eMMC image, then clean the image for encryption partition, too
Setup Secure Storage on your Device
The filesystem encryption ensures the target has a unique key or an equal key per device.
The filesystem encryption process flow:
- The filesystem encryption key is generated and stored encrypted with CAAM, TEE or TPM.
- Encryption is initialized.
- The partition is formatted.
- Data is copied to the encrypted partition.
1. First Boot or Recover a Device
From a high-level point of view, an eMMC device is like an SD card. Therefore, it is possible to flash the image <name>.sdcard from the Yocto build system directly to the SD card or eMMC. The image contains the signed bootloader, signed FIT-Image, and root filesystem.
If your filesystem is not initialized, damaged or the key blob is deleted, then you can reinstall the encrypted filesystem with the following commands.
- Stop booting in the bootloader. The Protection Shield Level low is in default with password: root
- Add Linux bootargs:
| i.MX6/i.MX6UL with barebox | i.MX8M with u-boot |
|---|---|
barebox$ global linux.bootargs.rescue="rescue=1" |
uboot$ fatload mmc ${mmcdev}:${mmcpart} ${loadaddr} fitImage
uboot$ run mmcargs
uboot$ setenv bootargs ${bootargs} rescue=1
uboot$ run loadraucimage
uboot$ run raucargs
uboot$ setenv bootargs ${bootargs} rescue=1 |
- Boot the FIT-Image:
| i.MX6/i.MX6UL with barebox | i.MX8M with u-boot |
|---|---|
barebox$ boot | uboot$ bootm ${loadaddr} |
- The device stops with the following message because there is no encrypted key stored in the folder/secrets:
Run /init as init process

(none) login:
The Protection Shield Level low is in default with user: root and password: root
Note
If there is no login in 60s, then the system goes to power off
Login timed out after 60 second
[ERROR] Key and Filesystem Initialization
The system will poweroff in 10 seconds
reboot: Power down
2. Key Generation for Secure Storage
Refer to Secure Key Storage
The commands for key generation
- Secure Key Storage initialization with phySecureKeyStorage Tool
- Manual initialization of Trusted Key (caam|tee|tpm)
- Manual initialization of NXP CAAM secure key (black blob)
- Manual initialization of NXP CAAM secure key (red blob) discontinued
3a. Secure Storage initialization with phySecureStorage Tool
The tool physecurestorage-install is part of the ramdisk userspace and included in the BSP from yocto hardknott. Refer First Boot or Recover a Device to stop the boot in the ramdisk.
If the tool is not part of your BSP, then you can find the tool in: https://git.phytec.de/meta-ampliphy/tree/recipes-physecurity/secure-storage
The physecurestorage-install tool can initialize filesystem with encryption, integrity, or both methods together.
PHYTEC Install Script v1.1 for Secure Storage

Usage:  physecurestorage-install [PARAMETER] [ACTION]

Example:
    physecurestorage-install --flashpath /dev/mmcblk0
    --filesystem /media/phytec-security-image.tgz --rauc
    --flashlayout 5,6
    --newsecurestorage intenc

One of the following action can be selected:
    -n | --newsecurestorage <value>   Create new Secure Storage of type
                            int     Root File System with integrity
                            enc     Encrypted root file system
                            intenc  Encrypted root file system with integrity
    -h | --help             This Help
    -v | --version          The version of the physecurestorage-install

The following PARAMETER must be set for new Secure Storage:
    -p | --flashpath <flash device>
    -s | --filesystem <path to root as tgz>
    -l | --flashlayout <value>    partion number for the rootfs partitions
                       2,4        rootfs partitions are 2 and 4 (old)
                       5,6        rootfs partitions are 5 and 6 (new)

The following PARAMETER can be set for new Secure Storage:
-r | --rauc (A/B system on the flash)- The parameter <flashpath> is the eMMC partition for
- i.MX6/UL (Mainline): /dev/mmcblk3
- i.MX8M Series (NXP Vendor Kernel): /dev/mmcblk2
- The parameter <filesystem> is the path to tar.gz archive of the filesystem, which should be installed on the flash device.
Please copy the filesystem image,<IMAGENAME>-<MACHINE>.tar.gz,to a USB or MMC drive so that it can be installed on the target. - The parameter <flashlayout> contains the rootfs partition.
- The parameter RAUC initializes both RAUC rootfs partitions.
3b. Manual initialization of encrypted Filesystem
The file encryption example uses the Linux kernel device-mapper crypto target (dm-crypt).
- Please copy the filesystem image,
<IMAGENAME>-<MACHINE>.tar.gz,to a USB drive so that it can be installed on the target. - Add kernel module for dm-crypt
kernel$ modprobe dm-crypt
- Create the device-mapper /dev/dm-0
| Trusted Key (Mainline Kernel and NXP vendor Kernel ) | NXP secure Key (black blob) i.MX8M Series |
|---|---|
kernel$ dmsetup create encrootfs --table "0 $(blockdev --getsz /dev/mmcblk3p2) crypt aes-xts-plain64 :64:encrypted:rootfs 0 /dev/mmcblk3p2 0" |
kernel$ dmsetup create encrootfs --table "0 $(blockdev --getsz /dev/mmcblk2p2) crypt capi:tk(cbc(aes))-plain :64:logon:rootfs: 0 /dev/mmcblk2p2 0" |
- Format the new mapper with ext4 filesystem:
- For RAUC support the label for the partition is important.
- eMMC Partition i.MX6/UL (Mainline): root0 for /dev/mmcblk3p2 and root1 for /dev/mmcblk3p4
- eMMC Partitioni.MX8M Series (NXP Vendor Kernel): root0 for /dev/mmcblk2p2 and root1 for /dev/mmcblk2p4
kernel$ mkfs.ext4 -L rootN -t ext4 /dev/dm-0
You will receive:
mke2fs 1.46.1 (9-Feb-2021)
Creating filesystem with 288800 1k blocks and 72288 inodes
Filesystem UUID: 056b9433-2535-4e5f-9c13-3f38f04a1dad
Superblock backups stored on blocks:
        8193, 24577, 40961, 57345, 73729, 204801, 221185

Allocating group tables: done
Writing inode tables: done
Creating journal (8192 blocks): done
Writing superblocks and filesystem accounting information: done- Mount the formatted mapper:
kernel$ mount /dev/dm-0 /newroot
- Mount the USB drive with a filesystem image
<IMAGENAME>-<MACHINE>.tar.gz:
kernel$ mount /dev/sda1 /media
- Untar
<IMAGENAME>-<MACHINE>.tar.gzrootfs image to it:
kernel$ tar xvfz /media/phytec-security-image-phyboard-mira-imx6-5.tar.gz -C /newroot/
- Sync the filesystem:
kernel$ sync
- Unmount the partition:
kernel$ umount /newroot
- Remove mapper:
kernel$ cryptsetup remove encrootfs
If you have a RAUC A/B system, then repeat these instructions for:
i.MX6 / i.MX6UL Mainline Kernel i.MX8M with NXP Kernel eMMC Partition: /dev/mmcblk3p4
eMMC Partition: /dev/mmcblk2p4
- After the installation, power off the system:
kernel$ poweroff -f
- Restart the system. After a successful installation, the system will boot to the kernel login console.
Secure Update
Due to the connected nature of devices, security vulnerabilities are more widespread than ever before, and new threats are discovered by the security community daily. Security requirements change often, and it is, therefore, important to make sure your system is ready to be securely updated so new vulnerabilities can be patched or functionality can be added to the product. A secure update process involves more than safely updating a device. It also verifies that the delivered image is coming from a known source and that the image was not modified to introduce malware.
The phytec-security-image includes the phytec-rauc-image with an A/B system and the RAUC update client.
More information about the supported update client rauc and the Update System with the OSB connagtive IoT Device Suite Kit.
The RAUC handler on the target backs up and restores the secrets for boot0 partition.
From the BSP with yocto hardknott the encryption for the filesystem remains intact because the device-mapper will be updated
Warning
Before the version yocto hardknott:
After the RAUC update, the encrypted filesystem partition is NOT encrypted.
The RAUC handler must be reworked to handle the updates for an encrypted filesystem. Additionally, the data in the RAUC bundles should be encrypted during the transition to the target with a different key.
Access Control: Protection Shield Level
The DISTRO_FEATURE protection shield offers an easy way to switch between different protection levels. You can use the low protection level during your development and easily switch to a higher level for your final build when entering series production.
Password Protection in Protection Shield V1
The following table shows the different protection shield levels for password protection.
| Feature | Level Low | Level Medium | Level High |
|---|---|---|---|
| Debug Interface: Password Protection for Bootloader |
|
|
|
| Debug Interface: Password Protection for Kernel Image |
|
|
|
Password protection depends on the quality of the password. The default password for user root is root, which is a very low-quality password.
Warning
The variable PROTECTION_SHIELD_ROOT_PASSWORD is stored in your distro configuration file conf/distro/xyz.conf. Do not push this file to the git repository with your actual series password.
User Role and Password Protection in Protection Shield V2
The phytec-security-image includes the phytec-example-users with the following configuration depending on the shield level.
Most interfaces are in the group phyapix for access controll.
| root | phyadmin | phyuser | phyreaduser | |
|---|---|---|---|---|
| description | the superuser with rights for all | is for administration and can get superuser rights with sudo | a normal user with rights only for selected features | only read access and no access to the most interfaces |
| group | root | root, phyadmin, phyapix, , tty, tss | phyuser, phyapix, tty, tss | phyreaduser |
Protection level Login Password for serial and ssh | ||||
shieldlow
| root | phyadmin | phyuser | phyreaduser |
shieldmedium
| root{mac-address) | phyadmin{mac-address) | phyuser{mac-address) | phyreaduser{mac-address) |
shieldhigh
| serial and ssh no login access | phyadmin{mac-address) | phyuser{mac-address) | phyreaduser{mac-address) |
Enable Protection Shield Support in Yocto
Enable Protection Shield in Your Own Distro
To enable the protection shield, add the DISTRO_FEATURE protection shield to your distro configuration file conf/distro/xyz.conf. The variables PROTECTION_SHIELD_LEVEL and PROTECTION_SHIELD_ROOT_PASSWORD must be set:
 DISTRO_FEATURES += "protectionshield"
 PROTECTION_SHIELD_LEVEL = "shieldlow"
 #user root password for shield low and midle
 #password quality decide about the protection level
 PROTECTION_SHIELD_ROOT_PASSWORD ?= 'root'
Enable Protection Shield Level in Your Kernel Image
To enable a protection shield in your Linux kernel image, you need to include security/userauthentication.inc into your image recipe. For an example, please take a look at recipes-images/images/phytec-security-example-image.bb included in ampliphy-secure.
If you use a ramdisk for your filesystem, you will need to include security/userauthentication.inc into your ramdisk recipe, too. For an example, please take a look at recipes-images/images/phytec-secureboot-ramdisk-image.bb included in ampliphy-secure.
Physical Security
To further protect your device, it is important to reduce attack vectors. Start by securing development features like JTAG and serial downloader.
For activation or deactivation of controller features, is necessary to write and read eFuses.
Warning
The secure eFuse configuration can only be written once and is irreversible.
Secure JTAG
Most embedded devices provide a JTAG interface for debugging purposes. However, if left unprotected, this interface can become an important attack vector on the systems in series production. The i.MX6 series System JTAG Controller (SJC) allows you to regulate JTAG access with three security modes using OTP (One Time Programmable) eFuses:
| Mode | Security Level | Description |
|---|---|---|
| Enabled | low | This is the default mode of operation and you have full access to JTAG |
| Disabled debugging | medium | This mode disables debugging but leaves the boundary scan functionality enabled. |
| Secure | high | This mode provides high security. JTAG use is regulated by a 56-bit secret key-based challenge/response authentication mechanism. |
| Disabled JTAG | high | This mode provides maximum security. All security-sensitive JTAG features are permanently blocked, preventing any debug. |
Additional information about JTAG Security can be found here: https://www.nxp.com/docs/en/application-note/AN4686.pdf
Disabled Debugging Mode
Set JTAG to "Disabled debugging" mode:
| i.MX6* with barebox | i.MX8M* |
|---|---|
barebox$ mw -l -d /dev/imx-ocotp 0x18 0xC00000 | uboot$ fuse prog 1 3 0xC00000 |
Secure JTAG Mode
Set JTAG to "Secure" mode as an example for i.MX6/i.MX6UL.
- Generate a secret response key
You can choose between Identical Response Keys on each device or unique response keys for every device
host$ cat /dev/random | tr -dc a-f0-9 | head -c${1:-14} | sed 's,^\([[:xdigit:]]\{6\}\)\([[:xdigit:]]\{8\}\),0x00\1 0x\2,g'You will receive, for example:
0x00edcba9 0x87654321
Write secret response key:
i.MX6* with barebox i.MX8MM barebox$ mw -l -d /dev/imx-ocotp 0x80 0x87654321 barebox$ mw -l -d /dev/imx-ocotp 0x81 0x00edcba9
uboot$ fuse prog 8 0 0x87654321
uboot$ fuse prog 8 1 0x00edcba9
Lock access to secret response key:
i.MX6* with barebox i.MX8MM barebox$ mw -l -d /dev/imx-ocotp 0x00 0x0040
uboot$ fuse prog 0 0 0x400
Set Secure JTAG mode:
i.MX6* with barebox i.MX8MM barebox$ mw -l -d /dev/imx-ocotp 0x18 0x400000
uboot$ fuse prog 0 0 0x400000
Disabled JTAG Mode
| Task | i.MX6* with Barebox | i.MX8MM/i.MX8MP Bootloader |
|---|---|---|
| Set JTAG to "Disabled" (SJC_DISAB FUSE) | barebox$ mw -l -d /dev/imx-ocotp 0x18 0x00100000 | uboot$ fuse prog 1 3 0x200000 |
Disable HAB JTAG Enabling
When JTAG is set in "Secure", an option to enable HAB JTAG DEBUG becomes available. By writing '1' to HAB_JDE (HAB JTAG DEBUG ENABLE) bit in the e-fuse controller module, the JTAG is opened, regardless of its security mode. If this feature is not required, it is highly recommended this be disabled.
For this, we program the JTAG_HEO FUSE.
| Task | i.MX6 with Barebox | i.MX8MM/i.MX8MP Bootloader |
|---|---|---|
Prevent HAB from enabling JTAG | barebox$ mw -l -d /dev/imx-ocotp 0x18 0x08000000 | information only available with NXP NDA |
Disable Serial Downloader
The i.MX6, i.MX6UL and i.MX8M series Controller supports the burning of different eFuse to disable the USB Serial Download Protocol (SDP) and Force Internal Boot Only to enhance device security.
Note
i.MX6 and i.MX6UL: i.MX & Vybrid Security Vulnerability Errata - ERR010872, ERR010873
Below is a list of PHYTEC Products and variants that include the controller version with the feature for Disable serial downloader and Force Internal Boot:
| phyCORE-i.MX6 | phyCORE-i.MX6 | phyBOARD-Mira | phyBOARD-Mira | |||
|---|---|---|---|---|---|---|
| PCL-058-33230C0I.A5 | PCM-058-33230C0I.A6 | PB-01501-001.A5 | PB-01501-010.A2 | |||
| PCM-058-12000D0C.A6 | PCM-058-33230C0X.A7 | PB-01501-002.A6 | PB-01501-0110C.A5 | |||
| PCM-058-12050D0I.A2 | PCM-058-332B0C0I.A2 | PB-01501-007.A4 | PB-01501-1201I.A6 | |||
| PCM-058-30242C0X.A4 | PCM-058-40213C0X.A3 | PB-01501-008.A2 | PB-01501-1251I.A2 | |||
| PCM-058-33000D0X.A3 | PCM-058-40233C0I.A4 | PB-01501-009.A1 |
For phyFLEX-i.MX6 and phyCARD-i.MX6 support, ask your sales contact.
Disable SDP Mode Completely
Disabling the serial download support is recommended for security-enabled configurations:
| i.MX6 | i.MX6UL | i.MX8M series |
|---|---|---|
barebox$ mw -l -d /dev/imx-ocotp 0x18 0x0001 | barebox$ mw -l -d /dev/imx-ocotp 0x18 0x20000 | uboot$ fuse prog 2 0 0x200000 |
Disable Read Access in SDP
Disabling only read access via SDP. Writing will still be possible.
| i.MX6 | i.MX6UL |
|---|---|
barebox$ mw -l -d /dev/imx-ocotp 0x18 0x0004 | barebox$ mw -l -d /dev/imx-ocotp 0x18 0x40000 |
Force Internal Boot
Ensure the device always boots in INTERNAL BOOT mode, ignoring BOOT_MODE pins. This setting is recommended for security-enabled configurations.
This feature is supported in the listed PHYTEC product versions Disable Serial Downloader.
| i.MX6 | i.MX6UL | i.MX8MM/i.MX8MP |
|---|---|---|
i.MX6 barebox$ mw -l -d /dev/imx-ocotp 0x18 0x80000000 | barebox$ mw -l -d /dev/imx-ocotp 0x18 0x10000 | For i.MX8M* uboot$ fuse prog 2 0 0x100000 |
Disable boot from external memory
By writing to the DIR_BT_DIS FUSE, we can disable boot from external memory.
| i.MX6 / i.MX6UL | i.MX8M |
|---|---|
barebox$ mw -l -d /dev/imx-ocotp 0x18 0x0008 | uboot$ fuse prog 1 3 0x8000000 |
Keys and Certificates Management
Public Key Infrastructure Tree (PKI tree)
To use secure boot with barebox and kernel image, several keys and certificates are required to sign the images. The key and certificate creation is a manual process and the public key infrastructure (PKI) tree must be in place before you start your build. This BSP includes the phytec development pki-tree as an example. You are obligated to create your own pki-tree with your own keys and certificates.
Note
It is highly recommended to use different keys for different parts of your system to avoid a single point of failure regarding your security concept.
PHYTEC Development Keys (phytec-dev-ca)
The included phytec-dev-ca example consists of a self-signed main-ca and three derived sub-ca's for bootloader, Fit-Image, and RAUC updates.
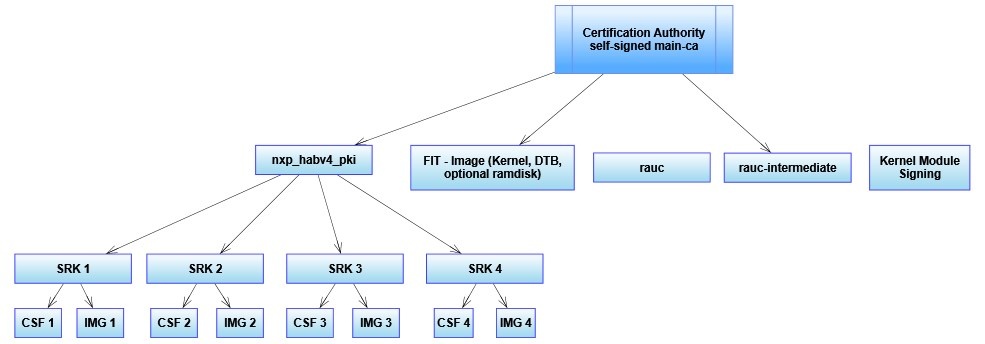
The recipes for Bootloader, FIT-Image, and RAUC depend on the recipe phytec-dev-ca. If you build the BSP for the first time, the PHYTEC development keys are downloaded in yocto/phytec-dev-ca and used to sign the Bootloader, FIT-Image, and the RAUC bundles.
| Name | Description | Key Type |
|---|---|---|
| main-ca | self-signed Certificate authority | RSA-4096 |
| nxp_habv4_pki | main-ca signed NXP HABv4 Key Authority | RSA-4096 |
| fit | main-ca signed FIT-Image signing key and certificate | RSA-4096 |
| rauc | own self signed Certificate authority and development key for signing the bundles | RSA-2048 |
| rauc-intermediate | main-ca signed rauc ca (intermediate ca) and rauc ca signed development key for signing the bundles | RSA-2048 |
| kernel-modsign | Example key for the Linux kernel module signing facility, independent of CA | RSA-4096 |
Warning
- Use the PHYTEC development keys only for the first test.
- The PHYTEC development keys are not secure!
- Create and use your own keys and certificates!
NXP HABv4 Key Structure
The NXP HABv4 Key structure is for signing the bootloader, which is verified from the ROM bootloader of the NXP controller with the HABv4 module. The i.MX6, i.MX6UL, i.MX7, i.MX8M, and i.MX8M Mini includes a HABv4 module for secure boot.
- CA (Certification Authority): This certificate is used to sign the SRK keys and establish the authority of other keys. There is only one CA certificate per PKI tree. This certificate is never used on the target and has no requirements. An existing certificate can be used as CA during the generation of all these keys. The rest of the keys and certificates are always generated and have special requirements, as they are directly used on the target.
- SRK (Super Root Keys): This certificate is used to sign the CSF and IMG certificates. There are up to four SRK certificates per PKI tree (each one is used to sign one CSF and one IMG certificate). See revoke a key for more information on having multiple SRK certificates.
- CSF (Command Sequence File): This certificate is used to validate the CSF region.
- IMG: This certificate is used to validate the bootloader.
Create Your Own PKI Tree
We included a script in sources/meta-ampliphy/scripts/ to build your own PKI tree. The script helps you generate a main-ca, bootloader keys, Fit-Image keys, and RAUC keys.
Requirements
To generate keys and certificates for the bootloader, you will need two scripts from the NXP cst tool
- Copy
cst-3.3.1/keys/hab4_pki_tree.shandcst-3.3.1/linux64/bin/srktoolinto thesources/meta-ampliphyfolder. - Check the configuration files for main-ca, Fit-Image, and RAUC in
sources/meta-ampliphy/scripts/, adjust to your requirements.
1. Create the main-ca
host$ ./scripts/openssl-ca.sh -m
You will receive:
Creation of the Main CA for Bootloader, FIT-Image and
rauc bundle Signning
The Main CA based on RSA4096
No pass phrase for protecting the Main CA private keys
Please put a pass phrase (store it in the key_pass.txt):
2. Create bootloader signing and verification keys and certificate
host$ ./scripts/openssl-ca.sh -b -s
You will receive:
serial: a positive 32-bit number that uniquely identifies
the certificate per certification authority e.g. 12345678 ?08154711

Main ca exist, please use existing CA in SRK creation Tool with
CA key name: /home/user/yocto/sources/meta-ampliphy/openssl-ca/main-ca/private/mainca-rsa.key
CA certificate name:  /home/user/yocto/sources/meta-ampliphy/openssl-ca/main-ca/mainca-rsa.crt
Do you want start the SRK creation with hab4_pki_tree.sh (y/n)y
+++++++++++++++++++++++++++++++++++++++++++++++++++++++++++++++
the script  hab4_pki_tree.sh is started
+++++++++++++++++++++++++++++++++++++++++++++++++++++++++++++++

Do you want to use an existing CA key (y/n)?:y
Enter CA key name:/home/user/yocto/sources/meta-ampliphy/openssl-ca/main-ca/private/mainca-rsa.key
Enter CA certificate name:/home/user/yocto/sources/meta-ampliphy/openssl-ca/main-ca/mainca-rsa.crt
Do you want to use Elliptic Curve Cryptography (y/n)?:n
Enter key length in bits for PKI tree: 4096
Enter PKI tree duration (years): 10
How many Super Root Keys should be generated? 4
Do you want the SRK certificates to have the CA flag set? (y/n)?: y
- The serial content must be a positive 32-bit number that uniquely identifies the certificate per certification authority.
- You can use an existing key as CA key by answering the first question with 'y' and then providing the path of the given created main-ca certificate and the key for the certificate to be used as CA.
- If asked about using ECC cryptography, answer 'n'. The RSA keys are used for the signature.
- The following key sizes are supported: 1024, 2048, and 4096.
- The PKI duration is used to compute the expiration date for the certificates.
Note
NXP HABV4 does not take into account the expiration date. A signed bootloader image will remain valid if its certificate has expired.
- You must generate four keys (for key revocation purposes).
- The last question regarding the “CA flag” in the SRK must be answered as 'y'
The generated Keys, Certificates (IMG1_1_sha256_4096_65537_v3_usr_crt.pem, CSF1_1_sha256_4096_65537_v3_usr_crt.pem), and SRK_1_2_3_5_fuse.bin are in the foldersources/meta-ampliphy/openssl-ca/nxp_habv4_pki/crts/.
3. Create FIT-Image key
host$ ./scripts/openssl-ca.sh -f
You will receive:
Creation of Signing Keys for FIT-Image
Enter key length in bits for PKI tree:4096
- The following key sizes are supported: 2048 and 4096.
4. Create RAUC keys
host$ ./scripts/openssl-ca.sh -r
You will receive:
Creation of Signing Keys for rauc bundles
Enter key length in bits for rauc PKI tree: 2048
- The following key sizes are supported: 2048.
5. Create kernel module signing key
host$ ./scripts/openssl-ca.sh -K
You will receive:
Generating a 4096 bit RSA private key
....................................................................................................................................................................................++
..................................................................................................++
writing new private key to 'kernel_modsign.pem'
-----
Change PKI-Tree from phytec-dev-ca to Your Own PKI
In the configuration class sources/meta-ampliphy/classes/secureboot.bbclass, the path to your PKI tree is initially defined.
CERT_PATH ??= "${OEROOT}/../../phytec-dev-ca"If you want to change the path, then reinit the CERT_PATH ?= in your layer or overwrite the CERT_PATH in the conf/local.conf
The name of your PKI tree must have a name other than phytec-dev-ca. The recipe for phytec-dev-ca use the name phytec-dev-ca as a parameter for the clean command.
After the CERT_PATH has been changed, you must clean and rebuild the bootloader, FIT-Image, RAUC bundles, and the rootfs!
host$ bitbake -c cleanall phytec-secureboot-ramdisk-fitimage
host$ bitbake -c cleanall phytec-security-bundle
host$ bitbake -c cleanall phytec-security-image
Encryption Keys
| Key | Usage | Considerations |
|---|---|---|
| CAAM OTPMK | Secure other keys:
| Unique per device and unreadable.
|
| Filesystem encryption key | Encrypts file system data | Encrypted and stored in the first boot partition. |
| Secure JTAG | Protects JTAG port | Stored in the OTPs of the device. Unreadable when the Secure JTAG configuration is locked.
|
Security Vulnerability
The used software can be affected by a security vulnerability. A secuvulnerability is a defect in software that could allow an attacker to gain control of a system. These defects can be because of the way the software is designed, or because of a flaw in the way that it’s coded.
So it is important to check the software regularly against published security flaws (Common Vulnerabilities and Exposures).
Revision History
| Date | Version Number | Changes to the Manual |
|---|---|---|
| 13.12.2021 | L-1004e.A2 |
|
| 03.8.2021 | L-1004e.A1 | Information added for:
|
| 11.05.2020 | L-1004e.A0 | 1st Release |